
Note: this post contains affiliate links, proceeds support this website.
Dyna Med Maxi-Medic Bag Model BG087.
This product review and kit contents were inspired by the project to update our medical equipment and supplies.
The Maxi-Medic is good durable bag suitable for many types of medical kits. It is 1000 denier nylon. Measures 9″H x 20″L x 12″W. Side Pocket: 6″H x 12″L x 2 1/2″W. Main compartment: 9″H x 14″L x 12″W. Lid Pocket: 5 1/2″ x 9″. The first time I can remember using one of these was sometime in the early 1980’s. Maybe ’81-’82? In the late 70’s early 80’s services were still using the recycled television and radio tube heavy duty plywood cases and surplus canvas M5’s that always had that canvas tent smell. Look them up online, can’t find any images to use here.
Back to the present. No issues with the zippers, good quality YKK. No issues with stitching. Wish the webbing went all the way around to support the bag better, no issues to report. The mesh zippered pocket on the lid of the bag works well. Based on my experience the zipper should be near the hinge part of the lid. It would be much better to use in that position.
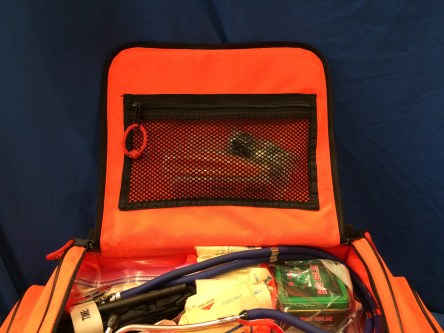
Lid pocket
One hand could be used to open, close or retrieve contents in an unsupported way. Also reducing the possibility of loosing valuable items if the zipper fails or is not properly closed. In the current position contents would spill out of the pocket and bag. With the zipper located near the hinge loose contents would have a better chance to fall into the bag and prevent loss or damage.
In the photo below the lid was opened in the usual way. The lid was held up with one hand, the pocket unzipped by the other. Once unzipped the lid was let go of. The items are not staged they are exactly how they fell out of the pocket.

Natural position of lid in the open position, zipper open.
Here is why I have to follow up the video with a blog. Since I don’t use the feature and the other hook part of hook/loop has been removed from the bravo compartment foam insert I forgot to mention this in my notes. Something made me remember it.

Knuckle scratcher.
One of the reasons I do not use hook/loop for most things is the hook part. It can be very irritating if located in the wrong place. If they would place the loop part inside the insert and hook on the divider it wouldn’t scratch fingers and knuckles. The hook/loop should also be on both sides that way the divider can be completely removed. If not is has to be folded to the side and takes up valuable storage space. Why I usually cut them out.

Where the divider stops when using.
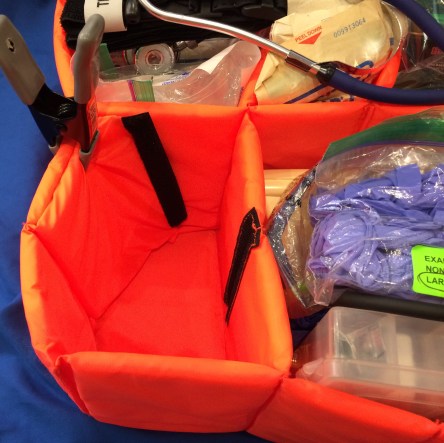
Divider taking up storage space. Must be forced into position.

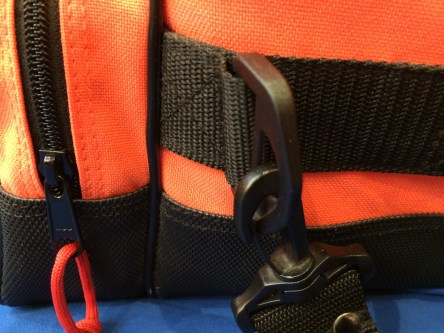
Paracord zipper pull.
Added paracord zipper pulls to make life easier. No problems with zippers as long as I don’t do the jerky-high-speed-mofo kind of crap or loose my cool when the zipper hits a snag. The longevity of this bag depends on two things, flawless construction and end user handling of the bag. Like anything, abused- it won’t last long, taken care of= years of service.

Shoulder strap, carry handle.
It does have a shoulder strap that is removable and adjustable. This shoulder strap has held up well, so has the carry handle.
Shoulder strap hardware.
More about the video on this bag and contents. Had no idea it would be so long, 41:22. It’s a sleep generator for sure. Maybe with better notes it could have been made shorter. At this point it is edited and ready to go so it will stay like it is.
Making a video that includes the many reasons items are in the kit would take hours. I’m trying to speak in layman’s terms and keep it very basic. In part the video was made to share how others do things. It is never meant for instruction or teaching anyone how to do it. I think the content of the video is great for inspiration and to make a decision on whether this bag would suit your particular situation. For how-to do things there is nothing like in-person, hands-on, training and experience.
The scope-of-practice for this kit has evolved working with humans, domestic, native and exotic animals in many roles since the late 1970’s. It’s for use at any time, has most of the initial bandage basics and vital sign instruments. Usually my starting place for all things medical related. It is for medical issues that have presented many times. In station aid, medical coverage at public events, emergency service calls. People asking for anti-acids for heartburn, a toothpick or length of dental floss to pick out a piece of popcorn kernel or meat. Band-aids for the stubbed toe or skinned knee. A condom. Blood pressure checks.
I start with this kit and use other kits as needed. If there is a respiratory issue the airway, the oxygen and aspirator kit will be at hand. Trauma beyond this kit, spine boards, trauma kit, cervical collars, etc. depending on what is presenting. Writing the last two lines is why I don’t get into specifics in the video. The list of situations and possibilities becomes endless and exhaustive. Back to the video.

Vital sign instruments.
Working correctly the pulse oximeter and blood pressure monitor can be accurate. They’re here to complement patient feedback, palpation, my stethoscope and sphygmomanometer along with the other digital age technology. All of them producing life saving information that could make a difference in outcome. These instruments provide: bowel/heart/lung sounds, blood pressure, blood oxygen saturation, pulse, temperature and blood glucose levels. The instruments may be the only way to get vital information from a lethargic or unconscious person.
They can also be used effectively by layperson with on-the-spot training. A layperson doesn’t have to understand the results to obtain accurate ones with the battery operated devices. Many of them were designed for the patient to use at home. In austere conditions this capability could prove invaluable.
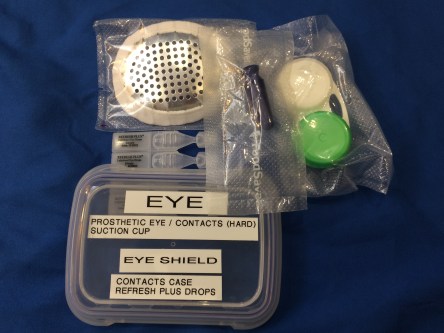
Basic eye emergency kit.
Another item good to have on hand for those who use contact lens or prosthetic eye is the suction cup designed to remove hard contact lens and prosthetic eyes. If the package is opened and handled correctly, the suction cup can be handled by a dirty hand to remove an eye or contact lens in an emergency without contaminating the eye, contact, or eye area. This kit has a place to put contact lens or prosthetic eye after removal. Wetting eye drops for the intended purpose or temporary storing the contact lens. A way to cover and protect an injured eye or exposed socket tissue. That’s the basic eye kit contents.

This bag has common bandaging material seen in any hospital, clinic, ambulance, emergency room or aid station. 18″ and 36″ SAM splints, tapes, triangle/self-adhering/elastic/gauze bandaging materials. Gauze sponges and dressings of various sizes.
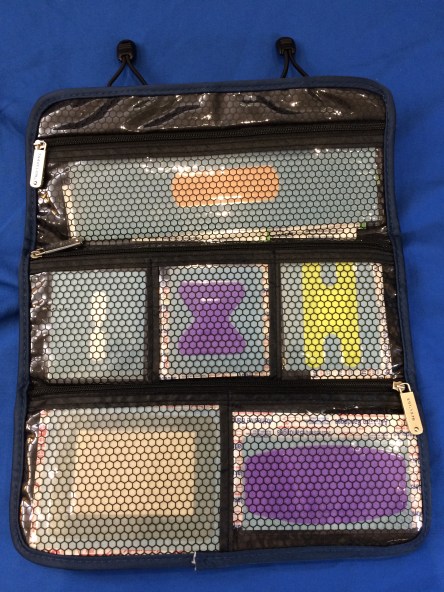
Travelon, Jewelry Roll/Adhesive bandage kit
The adhesive bandage (band-aid) kit is a small 10 1/2″ x 12 3/4″, 6 zippered pocket, tri-fold carry case. It holds the adhesive bandage styles and sizes we’ve found covers all our small bandaging needs. The most common thing treated out of the aid bag are finger lacerations. Lots of band-aids and self-adhering wrap.

Hot & Cold Compress
Other items that have been useful are the instant hot/cold compresses. For the bumps, sprains, cramps and whatever else. No heating or freezing required. Also kept in the kit are washcloths. Everyday washcloths, for their intended purpose and to use as an insulator with the compresses. Wetting the washcloth first helps transmit the heat or cold much better. If you have not used them before remember they can damage the skin if used incorrectly and must be monitored.
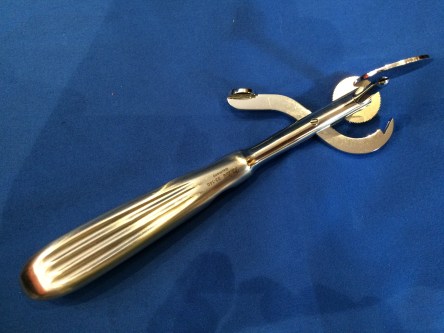
Finger ring cutter. Miltex 33-140
Instruments like the finger ring cutter have turned many purple swollen fingers back to normal size and skin tone. It will work for soft metals and works good. Unless it’s a thick class ring or similar it will take less than a minute to get through gold, silver, or pot metal rings. It will not work on titanium or ceramic. We have vice grips in our extrication hand tool kit if becomes necessary for those rings. When it comes to purchasing ring cutters, do not go for the lowest price cutter. Go for the lowest price highest quality cutter(Miltex, V. Mueller, Sklar). Low budget cutters will let you down.
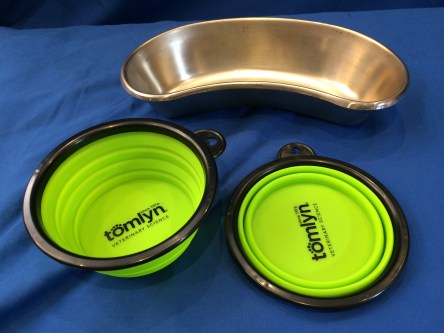
Silicone collapsible bowls come in handy when a kidney basin won’t fit in a kit. These fit so well in the side pockets they were added the day they arrived. Working out away from a base the bowls are perfect. If they have to be disposed of no problem.
There are many other items in the bag covered briefly in the video and why this is ending here. This blog would be longer than the video if that path was taken. Each item or subject could go in many directions. My default about any of the kit items or topics is this, get training, get experience. Do that, everything in this kit will make sense. -13

Pingback: Austere Medicine: Mega Medic Bag – Kit Contents | Unit-13 FREMSLT
Pingback: Over-the-Counter Medications Kit | Unit-13 FREMSLT