Note: this post contains affiliate links, proceeds support this website.
This blog post is not in any way to be considered as instructions or advise. It is so others can see how I do it. Individuals performing any of the following do so at their own risk and assume all responsibility and liability for their actions.
Photo by Pixabay on Pexels.com
In South Florida we have the potential to be without electrical power for long periods of time after a hurricane. One hurricane left us without power for 3 weeks. That potential left us asking, how would we sterilize medical instruments without a commercial autoclave in austere conditions?


With that in mind I set out to see if I could purchase or construct an autoclave that did not require electrical power to operate for under $200.00 dollars. At first I found electric autoclaves that were priced $700.00 dollars and up. Those were out of our budget and electric which wouldn’t be very useful for the situations we envision using an autoclave in. There were non-electric stove top units for $300.00 up to over $600.00 dollars.
The $300.00 dollar unit was only 9.5 quarts much too small for large instruments or packs. 300 seemed like too much for such a small unit. I was somewhat disappointed that there seemed to be few options but the commercially made out of budget autoclaves.
Not satisfied with that I started searching for possible ways to construct a homemade autoclave out of readily available materials. That search led me to this PDF document titled “Use of pressure cookers for sterilization of clinical instruments” found here Link to original location for experiment inspiration. The paper refers to a study conducted by the Dental School of the University of Texas Health Science Center at San Antonio in 1997 which evaluated pressure cookers for their autoclave capabilities.
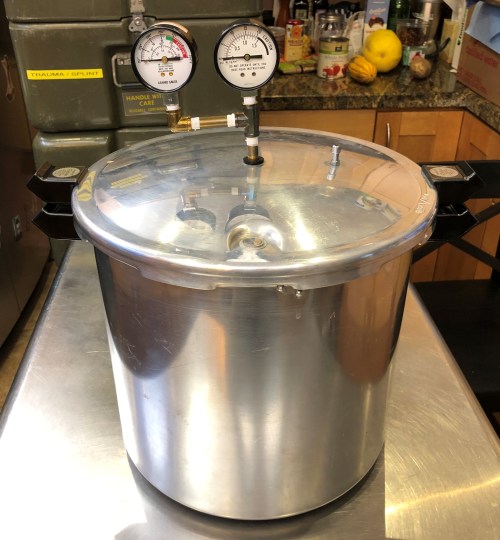
After reading that paper I decided to try to find the 22 quart pressure cooker/canner mentioned in the paper. I was able to locate a Presto 22 quart model 0178003 on ebay for $59.99. It was in excellent condition. All of the gaskets were changed including the over pressure plug for safety. It also seemed to be good idea since gaskets were mentioned in the document as a potential problem point.
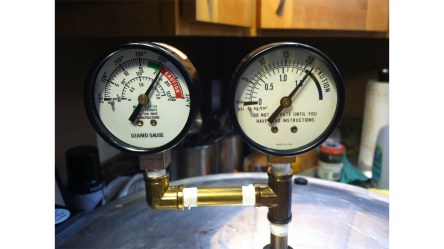
All-American gauge left, Presto gauge right, brass pipe fittings.
Also added was an All-American autoclave pressure gauge. Since there isn’t anyone local to test our pressure canner it seemed like a good idea to add a pressure gauge that was made to be used with an autoclave. I also wanted to keep the original gauge and see how they compared during testing. To do this 1/8″ brass pipe fittings were added so that both gauges could be monitored during a sterilization cycle.

3″ stainless steel screws for legs.
After installing the gauges, gaskets and seals I installed 5 stainless screws on the cooking rack that separates canning jars from the bottom of the canner. I left the rest of the rack untouched. During testing all of the packs came out wet. The rack had a few large holes leaving a lot of surface space for water to accumulate. To give more drainage the entire surface of the rack was perforated by drilling as many holes as I could without compromising the integrity of the rack.
After several tries the packs were still wet where the water wouldn’t drain off. I thought it might be there was still too much surface and surface tension to release the standing water. Also during those test I realized I needed something to prop the pouches and packs against so there would be room for the steam to pass and give the ability to add more instruments.

Stainless grill grate.
Another thing considered was that maybe the aluminum was cooling before the water had a chance to evaporate. I started searching online for a stainless steel cooling rack or grill grate. I found a 10 1/2″ stainless round grill grate on ebay. Also needed was something to separate the packs and pouches. I ordered a length of stainless steel wire online, wrapped it around something which I can’t remember to coil the wire to the shape I wanted. That piece of wire would push into the grill grate in several ways to accommodate the various pack/pouches.
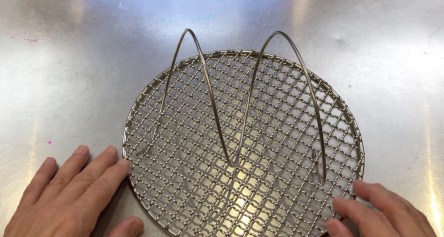
Grill grate with wire coil.
Also during that phase of testing I noticed that once the cooking/drain rack was loaded with packs there was no way to remove them without touching them before they had a chance to cool down. I had a short piece of aluminum flat stock laying around so that was bent into a handle shape then attached to the cooking rack.

Cooking rack with attached handle.
The information in the document mentioned the success difference between the 15 psi and 20 psi pressures. It seemed to me that the preferred pressure would be 20 psi since the document on page 6 stated “No positive cultures were evident in any ampules processed at the increased saturated steam pressure for 5, 10, 15 and 20 minutes in all vessels.”

Cooking rack, grill grate and wire coil

3 piece pressure regulator
A 3 piece pressure regulator was purchased to use for parts to add to the regulator that came with the pressure canner. To achieve the 120 grams as the document mentioned one of the weights from the 3 piece regulator was added with 2 washers. The pick up knob was modified to accommodate the washers so that they would stay centered on the regulator.


After multiple test to assure dry packs and a consistent pressure of 21 psi it was time to see if the modified canner could function as a successful autoclave. Mail in spore test containing Geobacillus stearothermophilus from Mesa Labs were ordered to determine if packs had reached sterilizing conditions.


Instruments were packed in commercial pouches, muslin and CSR wraps to determine if they would interfere with the process. Packs were packaged tightly to make it as difficult as possible for steam to penetrate the pack to the place where the test were located. I was trying to get the process to fail. It never did.

Spore test results
Test results for the thickest pack passed 2 times. The other packs and pouches passed as well. That’s still no guarantee that the packs are sterile. Anyone who processes packs knows that the only place we have any certainty of sterilization was where the test strip was located everything else is assumed to be sterile. I feel confident that sterilization conditions were sufficient throughout the canner so much so I’ve added it to our aid station equipment.
Since there were no specific instructions mentioned in the document I used the instructions for the All American autoclaves. After multiple test conducted I noticed that instead of the 15 cups recommended in the document I was able to use as little as 11 cups but added 12 cups to ensure the cycle wouldn’t dry out.
The steps I followed, also our standard operating procedures(SOP), are the following:
- After the canner is loaded with the 12 cups distilled water and the packs the heat source is set to high to bring the water to a rolling boil.
- Once boiling and there is a steady stream of steam venting from the vent pipe a timer is set for 7 minutes
- After the 7 minutes the pressure regulator was placed on the vent pipe. The pressure is allowed to reach the desired 21 psi.
- When the pressure reaches 21 psi the pressure regulator is removed to allow pressure and steam to escape for 4 minutes in an attempt to evacuate all ambient air which may not sterilize if trapped in the canner.
- After the 4 minute venting cycle is complete the pressure regulator is placed back onto the vent pipe.
- When the pressure on both regulators reaches 21 psi the heat source is turned down to maintain pressure throughout the sterilization cycle.
- After the heat source is turned down a timer is set for 5 minutes. During this time the pressure is monitored to ensure it does not go over 21 psi.
- Once the pressure is assured a timer is set for 35 minutes to ensure that all parts of thick packs are sterilized.
- After the sterilization cycle the packs are removed and the canner is emptied of water.
- The packs a placed back into the canner on the heat source set to low to start a dry cycle of 35 minutes.
- Once the 35 minutes have passed the packs are removed and allowed to dry for 6-8 hours.
- After the packs cool and vent any residual moisture they are placed into plastic pouches and vacuum sealed to preserve the sterility.
SOP’s also include when using a new heat source running at least 3 test to ensure consistent pressure throughout the cycle. We use indicator tape as well as test strips to indicate a cycle is successful. Project cost for the canner, replacement parts and parts for autoclave use was $170.13.
Dangers are explosion if safety features are modified and severe steam burns if a heat protective glove is not used when placing or removing the pressure regulator weight. This type of autoclave must never be left unattended and the pressure must be constantly monitored for consistency and safety.
We have a working autoclave for austere conditions! Now we can sterilize instruments wherever we have a consistent heat source whether it’s in our back yard after a hurricane or in a remote location far away from help. -13
Link to additional information about pressure cooker autoclaves
Check out this 20 minute video about our pressure canner autoclave.


![IMG_2528[1]](https://unit13fremslt.com/wp-content/uploads/2017/03/img_25281.jpg?w=444)
