13Jan2019 Update:
Update is an understatement. After browsing the other project blogs and watching the videos made at the time I realized I could do it a little better. Instead of having multiple blog post on the project it would be much easier to use one page and keep updating it as necessary.
The videos were not so good. Information was missing, unnecessary video, bad audio and, experimental editing. I was using poor quality microphones. Thought I was getting one microphone for $10.00, it was actually 3 for 10. Junk! Those microphones and an old phone as my recorder had me sounding like a teenager reaching puberty. Too funny. At first I didn’t recognize who it was when editing the original videos.
I thought for sure someone would give me some shit about it but no one ever did. Boring! It may be because not many were watching the videos. After watching many YouTube videos I thought anyone watching the project progress videos compared the new one would have a much more informative experience.
All the original footage and photos available, it seemed like the thing to do was edit a long play new version. Skip the multi part versions on projects like this. Maybe this one is better? One thing for sure is the audio is much different. Hope it helps motivate someone have a fire plan and a way to deal with it. -13
New Video
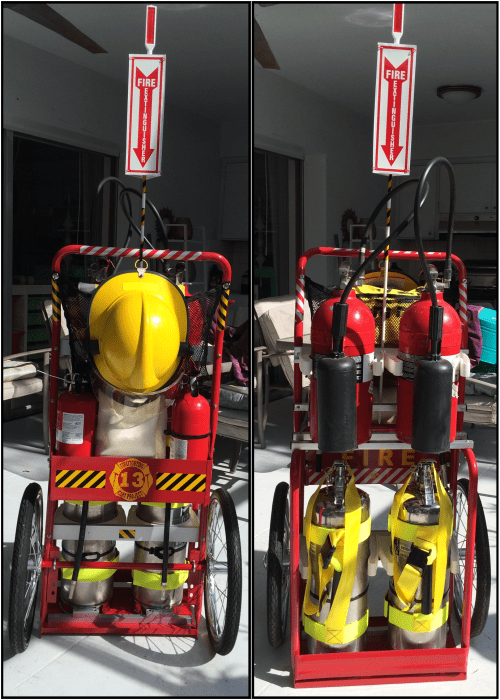
Firefighting Cart: Mission – Grand Tour
This is the last update on the firefighting cart project. I have all the parts in place. Well on second thought, almost. I unexpectedly want flat free tires since the ones on it won’t hold air. So this may not be the last update, time will tell. Otherwise everything is mostly like I planned it. I don’t currently have any tire tools so I can’t check or change out the valve stem core so that will have to wait, for now it’s “fill ‘er up!” with air. This video is different in a few ways. First I remembered how the old surf and ski documentary’s if that’s what they’re called, would run the music credits at the beginning of each song instead of at the end in the credits where its hard to figure out what’s playing if it’s not familiar. There is much more detail from the action featured to the text that has cost or important project details. I also tried to make my videos as concise and information filled as I can so you make the most of your time when watching my videos. I hope you find this project, informative and inspiring. Don’t forget to make fire prevention and protection part of your homestead everyday life. Thank you for checking out my blog! -13
Firefighting Cart: Final Modifications
All of the major modifications and additions have been made! More to follow. -13
27JUN16: When I posted this the other day I didn’t have the energy or clarity to write much then, now I’m ready to write. The last of the modification have been made! I was thinking I would be able to complete the project in days. Not the several weeks it has taken. The reason it took me longer than expected was I needed to figure out what I wanted for ABC extinguishers, where and how to mount them on the cart as well as other details.
Once I decided on small 5lb. extinguishers it was an easy choice on how and where to mount them. I had one 5lb here already and found another rechargeable extinguisher at Costco. There is a rectangle box mounted on hinge pins for storage on the cart. I could simply place the extinguishers in there and be done with it but they’re top heavy and they want to tip out with the hinged box. To solve that problem I ground off the welds, popped out the pins then bolted the box to the brackets. That took care of that now I have a place for two 5lb. ABC extinguishers and a welding blanket.
I also added some reflective tape for visibility in some of the most obvious, visible places on the cart. Found a place on eBay to order custom reflective lettering and also a cool custom Maltese cross specific to the project. I also found a three pack of fire extinguisher signs that I’ll mount on a dowel and spring clamp to mark the cart from multiple angles. I think it will work out well can’t wait to see how it turns out.
The other thing I wanted on this cart was turnouts so I or anyone could use the extinguishers on the cart much more effectively and safely. I chose to recycle an old wildland firefighting jacket, welding gloves from Harbor Freight and recycle a structural firefighting helmet. Not ruling out anything available locally or online as a way to mount those items on the cart I settled on SCUBA mesh for a bag to hold the gloves and jacket. I liked that I could see at a glance that the gloves and jacket were on-board the cart without having to open up a bag and look in. After sewing a bag together and testing I had a little trouble getting the jacket out of the bag so I added webbing with velcro tabs, problem solved. The tabs wrap around a support and hold the lower part of the bag down. Works really good.
After much thought I’m surprised I settled on the velcro cord-wrap as the way to mount the helmet. I did it because it held well, was simple to use, easy to apply without tools, was already in the stock inventory and stuck the use-what’s-available school of thought. I think it will work well, plus I have two rolls. Time will tell the outcome.
Must have those water cans! And, a better way to move them. I found a SCUBA tank carry strap at a local dive shop on sale so I bought three. Two for the cart, one for my POV. They only had a hand carry handle so I sewed lengths of 2″ heavy duty seat belt web with a quick buckle so I could have an over the shoulder way to secure and carry one or both of them. After several test they work really well.
For now I’ll wait for the decals to arrive. -13
Firefighting Cart: Brackets
I was able to find the bracket rail at a dive shop! Progress report coming soon. -13

Time for a little update on the homestead firefighting cart. Lucky me. I was able to source the extruded aluminum rail that the SCUBA tank brackets slide into at local Diver’s Direct. Another trip to Home Depot for a metal capable countersink and Lowes to search for hardware which I chose flat aluminum stock and pop rivets for the cantilever instead of the diamond plate aluminum they had a Home Depot. The 3/4″ end caps were in already here in the mail.
I was so excited after sourcing the bracket rail that I went to work on the project as soon as I got it home. Things went well without major problems. What I did notice was it sure does slow me down to not have a shop or utility truck to work out of. Frustrating, but it will change. I really miss the precision of tools like a chop box and drill press. Beats using a hack saw and cordless any day of the week.
The first issue was after I mounted the tank brackets to the lower half. When I tried to pull the cans out the bottom kicked out with nothing to brace onto making the cans very difficult to remove. To solve this I used one of the 3/4″ square stock pieces to rivet onto the bottom of the cart as a stop. This wasn’t successful because the 3/4″ was too low so I had to add another shorter piece for a double stack. That solved the problem.
The other problem was that the upper brackets pushed out the extinguishers so that almost half was hanging off the only two cross braces I was able to install. The curvature of the cart frame uprights won’t let me place a piece of the square stock out far enough. That’s when I decided to go with the flat stock. I would have chose the diamond plate but it came down to having a way to machine the piece. With the flat stock all I have to do is make a straight cut.
My original plan to have the upper extinguishers set on 3 pieces of square stock was changed because of that bump out and curvature. That turned out well because I ended up needing the extra to use as backstops to make the brackets functional as extinguisher holders. Now they’re being held by the friction of the bracket yet still immediately accessible during an emergency. I think I have somewhere between 8-12 hours on this project so far and a little over $300.00. More on that when I tally my receipts.
I made a video diary of the progress. Really have get it together and remember to empty the memory and charge the batteries on my iphone-cameras “before” I start so I can shoot more video instead of stills. That would be called, a, clue. The cart is usable at this point. I plan on adding a few more ABC extinguishers and some protective equipment. My next plans are to finish off the cart then make a video tour of the who, what, when, where, and why.
Really happy to have the peace-of-mind that goes with being prepared. -13
Firefighting Cart: Axle modification
After sweat-working several hours in the gnarly tropical climate here in Hollywood, Florida setting up tools, measuring, checking twice, filming, grinding, I did it! Yes! Wasn’t sure it was going to work out, but, it did! My major concern was being able to solder the washers back on and it worked out much better than I anticipated. I was able to grind off all of the washer with few issues. I had started off with a grinder wheel on my grinder then switched to a cut-off wheel to reach the tight spaces and preserve as much of the washers as possible. I cleaned off the paint where I wanted the washers to go then soldered them on exactly where I wanted them. It worked surprisingly well. Beginners luck. Once I did that I put the axle on the frame and it took several tries to get everything the way I wanted but it was worth it. I think I cut a little over 1 1/4″ off the axle which makes the tolerances very tight.
There was an issue with the paint. After proper cleaning, surface preparation and priming I was surprised when I applied the second coat of paint to watch the factory paint crinkle instantly. It was bizarre to watch the paint pucker up like that. Looks like I shouldn’t have been so lazy and striped the paint off the whole thing and started fresh. I wonder why it did that though. In my dream shop I’d media-blast it clean then powder coat it.
The good news is I can get through all the doors I want and need to. Next steps are to modify the cart to accept and hold the extinguishers I have set aside for the cart project. I also made a video diary of the modification hope you find it informative and inspiring. -13
Firefighting Cart: On the bench or in transit
Ok, better document some of the progress or I’ll miss the chance. One of my biggest dilemmas with the homestead firefighting cart project was how to mount the extinguishers to the cart. I have woodworking skills so I thought about using wood but it’s metal so there are the issues of joining the wood to the metal, that can be solved easy enough but I don’t have a wood shop or the tools I’m used to working with.
I’ve worked in a couple of shops that had any woodworking tool you would want, a woodworkers dream. I couldn’t believe I was lucky enough to work in them. So no shop/tools and if I can’t make it a particular way then I don’t want to do it. I don’t want it to look like crap. So that rules out the wood. My other option, metal.
Yeah, I’ll just get some tube stock, cut it, bent it, weld it, powder coat it, then call it done. Only a couple of problems with that idea as well. It’s pure fantasy and now I’m coming back to reality. First I’m back to the no shop thing. Then only metal working tools I have are a hack saw and an angle-grinder I use with a cut-off wheel. The only knowledge I have of welding is watching a friend of mine do it. So picking up a cheapo welder from harbor freight and faking it isn’t my idea of fun. Or a way to make something that’s high quality, looks good and not totally cobbled together. Now what?
Find a no shop, no wood, no weld required, minimal tool solution. I really wanted to fabricate something but there is reality. I would love to learn welding but there is the time it takes to learn what I need too and the equipment investment isn’t in the budget at this time. If I’m going to buy a welder then I’m going to invest in a really good one. The only welders worth my money are expensive and for good reason. I love how when I’m in a predicament like this and necessity forces me to see a different solution.
After all the maze chasing of ideas in my head I end up on ebay. Search for “tank bracket” So simple. And there it is. SCUBA tank brackets! That fit the 80 tanks. Which happen to be nearly the same diameter as the extinguishers but just a little bigger. Ok looking good so far because the best part is the brackets slide into a rail that can be screwed or bolted in anywhere along the rail. This is really good news. It solves all of the issues I was going to have. Using the rail/bracket system eliminates the welding and the wood. Plus I need a minimum of tools, cordless drill, a wrench and sockets and a way to cut the rail. This will work out very good.
The other problem to solve was how to create the top level for setting the 10lb. Co2 extinguishers on. I was able to find some 3/4″ aluminum square stock at Home Depot. They don’t carry end caps for those so I ordered some from ebay. That will solve that now I have to order the rail for the brackets. -13


Firefighting Cart: Door clearance issues
The Harbor Freight Welding Cart(65939) I chose to convert into a firefighting cart has some issues getting through household doorways. In every door in the house I’m in now it appears to be about 1/2″-3/4″ too long. There looks like there is going to be enough to cut off about 1 1/2″ length of tubing. One wheel has 1/4″ play in the hub the other side is about the same. The tubing needs to be shorter and the alignment washers need to be moved then welded back into place. Since I don’t weld or have a welder I’m hoping I’ll be able to solder the washers where I want them. If not I’ll have to go to a welding shop.
The next thing I’ll do is pull the axle, grind off the washers. Clean up the paint then attempt to solder on the washers. -13


Harbor Freight Welding Cart Model 65939 to be converted into a homestead Firefighting Cart. More in my next post. -13


