I have not received compensation in any way for the video or this blog post. I put this up because I could not find a non company post or video about this model of tent. I want to provide useful information for those considering buying one.
Another addition to Camp Down the Rabbit Hole is the Easy Camp Huntsville 500 5 Person Tunnel Tent. It’s a 10′ x 15 1/2′ tunnel tent. The tent comes in three pieces, the outer part of the tent, considered the rainfly, the floor and the interior enclosed room. The rainfly is made from 190T 100% coated polyester with taped seams, the enclosed room from 100% uncoated polyester, the floor is 100% polyethylene.
There are five windows, two doors and vents. The main door has two zippers with Velcro tabs to attach the bottom to the rainfly and a double zipper screen panel. Both parts can be rolled up to the top of the entry and be held in place with toggles and loops. There are two grommets on each corner of the door so that it can be held open with poles to act as a shade over the screened area. On either side are small mesh screen vents that are held open with foam and fabric arms. The side door also has a two zipper closing system where the bathtub floor can fold out flat. There is no mesh screen. The back or rear of the tent has a screened window that zips closed from the outside.
Main entry, ventilation sleeves, vinyl window
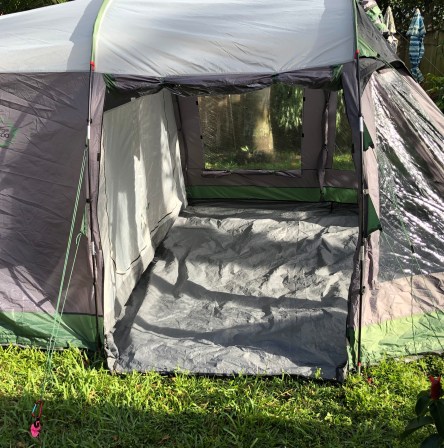
Four of the windows are vinyl with no screen or way to open them. Fabric covers for privacy can be opened or closed by separating them from the Velcro tabs. The interior room insert is meant to create a separate room in the back section of the tent. It is held in place with toggles attached to rings with elastic. While it can offer privacy and an alternate to the open floor plan I don’t like it much. It is not snug fitting to the sides of the rainfly. When put in place there is about 6″ of space on the sides, top and back. That is a lot of space lost. Sometime in the future I may disassemble it so that only the door side attaches to the tent. Then it would be useful.
Main entry open, view to back of tent, ventilation vents
There are several reasons I choose this tent. My main reason was to set it up as our heated or air conditioned in camp aid station. There is enough space for two cots or stretchers on saw horses, medical supplies and equipment. The side door floor folds out flat so that if hard plastic or plywood flooring was added a gurney could be wheeled in instead of carried. And, it makes it easier to hand carry without having to step over the fabric threshold of the main door. The vinyl windows don’t open making it easier to heat and cool without modifying them.
View of interior room insert
Toggle attachments
Room divider
I have changed a some things and added a few. Two 8″ ventilation hose sleeves were added to facilitate use of a heater or air conditioner. Velcro was sewn across the bottom of the rear window closure to reduce air exchange. I sewed the floor onto the rainfly walls to keep the insects and unwanted wildlife out. Velcro was also placed at the bottom of the side door. The retaining straps that ran across the floor to hold the sides in place were removed so that the floor could expand and pull tight. They had been placed there to prevent the sides from splaying before the floor was sewn in. The tent seals up good.
View of side door with floor folded down
Set up is easy enough that one person can do it in about 30 to 35 minutes. There are 14 stakes for the tent and 14 for the guy lines. I’ve had the most success setting it up by my self by laying the tent out so the footprint is mostly in place, staking the back corners down, then staking the front entrance center guy line. Once those are in place the three fiberglass color coded poles are pushed though the sleeve then the ends are put over the metal pins connected to the tent body. Moving from back to front the tent will begin to stand up and stay in place.
Front entrance, taper is visible
Next the tent body stakes are placed. To keep the tent in line stake and connect one side then move to the other. Note the front entrance corners are tapered from the place where the poles connect making it a little difficult to line up without them shifted to one side or another. I leave the front for last. It seems easier to line the front up with the sides. Although this tent is not heavy duty it will work well for the occasional use. I’m satisfied how the modifications turned out and the tent itself. Questions and comment are always welcome. Check out the video below. -13
I have not received compensation in any way for the video or this blog post. I put this up because I could not find any post or video about this model of cabin tent. Plus I want to provide useful information for those considering buying one.
I purchased two of the Bass Pro Eclipse 6 person cabin tents for a couple of reasons. One, Camp Down the Rabbit Hole could offer quarters for housing one or two individuals for our alliance of like minds for camping. Two, to be prepared with temporary quarters in the event our home was damaged in a natural disaster or we had evacuated for any reason.
The tent is constructed with 190T polyester with a 600mm PU coating. It has a bathtub style floor made with 120gm polyethylene. There are two triangle mosquito net ventilation panels in the roof. Four mosquito net windows with zip up privacy shades including the door. The door has a double zipper and is roomy enough to walk through wearing your load bearing equipment. There is also a port on the door side for electric power.
Window with privacy panel down for demonstration. Panel is usually neatly rolled up.
The footprint is 9′ x 10′. The propaganda states that the floor plan is big enough to house to queen size beds and 6 persons. When I’m in the tent it seems to me that it is more suitable for one or two adults, one maybe two camp chairs, a roll top camp table, some personal gear and a portable heater or air conditioner. Not much else. This would depend on how everything was organized.
Fabric plenums.
Vinyl window panel in place.
I made a few modifications to make it more usable. Two fabric plenums were added for interior or exterior air conditioning or heating. Vinyl panels were added using Velcro to quickly and easily attach or remove them. The window coverings allow the privacy panels to be lowered providing a way to see outside and keep the heated or air conditioned air inside. The triangle roof panels were also covered with the clear vinyl so they would seal up the tent yet allow light to pass though.
Pole elbows
Roof crossmember tie off point
The tent is set up using four metal and two fiberglass shock corded poles. The fiberglass poles are used on the roof to give it strong arch support. While the metal poles support the fiberglass roof poles and sides of the tent at each corner with a plastic elbow. Each corner elbow is marked with a 140° mark. This is where the metal poles go. The other end is too small for them and where the fiberglass poles attach. The fiberglass poles cross at the top and are tied in at the center. When putting the poles in place there is a metal pin attached at the corners that goes into the end of the pole.
Corner pole pin
The rainfly has a quick release buckle at each corner that adjust the tension of the fly. There is also a pole that attaches to the rainfly over the door to maintain it’s shape and to offer an awning like structure. The floor outline requires 6 stakes, the rainfly needs 7. The rainfly must be used for stability. It has all the attachment points and guy lines. It takes about 15-20 minutes of uninterrupted time for one person to set the tent up. Also of note is that the only place there is seam tape is the rainfly. None of the seams on the tent body are seam taped. I’ve only experienced mild rain and cannot tell how it performs in a heavy storm.
This video has mostly the same information and footage of the set up. If you have experience with this tent or have questions post them here. -13
Wearing the Danner Marine Expeditionary Boot for a few days indoors and deciding to keep them the waterproofing spray was applied before I wore the boots outdoors. The online reviews made me think the worst. Drastic color change, ruined nap. I’d rather have ugly waterproof dry boots than pretty khaki color wet ones.
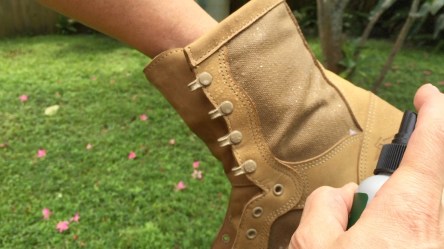
The water based Danner waterproofing spray was easy to apply and smelled a little like Armor-all. Due to the runny nature of the spray I found it worked better if the surface was horizontal. At first I was spraying the boot in vertical. As soon as my first spray hit the leather/nylon the liquid ran off of the surface. It seemed to be better to spray the area, then distribute it evenly by hand. Washing hands first or wearing gloves will prevent dirt transfer from skin.
Two, soaking coats were applied, drying in between each coat. When first applied, before it dried, the surface of the leather did not look good. It was blotchy, light and dark spots throughout. It looked bad. Like the discoloration was permanent. Thought for sure I ruined them. After drying for several hours the color seems to be unchanged. Like disappearing ink. Remember that stuff?
A quick test under running water resulted in water beading off both boots like car wax. Not sure how much confidence I have in water based waterproofing. It worked or seems to. I’m wondering how long it will hold up. The real test will be on the fringes of the Everglades and getting the trash can to the curb. Check out the short video below if you want to see what happened. -13
My search for boots. What a change in experience over the past 40 years or so. I used to be in a place where I had access to multiple individuals wearing the best boots available at the time. Shopping for boots back then involved asking lots of questions to those who had them on their feet as we spoke. Checking out company claims then trying on a few prospects in store until I found what worked best.
2018 the search for new boots is much different. I’m no longer around multiple individuals with the best boots and trustworthy opinions. I’m surrounded by bare feet and flip-flops! Now if I need an opinion on boots I have to watch a video if I can find one or read a rating posted online. Given the nature of corporations to censor bad ratings, good rating sources must be scrutinized. Sucks not being able to ask the person wearing them the questions I’d like to.
Most retail stores won’t carry the kind of boots I would buy. They’re more of a speciality and much too expensive to have sitting around collecting dust. In the past there were only a few places that would sell them. With the internet I haven’t found any local stores that carried any of the boots I’d considered. They were only available online. That leaves me ordering boots online. If they don’t fit ship them back then order the next size or a completely different boot. Don’t like it much but that’s modern shopping.
I’m very picky about my boots. My opinions began to form in the 1970’s. From first hand experience as a Boy Scout on local hikes to my favorite, advise from infantry soldiers and pilots returning from Vietnam. I can still spit-shine boots if I have too. You? There is lace breaking, eyelets tearing out, soles falling off, laces caught in pedals, foot rot, leather or nylon/leather combo issues, vents or not, zippers and more. I could never have imagined all the possibilities of failure or discomfort, it pays to ask questions. I was really lucky.
My preferences then evolved from experiences responding to emergencies with a rescue squad, fire department, ambulance service and some related type side jobs. I no longer look for daily wear boots with NFPA ratings, nothing else has changed. My requirements are few but hard to find in one boot. Fit, comfort, materials, reputation, durability, confidence, performance and no excuses.
My requirements narrow the choices quickly. Goodyear welt fully sewn and a Vibram brand outsole. A heat fused sole as seen on most boots, once separated from the boot renders the boot useless. Unrepairable! Goodyear welt soles can be repaired multiple times. Can also be field repaired with the right materials. One should know how to fix one’s boots and have spare. I’ve never had a Goodyear welt sole fail me. Every pair of heat fused/glued boot or shoes I’ve tried failed.
Laces. How laces pass through and attach to the boot is also a major factor in my boot choice. Only two types of eyelet are acceptable. One or two piece eyelets or a loop type speed lace combination. Never, ever, hook type speed laces. One pair of boots 30 something years ago taught me everything I needed to know about them.
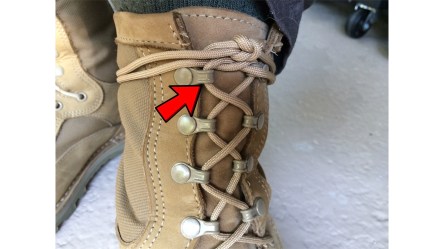
If I had a pair I would demonstrate the issues on video. But I made a vow then that I would never buy another pair of boots with them and support that crap ever again. Anyone who has the responsibility of life and property as a job task, hope the following helps you.
My why- never again of hook speed laces. The hook in the photo above is a good example. It’s the first hook located at the top of the boot. Items can catch that hook and pull it outward forcing the top of the boot inward flipping the lace off the hook requiring the boot to be tied again. These hooks can also be bent outward so the lace won’t hold or bent in trapping the lace preventing it from being untied. When attempting to bend it back into place the hook breaks. Also, the placement of the lace make the hook pull the boot body outward and from above. Eyelets pull lower and do not cause the inward motion caused by the hook.
Actual never again with the speed lace hooks come from emergency calls I was working. I like many saw the speed laces and thought it would be great to be able to put my boots on faster when a run comes in. Until several in field experiences changed my mind.
On the roof of a house about to lower a patient down a ladder, the wire part of a Stokes litter catches the top speed hook, flips it out, unties my boot. Pain in the ass I thought as I quickly tied the boot. Good thing there were others around it was doing CPR compressions. Didn’t give it much thought after that. Seemed like not such a big deal at the time just a hassle.
Not long after that experience I had another cardiac patient untie mishap. Doing compressions on an arrest I had to quickly brace my foot on the gurney to keep from falling when the ambulance made an evasive movement to avoid an accident. I was trying to get my footing on any part of the gurney I could. As I moved my foot the top speed hook caught on the gurney and untied it instantly.
Once part of the hook system comes unlaced it all goes. That time I was pissed off. Swore off the boots “never again!” and casually started looking for another pair.
But I didn’t get the message or move quickly enough. About a month after that I’m chest deep in Spring Creek with a patient clinging to the bridge foundation. I don’t know what’s under the water but the lace hooks at some point catch on something. Can’t reach it by hand without going under water. Not a reasonable or safe option at that point. Moving my foot around didn’t work so I pulled hard as a could.
It felt like I ripped the boot. Couldn’t see anything until we got out of the water. The patient was packaged at that point all that mattered was getting up the embankment into our ambulance. The way up the embankment was the last time I ever wore boots with speed laces. On our way to the place where we get back to the road I noticed that two of the hooks were bent. During a pause as we were preparing to go up the embankment I had the bright idea to bent the hooks back and broke them both.
So, that is the why, of the never again, with speed lace hooks. There are more problems I’ve seen over the years when other people were wearing them. On the opposite end I’ve heard from many people over the years how much they love their speed lace hooks. I wonder how much they’d like them if any of that was happening while they were being rescued. Can’t do that to anyone or myself ever again. It’s hard to believe those things have made it this far on boots.
Shank is also a must have. Prefer metal over plastic. Working on a ladder or pushing a shovel you will tell you very quickly if you have them. The M.E.B has a fiberglass shank. We’ll see how that works out.
Leather is a must, some nylon is also acceptable for hotter climates. As much as I’d like to have vents I have never found them practical in any application. In some of the driest locations I’ve been there is still a need for the ability to walk through shallow bodies of water. I’d rather have a boot be a little warm and dry and have to change sweaty socks than worry about wet feet for the shift because I stepped in a puddle of possibly contaminated water in boots with vents.
That was a long ass winded way to get to this place wasn’t it? The Danner Marine Expeditionary Boot has what I’m looking for. Snug, comfortable out of the box. No excessive foot movement within the boot that needs to be filled with insoles and socks. There is enough head-room over the top part of my foot to allow comfortable movement/flexing of my foot and toes. Like a glove fit. I did add *arch support like I do with all my footwear it was no surprise.
Leather/Cordura outer for durability and comfort in hotter climates like we have in Florida. A Gore-Tex liner so I can keep my feet dry when the water isn’t deep enough for rubber boots. We often have storms that leave standing water that require wading. Eyelet and loop speed lace combination works great. It’s easy to fine tune the laces.
Goodyear welt construction with a replaceable Vibram outsole. Danner says this boot is recraftable meaning they can repair the boot but not in every case. Based on past experience a good cobbler may also fix issues if the factory wasn’t able or not available. Then there is a USMC reputation for durability and confidence when my or someone else’s life depends on it.
I made notes of wearing the boot in the blog Marine Expeditionary Boot: Notes of the First 7 Days I’ll make an update video/blog in six months. We’ll see how the boots are holding up and if my opinion changes. Also there is a video review below check it out. -13
*NOTE: Spenco Total Support Max will not fit this boot. After trimming the insole to match the factory insoles I attempted to put one into the boot. With or without the laces in place it was so difficult to get into place I was sure I would either break the plastic support of the insole or the edge of the plastic support would tear the inside of the boot or liner.
The insole seems like it might be too wide or inflexible to work properly with these boots. I was able to angle them into the boot after much trying, aggravation and fear of damaging something during the process. Once in the boot it was clear it would not work in any way at all. In place the insole wanted to push up down the length in the middle as if it was being folded in half. Not a drastic bend, just a small raised area from lateral compression making them unusable in the M.E.B.
Thought it might be a good idea to make notes from my first week wearing the M.E.B. and keep track of how the boots felt each day. I’ve never kept notes on boots before but in the age of the internet and censored reviews it may help others make a wiser choice when purchasing vital items like boots. Don’t want company propaganda, I want real people sharing their experience. Here’s my first 7 days wearing the Danner Marine Expeditionary Boot
For those interested and for consistency I’m wearing Darn Tough Cool Max socks exclusively. I’ll blog/video about them after I’ve worn them longer. At present they are comfortable to wear and help keep my feet dry when moisture builds up.
Day two feet feel good. No hot spots or rubbing. Still new stiff but soften up a little with body heat/moisture. The fit is snug and well fitting. Will need more arch support than the original insoles provide. It feels like the space is slightly empty in the arch. I have high arches I expected to add them and ordered *high arch insoles in anticipation. When standing stationary the rounding on the sole is noticeable. My ankles are wanting to tilt inward or outward. Depends on where I position my body weight.
Day 3 sat on my ass all day in front of a computer, boots on. Comfortable, so much for day 3.
Day 4 of boots on my feet. Light duty day. Grocery store, water the plants, worm bin maintenance. Really hardcore test huh? There are some notable experiences. The addition of an insole used for high arches helps the boots fit a little more snugly. Unexpectedly making the boots feel much more like they had been made for my feet. When I first put on the boots I had over tightened the lace in various places causing fatigue. Once this was addressed the comfort and fit felt good to be wearing.
Day 5 working on projects required me to be knelt down after several minutes noticed a pressure point in the same place on the inside ankle bilaterally. Not bad because I try not to spend time working like that because it is uncomfortable to work in any way. It could get uncomfortable when kneeling on the ground or in a confined space for a lengthy period of time. The shifting weight/switching sides or slightly moving could help remedy or give some relief. I make a note so if you’re in a predicament out there you won’t be surprised. It won’t keep me from wearing them and it’s a position humans don’t normally spent time much time in anyway.
Ankle pressure point when kneeling.
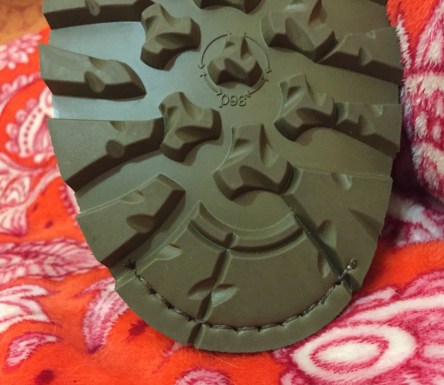
Day 6 88°F/31°C, 65% or so humidity, thunderstorms on the way. Perfect time to move stuff into storage. Moving around obstacles, pushing heavy carts the tread kept traction on pavement, concrete and painted concrete. The arch or roundness of the tread is noticeable. Since the sole isn’t flat the ankle tends to tilt lateral until it settles. So far not a deal breaker it is something to be aware of. It may be the way I walk, when I do there is a rolling feeling when the toe part of the boot moves into the next step to push off. Not so sure how descriptive that was it is demonstrated in the video.
The heat build up but was never uncomfortable. I’m sure the tan color helped when in the sun. The socks and the Gore-Tex liner may be helping with moisture buildup. The socks were very wet with sweat. The liner of the boot felt dry. After a change of socks it was back to normal. No noticeable hot spots or rubbing. An issue that surprised me was the top speed lace loop on the left boot pressing into my leg. The way the boots are tied, the wrap around of excess lace presses one of the lace loops into my leg. Just the one on that boot. The right one, nothing tied the same way.
Top speed lace loop pressure point.
After experimenting its clear it had to do with the way the lace crossed the loop and amount of pressure on it. Fine tuning that really helped. It hasn’t been a problem after the adjustments.
Had to go through some mud and wet sand typical of Florida after the storm. Shortly after was able to hose them off. All of the dirt washed off. The leather beaded water like car wax. My feet were dry. This was after I’d changed socks. The boots stayed dry inside no problem. So far, good comfort without all the excess padding. My feet are liking these boots.
Day 7 putting the on boots is getting faster. The paracord lace has stretched and is settling into the memory spot it develops after regular use. No hot spots, rubbing or compression on the foot, ankle, arch or lower leg. As long as the laces are adjusted properly. My heel fits into heel cup well adding to the comfort. Although boot has a glove like fit on my foot there is enough space to flex the foot and toes as is sometime necessary for comfort.
The tongue stays centered like no other boot I’ve worn. With the help of a tool from the window glass industry I like to call a tongue fid I’m able to keep the tongue centered and free of bunching that causes pressure points. The tongue fid is stout but flexible plastic. The tapered end has rounded edges. It works really well for pushing the tongue into place as the boots are laced up. Those double folds can cause gnarly pressure points and be hard to move once the boot is tied. Sometimes it can also be used it for scratching parts of my leg or ankle without having to take off the boot. Some itching can’t be ignored.
The heat factor isn’t as bad as I thought it might be. In south Florida heat and humidity are part of life here. It’s expected. These boots don’t seem overly hot here. At this point it does seem I can feel a difference in temp where the Cordura is. It seems to be cooler than the foot. The foot area does build up moisture. The Darn Tough Cool Max socks are making a difference in a different way than I expected. Watch for a blog/video soon.
*NOTE: Spenco Total Support Max will not fit the M.E.B. After trimming the insole to match the factory insoles I attempted to put one into the boot. With or without the laces in place it was so difficult to get into place I was sure I would either break the plastic support of the insole or the edge of the plastic support would tear the inside of the boot or liner.
The insole seems like it might be too wide or inflexible to work properly with these boots. I was able to angle them into the boot after much trying, aggravation and fear of damaging something during the process. Once in the boot it was clear it would not work in any way at all. In place the insole wanted to push up down the length as if it was being folded in half. Not a drastic bend, just a small raised area from lateral compression making them unusable in the M.E.B.
Finally found a boot made on a last that fit my feet. Many brand boots have too much space above the foot. My foot in other brand boots properly tied would have at least 1/2″ of vertical movement. When I lifted my foot to walk the boot would shift downward moving the footbed off my foot. Then on the down step the boot hit the surface first, then the foot onto the footbed of the boot.
To remedy this I used a combination of socks and sole inserts which put my foot at an awkward place in the boot and never worked well. No more of that with the M.E.B. I can wear a single pair of socks and skip adding thicker sole inserts. The fit is more like an athletic type shoe, much more comfortable around the foot. Snug and supportive without binding. The leather has no visible flaws, stitching is perfect. The overall finish and look of the boots are aesthetically pleasing.
Materials quality will be determined through use. Concerns with the sole are an arch that causes the boot to want to move in a rocking motion. Maybe this will flatten out after the boot breaks in. I’m wondering if the sole might stay like that and wear out the protruding part until it evens out.
There is a short length of stitching that holds the front end of the sole onto the boot as reinforcement. This line of stitching is not protected and might wear through enough to break the stitch.
The laces that came with the boots are too thin and I prefer to use Mil-spec type 3 paracord so they were changed. The sole inserts feel comfortable, but I might add some arch support. I’ve worn them at home for about 7 hours walking as much as possible and am confident they will keep me happy for years. Since an opportunity presents itself to track these from the start I’ll post periodic updates on the state of the boot.
Next post will explain why the M.E.B. was chosen and a progress update. Video review is below check it out. -13