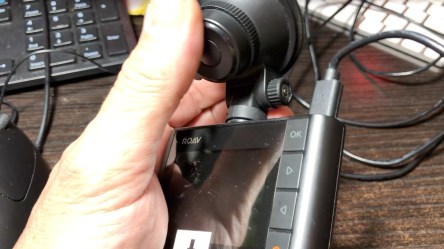
On 18 Octobrer 2019 our 4Runner was taken to Toyota Hollywood for maintenance. Before the vehicle left for the day I did what I do every day or two. Change out the SD card, clean the lens and check the position of the camera view. Everything was like it was supposed to be with a good camera view. When the 4Runner returned I started to change the SD card and noticed the camera was pointing in an upward direction.
Before camera is moved.
That’s odd I thought because for the camera to be moved into that position it would have to be forced that way. The mechanism that controls the vertical view of the camera has a knob that is tightened by hand. It also has indexing teeth so that the camera will stay in position once adjusted.
After camera is moved.
That then made me suspicious since the vehicle had maintenance that day. I loaded the footage on my computer. I was not surprised to see footage of the camera being manipulated. Someone started to move the 4Runner then slowed down as the camera was moved. The slow motion video demonstrates the indexing I was referring to. The clicks are visible in the footage. Adjusting the rear view mirror does not interfere with the camera.
The employee cannot claim it was bumped by a hand. I included a demonstration of how difficult it is to move the camera in the video I put together about what happened. So why would an employee of Toyota Hollywood be manipulating the camera without permission? Does the employee have something to hide. Does Toyota Hollywood? The camera is not a Toyota part. We put the camera in for our protection. They don’t have the authority to touch that camera or any other personal item. This makes me very suspicious of what is going on in their garage.
There is a guy that keeps showing up in the footage who is the one performing the maintenance. I’m not accusing the guy but do wonder if it was he who moved that camera. Whoever it was I want to make sure that person never has access to any of our vehicles again. The only person that could have moved the camera was the one who was driving it at the time.
I made a video record of the event that includes all the recordings from the time the 4Runner arrived at Toyota Hollywood to the time the person performing the work parked it outside. Nearly all of the footage playback speeds have been changed to move though the timeline faster. I included footage of me manipulating the camera angle and some slow motion to see movement detail.
For now all we can to is let the management know what happened so the issue can be addressed. I’m posting this video so the management can see the actions that bring us concern. As well as letting people know what took place there. We are shocked and disappointed this happened.
We want to know who did it so we can assure that person never accesses our vehicles again. That camera is set to turn off after the engine stops. In the future when maintenance is performed the camera will be set to continuously record once it arrives at the garage. Video is below. -13
107-110 are posted on the South Florida Driving 101 YouTube channel. I still find it amazing how much footage is generated by our dash cameras. If you’re ready for more jets, zombies, cut-offs, crazy exits and merges, and stupid we have it on video. Over a 110 videos so far with the specials. I’ve also recently found multiple dashcam channels on YouTube in Florida. They’re listed in our Featured Channels links on our front page go check them out and subscribe. Enjoy the crazy drivers -13
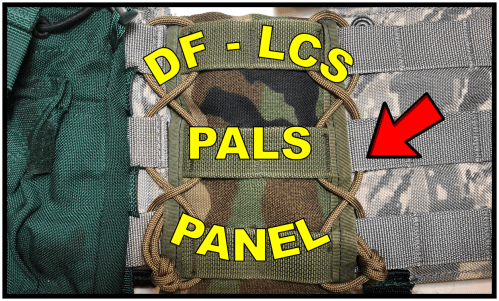
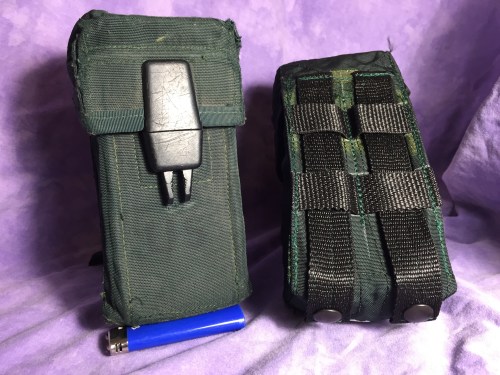
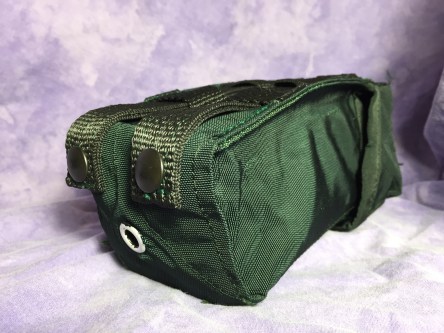
Once again another DF-LCS (Defensor Fortis Load Carrying System) modification. This time it’s for the elastic that connects the rear section to the two front sections. After using the DF-LCS I was unhappy with the unused space created by the elastic connection and wanted a solution. I had a surplus fighting load carrier (FLC) on hand when it dawned on me to break it down into individual components and reuse the parts to fill the space.
Elastic connector between front and rear DF-LCS sections.
The PALS (pouch attachment ladder system) panels on the FLC would be perfect with little modification necessary. Once they were removed from the rest of the assembly it would be easy to cut the parts to size, sew on the recycled edge binding, then sew the free ends together. This would allow them to slip over the elastic connector then be laced to the front and rear section of PALS webbing with military spec paracord.
PALS filler panel over elastic connector, laced onto front and rear sections.
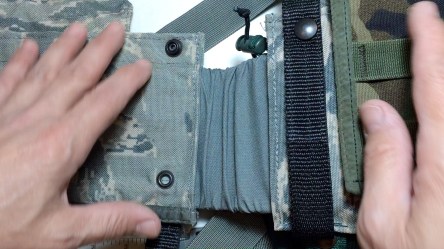
The idea works well for the ALICE M-16 pouches I converted to MOLLE. So far those have performed as expected when the ALICE magazine pouches are fully loaded with gear. I did have to tighten the lace up to eliminate the slight sagging issue.
Front view ALICE magazine pouch attached to PALS panel.
Rear view of ALICE magazine pouch and PALS panel on a DF-LCS.
I don’t have a lot of detail here because it’s in the video. The video moves from FLC disassembly, to layout, then sewing and finally how to make it work with the LCS. Video below. -13
Time for some gear updates. After switching from my old favorite ALICE LBE to MOLLE DF-LCS I experienced a couple of issues. When using the LCS it would inch it’s way over my pants belt and push down creating discomfort. I also noticed when in a sitting, crawling or in a prone position the rig would tend to climb toward my chest. After thinking of a solution the only one I could think of was to attach straps that would keep the LCS from moving away from my waistline.
Right segment of DF-LCS before adding belt keepers.
The idea came from my experience wearing a duty belt with belt keepers that were designed to hold the duty belt in line with my pants belt. With this in mind I measured the area I wanted to place the keepers, doubled the length then added a inch and a half. The extra length would give my fingers a place to work the snaps I intended to use. Once I had the dimensions for the strap I cut six lengths of poly webbing, folded them in half and sewed them so the two halves would work as one.
Right segment of LCS after belt keeper straps were added.
After sewing the keeper straps together they were sewn onto the three segments of the LCS. Next the holes were punched then the snaps were added. It was an easy project taking no more than 45-60 minutes to complete. After testing the idea seems to work well to prevent the LCS from moving around and causing me trouble. The LCS rig still has some movement/flexibility however it won’t move away from my waistline. I made a short video, the link is below.
I also modified what was labeled as a MOLLE flashlight holster to meet PALS specifications so I could attach it to my quick response belt. The holster had the vertical snap strap but did not have the ladder webbing. To fix this issue I removed the belt loop strap, opened the sewn seam to join the holster, added the new ladder section, then sewed the piece back together. Time spent was about a half hour. I made a how-I-did-it video the link its below. -13
103-106 are posted on the South Florida Driving 101 YouTube channel. Getting this back on track again after the last 8 months off. I had other projects to finish first that consumed all of my time. I’ll have a couple of videos and blogs about what I was doing during that time sometime soon. Over the last two days I’ve watched over 2500 three minute videos for content. I’ve changed some of the standards for which I’ll post a video section.
In the beginning I’d post most offenses but there are so many of the same thing it would be long and boring. I’m now trying to keep it to the most offensive drivers, cool sites, oddities. An example, if I put all the drivers not using turn signals in a video it wouldn’t be worth watching. However after this session of editing I’m starting to see a pattern among police not using them either. If the police don’t set the example how the hell can we expect others to use them? Maybe a supervisor will see a few of these videos and get on their asses to set a better example.
I never thought there would be so many videos when I started this project. I wish I had more time for it I’ll often have to delete videos I’ve never seen to keep up. Now that I have a major portion of the other projects I’ll be able to keep up. -13
103 has a jet take off and landing, cut-offs, zombie crossings, more police bad examples.
Video short- Driver almost strikes bicyclist’s
104, cut-offs, jet landing, bicyclist’s cut-off, motorcycle fly-by, last second merge, motorcycle and car close call.
105, Has a cool bird fly-by, van with no doors, accident scene, cloud formations, cool jet overhead, some drive-by art, dangerous ladder and South Florida drivers.
106, Lincoln cloud formation, peacocks in the city, lots of police not using turn signals, drawbridge, jet fly over, short art break, iguana crossing.
Note: this post contains affiliate links, proceeds support this website.
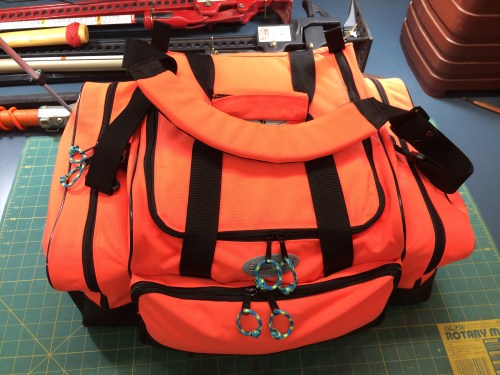
I finally got around to finishing this bag and making a video! On June 3rd of 2016 I posted a product review video of the Mega Medic bag. At the time it was sitting empty, we had decided our medical supplies and equipment needed to be changed and updated based on how the use of the kits evolved over the previous 5-8 years. Most of the kits had been used out of a rescue truck for a project we were working on.
When I made the review video I gathered various medical items that fit into the different parts of the bag to demonstrate the possibilities of what could be kept there. The items shown weren’t a set up ready-to-go kit. I already had a list for the kit contents but didn’t have everything I wanted. Some of the items on hand had reached it’s useful life.
Recently after reading a video comment on the kit I had never seen before I checked to see what was needed to finish this kit. Triangle bandages. That was all. Trying to keep track of medical inventory without a computer may put me in a straight jacket. After replacing and restocking items the kit was finally ready. How is that for a swift kick in the pants?
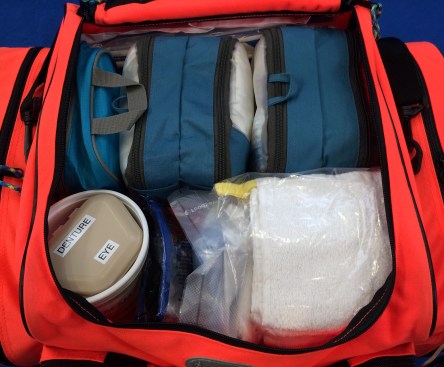
B Compartment
The kit is an extension of the aid bag. This is considered our Trauma Kit and builds on splinting, bandaging, eye, dental, large wounds, burns. Can be resupply or used as is. It is based on several kits from past experience. It may be hard to imagine but nearly every item in this kit could be expended on one incident.
Some of the kits from the past using the same bag had more of the bandaging and splinting materials. Those kits had been based on, in part, by proximity to a military base and a direct flight path where helicopters and transport aircraft that could hold hundreds of soldiers could and sometimes did go down.
Then there is the, being the only one there and no one is coming. To the rural 20,000 person county, only 5 people qualified to operate two ambulances with the nearest mutual aid unit 30 minutes away, no air support. Standing there after a mass casualty incident looking around and seeing empty aid bags and bandaging supply wrappers among the carnage leaves a lasting impression.
Alpha compartment, why we use those pouches
During the same time we were updating our kits we were able to find several different type packing organizers on sale at Marshalls store. After using a few of them we went back to that store and many others within our local area and bought whatever stock they had in the store.
Those finds allowed us to keep items protected in ziploc bags and create mini kits without having a kit full of ziploc bag mess. Multiples of one type item or a kit made of several different components they’ll work well for many common items.
Double side bandaging pouch (Go Travel Packing Pouch no.3)
The bag above was one of the last pouches found. As it’s packed it works very well, 8 rolls Kerlix, 12 5×9 Surgipads, 20 4×4 sponges. I’ve looked for more and can’t find them. The pouch below is what was used before we found the pouch above. The dressings were packed the same way they are shown, the Kerlix was packed like the double side pouch, 8 rolls in a ziploc bag.
Single side bandaging pouch (Travelon Packing Organizers Set-Small)
CD Case
I’ve been looking at ways to store the instant hot and cold compresses for years. When the portable CD cases became available I found out they worked well. If the internal storage sleeves are removed there is room for two instant compresses. All I had to do to get this type case to work was remove the sleeves from the rivets that were simple to pull out by hand.
At first I used a metal case but it added weight and was too stiff to fit in multiple spaces. When these softer type plastic cases became available I tried one. Discovered that I liked it better. It has more flexibility and can fit into tighter spaces than the metal case. For the type of compress and CD case chosen its simple to get them into the case. First, I arrange the liquid part of the compress in one half of the bag and the dry ingredients in the other then, fold in half.
Case open showing how compress is packed
Place both compresses in the case then close it. As shown below it works good. The compress is protected from punctures and abrasion and it’s easy to see the contents. I usually look for things like this at the outlet stores but ordered these off eBay for consistency.
Case packed with 2 compresses
This kit has one 18″ and two 36″ SAM splints that can be used in many different ways and can be custom cut with the trauma shears. Very handy to have on hand. They beat the old ice cream scoop, vinyl covered wood, blow-up doll, waxed cardboard splints any day.
FareTec CT-6
REEL Splint
The two photos above show the traction splints kept in or with the trauma kit. The FareTec and the REEL splints are surplus finds. If you’re looking to stock your kit check out eBay and the surplus stores. Make sure all the parts are there before you buy, get new if at all possible. Couldn’t give a price on either of these. eBay as I shockingly found out only keeps auction records for 3 years not a running tally like Amazon.
Dental / Eye Kit
In the photo above are the contents of the dental and eye kit. The denture case can be used for dentures, loose teeth or prosthetic eyes. There is a scleral cup for removing contacts and prosthetic eyes. A case for contact lens and a 10x magnified mirror.
Two eye shields and two food service 16 ounce deli cups for covering injured eyes. Those things can work well for keeping eyes protected. Some of the eye injuries I’ve seen makes me want these in stock at all times. Not shown are the sterile eye cups, the Sal-jet rinse 30ml saline vials or the Refresh Plus eye drops.
Most items in the kit have multiple uses. Dressing like the trauma and surgipad make good splint padding. The surgical CSR wraps in the kit to make clean working space can be used to protect wounds. A mylar blanket as an occlusive dressing. The list is endless.
Security Sealed Kit
Security seals are an important part of our medical system. The seals are tightly controlled and numbered. A strict system is in place, only a couple of people here are allowed to seal a kit. That way when one of the kits need to be used and the seal is intact we can be assured the contents will be there.
The seals used in the video are not the same seals used on our bags. They’re from old stock and are used for training. They work the same as fire extinguisher seals, twist or pull on the seal and it will break easily. If you get some, get numbered if possible it will help in case someone else has the same type/color seals.
A word of caution, be careful where they are placed on zippers they can break zipper parts easy.
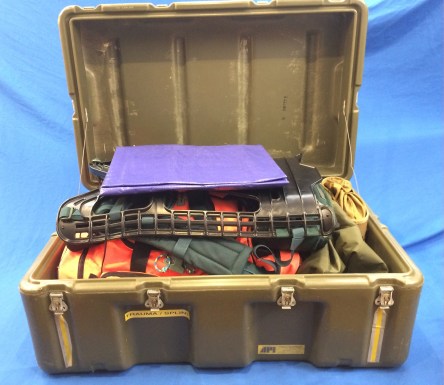
Hardigg AL3018-0905
The Trauma Kit is kept in a cabinet or could be stored and transported in a heavy duty case with the REEL splint, a MOLLE 2 pack frame, various color pack covers, a quick litter in a dump pouch and a small tarp to place the contents onto. The case is stored with the gasket out, if left in place it compresses under the weight of the other cases and is not as effective over time.
Seems like that covers the items I felt I left out of the video. I don’t want to repeat the video here. I would rather people watch the video, then read the blog after to see what was left out. Clearly I don’t write scripts for these videos, just an item name, maybe a note. If there are any changes or updates in the future they’ll be posted. The new video is below. -13
Other video project featuring the Mega Medic bag are below.
From the Laboratory of Insane Schemes. ALICE military surplus has been my load bearing choice since the mid 1970’s. Not perfect for sure but it was a great place to carry my canteens and other items that would fit into ALICE 30 round magazine pouches. Cut off the grenade pouch and they fit together nicely on an issue pistol belt.
Moving into the 2000’s. After checking out some of the PALS / MOLLE surplus available I decided to change over. Although the webbing can be hot and heavy the PALS way of attaching pouches or attachment of any kind to LBE or packs is a good one that almost makes the attached item a part of what it’s attached to.
Moving forward left unused canteen and ALICE magazine pouches packed in boxes and me wishing I had a better way than the adapters made to use ALICE on MOLLE. The adapter still leaves the pouch flopping around like its on a pistol belt. Not a very good solution.
I had the idea recently after a resupply to take apart an ALICE magazine pouch and see if I could convert it over to a MOLLE pouch. If it would work it would fit perfectly on the space fillers on the DF-LCS rig elastic section I’d made from a zippered FLC purchased to salvage for parts.
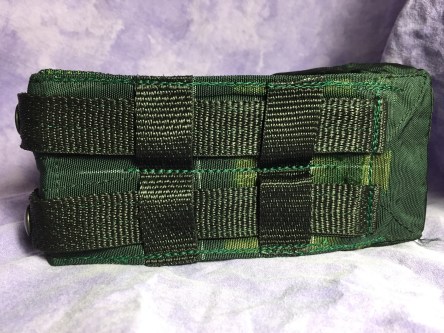
Inside view of FLC adapter/filler and “new” MOLLE magazine pouch attached.
First I had to figure out where the attachment straps would be placed near the top of the pouch and where to snap it on. At the top I chose the hinge point for the lid so it wouldn’t interfere with access. Snaps on the bottom. When the snaps are on the back of the pouch they tend to push it out due to the bulk of the snap. If snap popping becomes an issue they can always be changed to lift-the-DOT. We’ll see what happens in the future.
Finished pouch.
Location of snaps
The web straps were the same length. Doubled, folded in half and sewn together. Measuring the magazine pouches for the PALS webbing I discovered that the pouch width could vary as much as a 1/4″ between 4 pouches. I chose the widest width and cut all the pieces that size. There are no actual dimensions in here because the variation in pouch width, measuring devices and points of measurement may not be the same as mine. Duplicating it exactly may cause problems.
After lots of seam ripping and thread picking the pouch was in half and the ALICE webbing was removed. Laying out the PALS is as simple as can be 1″ x 1 1/2″. Since the pouch is so small I sewed a center line and the edges like I’ve seen on some issue pouches. Sew the straps to the hinge point. Keep it simple.
Although the snaps used and the Pres-n-Snap are designed to cut through the fabric without punching a hole, I did punch because the amount of pouches were small and I wanted more precise location of my snaps. I’ve had puckering and slight movement of the snap post under pressure from the hand press that the finished snap was visibly off mark times I haven’t punched a hole first. It’s also much easier on the body with a hand press if the hole has been punched.
With the holes punched and the webbing sewn on, the stud part of the snap was installed on the bottom of the pouches. I try to leave them until the end of the project or leave them off for as long as possible. In the past I’ve put them on early thinking I’m saving time but they were in the way of the sewing machine on many occasions or were scratched up.
Once the snap half was in place the pouches could be sewn back together again. The top and bottom received four stitch lines and the whole side of the pouch received two stitch lines. That complete, the other half of the snaps were installed on the web straps and that was it. Those are the steps I took to convert ALICE to MOLLE. Now I have some of my favorite pouches to use again. There’s a video below of the process. -13
Materials used: Mil Spec DOT snaps, poly webbing, sunbrella thread.
97-102 are posted on the South Florida Driving 101 YouTube channel. No descriptions needed (except for the short butterfly scene 102), count on it there is plenty of crazy. There are now over 100 videos of south Florida driving craziness and local sights. Never imagined there would be this much footage. As this is written there are 700 + videos waiting to be sorted for editing. Check out the videos for a true south Florida driving experience.
A note about the pedestrian crossings that only use the yellow flashing lights to warn traffic of pedestrians in the crosswalk. I think it will give the pedestrian a false sense that traffic will stop like its a red light. As can be seen in the footage if two of the three lanes have stopped and blocked the view of the drivers behind they tend to go around in an open lane if they can without regard to the flashing yellow lights or presence of a pedestrian in motion.
Maybe changing the color of the lights to red may help. I would react differently if they were red flashing. The best solution may be another traffic light with a green, yellow, and red. That would get me to stop for sure and know what is expected of me. This new yellow lights flashing everywhere thing didn’t mean anything until after seeing them on video paused otherwise they’re passing by like everything else when driving. Making these videos has made me more aware of how they function. I wonder how many others are confused by them?
Thank you, everyone who watches these videos. Enjoy! -13
Lesson 97
Speed trap, Tunnel ride, Truck goes for its first walk?
Lesson 98
Near miss van almost strikes a truck, almost blast thought a red light, pedestrian chaos, bicycle surprise + close call with motorcycle.
Lesson 99
Another cool jet crossing, dK2 oops, leaf falling, toll lane highway robbery?, lost dog finds way home, improperly marked lanes nearly cause accident, cloud formations.
Lesson 100
100 plus and counting! Truck door opens, cloud formation, bicyclist have issues.
Lesson 101
Finally got a mattress hauler! Everything looks normal in the video, however when at speed it looks much more interesting, a cooked tour bus, accident scene aftermath, nice jet crossing, lane line confusion.
Dash Cam 88-96, plus specials, Special 9 and Merge-Exit Madness 5 videos have been posted to the South Florida Driving 101 YouTube channel in July. July over, almost there! Getting caught up on editing, nearly to the current date. Still amazed how much footage we record driving here. It’s a lot to sort through. Going to limit the video descriptions. There some driving experiences that happen in every video, accident scene aftermath, no signal lane cutting, merge-exit stunts, the descriptions get boring to read. From now on it will only include unusual sights/sighting of cloud formations, aircraft close-ups, wildlife encounters etc. -13
Lesson 88-96 date back to February. There is a dK2 involved accident(89), a speed trap, wildlife encounters, merge-exit stunts, cruise ships, cool views, stop light free for all, clouds at night, passing on neighborhood streets, Florida Turnpike jackknife, aftermath traffic, and skid marks (6/29), and a side trip to Ocala.
Lesson 88
Short Peacock crossing, caught in a red light, accident aftermath.
Lesson 89
Henry E. Kinney Tunnel ride, Cruise ship drive-by, dK2 gets struck by a car (why we use a camera), one close call with a median barrier.
Lesson 90
Lightening show in several scenes, some choice cuts of merge-exit madness, dk2 lane oops, Bill Bird Marina Art Deco building, red light chaos -when the lights are flashing.
Lesson 91
New ROAV A1 cameras installed for dK2 and Unit-13, building art, clouds at night.
Lesson 92
Overturned car accident aftermath, muffler dragging, Florida Turnpike trouble on the 28th of June when a truck jackknifed blocking all lanes, traffic backed up for miles, also later are the skid marks, a couple of scenes with FSU bridge rubble.
Lesson 93
Ocala and back. Cool vintage truck, I-75 south accident aftermath, speed traps, what looks like a trooper driving straight into traffic, storm over the everglades, driver on the wrong side?
Lesson 94
Starts with some fire rescue action, Henry E. Kinney Tunnel ride, sculpture art, smoke ’em if you got ’em.
Lesson 95
Load issues?, motorcycle rider lucky to be alive.
Lesson 96
Pedestrian close call, tree limb on FedEx truck, reflections of the city, express lane “privilege” gets expensive.
Special 9 The long way around to avoid an accident on I-95. MIAMI US-1 / I-95 TO Fort LauderdalE US-441 / I-595 ONE-WAY TICKET.
Merge-Exit Madness 5 features special crazy drivers from Lessons 76-86. Plenty of exciting close calls.
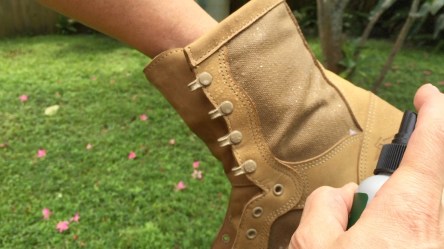
Wearing the Danner Marine Expeditionary Boot for a few days indoors and deciding to keep them the waterproofing spray was applied before I wore the boots outdoors. The online reviews made me think the worst. Drastic color change, ruined nap. I’d rather have ugly waterproof dry boots than pretty khaki color wet ones.
The water based Danner waterproofing spray was easy to apply and smelled a little like Armor-all. Due to the runny nature of the spray I found it worked better if the surface was horizontal. At first I was spraying the boot in vertical. As soon as my first spray hit the leather/nylon the liquid ran off of the surface. It seemed to be better to spray the area, then distribute it evenly by hand. Washing hands first or wearing gloves will prevent dirt transfer from skin.
Two, soaking coats were applied, drying in between each coat. When first applied, before it dried, the surface of the leather did not look good. It was blotchy, light and dark spots throughout. It looked bad. Like the discoloration was permanent. Thought for sure I ruined them. After drying for several hours the color seems to be unchanged. Like disappearing ink. Remember that stuff?
A quick test under running water resulted in water beading off both boots like car wax. Not sure how much confidence I have in water based waterproofing. It worked or seems to. I’m wondering how long it will hold up. The real test will be on the fringes of the Everglades and getting the trash can to the curb. Check out the short video below if you want to see what happened. -13
My search for boots. What a change in experience over the past 40 years or so. I used to be in a place where I had access to multiple individuals wearing the best boots available at the time. Shopping for boots back then involved asking lots of questions to those who had them on their feet as we spoke. Checking out company claims then trying on a few prospects in store until I found what worked best.
2018 the search for new boots is much different. I’m no longer around multiple individuals with the best boots and trustworthy opinions. I’m surrounded by bare feet and flip-flops! Now if I need an opinion on boots I have to watch a video if I can find one or read a rating posted online. Given the nature of corporations to censor bad ratings, good rating sources must be scrutinized. Sucks not being able to ask the person wearing them the questions I’d like to.
Most retail stores won’t carry the kind of boots I would buy. They’re more of a speciality and much too expensive to have sitting around collecting dust. In the past there were only a few places that would sell them. With the internet I haven’t found any local stores that carried any of the boots I’d considered. They were only available online. That leaves me ordering boots online. If they don’t fit ship them back then order the next size or a completely different boot. Don’t like it much but that’s modern shopping.
I’m very picky about my boots. My opinions began to form in the 1970’s. From first hand experience as a Boy Scout on local hikes to my favorite, advise from infantry soldiers and pilots returning from Vietnam. I can still spit-shine boots if I have too. You? There is lace breaking, eyelets tearing out, soles falling off, laces caught in pedals, foot rot, leather or nylon/leather combo issues, vents or not, zippers and more. I could never have imagined all the possibilities of failure or discomfort, it pays to ask questions. I was really lucky.
My preferences then evolved from experiences responding to emergencies with a rescue squad, fire department, ambulance service and some related type side jobs. I no longer look for daily wear boots with NFPA ratings, nothing else has changed. My requirements are few but hard to find in one boot. Fit, comfort, materials, reputation, durability, confidence, performance and no excuses.
My requirements narrow the choices quickly. Goodyear welt fully sewn and a Vibram brand outsole. A heat fused sole as seen on most boots, once separated from the boot renders the boot useless. Unrepairable! Goodyear welt soles can be repaired multiple times. Can also be field repaired with the right materials. One should know how to fix one’s boots and have spare. I’ve never had a Goodyear welt sole fail me. Every pair of heat fused/glued boot or shoes I’ve tried failed.
Laces. How laces pass through and attach to the boot is also a major factor in my boot choice. Only two types of eyelet are acceptable. One or two piece eyelets or a loop type speed lace combination. Never, ever, hook type speed laces. One pair of boots 30 something years ago taught me everything I needed to know about them.
If I had a pair I would demonstrate the issues on video. But I made a vow then that I would never buy another pair of boots with them and support that crap ever again. Anyone who has the responsibility of life and property as a job task, hope the following helps you.
My why- never again of hook speed laces. The hook in the photo above is a good example. It’s the first hook located at the top of the boot. Items can catch that hook and pull it outward forcing the top of the boot inward flipping the lace off the hook requiring the boot to be tied again. These hooks can also be bent outward so the lace won’t hold or bent in trapping the lace preventing it from being untied. When attempting to bend it back into place the hook breaks. Also, the placement of the lace make the hook pull the boot body outward and from above. Eyelets pull lower and do not cause the inward motion caused by the hook.
Actual never again with the speed lace hooks come from emergency calls I was working. I like many saw the speed laces and thought it would be great to be able to put my boots on faster when a run comes in. Until several in field experiences changed my mind.
On the roof of a house about to lower a patient down a ladder, the wire part of a Stokes litter catches the top speed hook, flips it out, unties my boot. Pain in the ass I thought as I quickly tied the boot. Good thing there were others around it was doing CPR compressions. Didn’t give it much thought after that. Seemed like not such a big deal at the time just a hassle.
Not long after that experience I had another cardiac patient untie mishap. Doing compressions on an arrest I had to quickly brace my foot on the gurney to keep from falling when the ambulance made an evasive movement to avoid an accident. I was trying to get my footing on any part of the gurney I could. As I moved my foot the top speed hook caught on the gurney and untied it instantly.
Once part of the hook system comes unlaced it all goes. That time I was pissed off. Swore off the boots “never again!” and casually started looking for another pair.
But I didn’t get the message or move quickly enough. About a month after that I’m chest deep in Spring Creek with a patient clinging to the bridge foundation. I don’t know what’s under the water but the lace hooks at some point catch on something. Can’t reach it by hand without going under water. Not a reasonable or safe option at that point. Moving my foot around didn’t work so I pulled hard as a could.
It felt like I ripped the boot. Couldn’t see anything until we got out of the water. The patient was packaged at that point all that mattered was getting up the embankment into our ambulance. The way up the embankment was the last time I ever wore boots with speed laces. On our way to the place where we get back to the road I noticed that two of the hooks were bent. During a pause as we were preparing to go up the embankment I had the bright idea to bent the hooks back and broke them both.
So, that is the why, of the never again, with speed lace hooks. There are more problems I’ve seen over the years when other people were wearing them. On the opposite end I’ve heard from many people over the years how much they love their speed lace hooks. I wonder how much they’d like them if any of that was happening while they were being rescued. Can’t do that to anyone or myself ever again. It’s hard to believe those things have made it this far on boots.
Shank is also a must have. Prefer metal over plastic. Working on a ladder or pushing a shovel you will tell you very quickly if you have them. The M.E.B has a fiberglass shank. We’ll see how that works out.
Leather is a must, some nylon is also acceptable for hotter climates. As much as I’d like to have vents I have never found them practical in any application. In some of the driest locations I’ve been there is still a need for the ability to walk through shallow bodies of water. I’d rather have a boot be a little warm and dry and have to change sweaty socks than worry about wet feet for the shift because I stepped in a puddle of possibly contaminated water in boots with vents.
That was a long ass winded way to get to this place wasn’t it? The Danner Marine Expeditionary Boot has what I’m looking for. Snug, comfortable out of the box. No excessive foot movement within the boot that needs to be filled with insoles and socks. There is enough head-room over the top part of my foot to allow comfortable movement/flexing of my foot and toes. Like a glove fit. I did add *arch support like I do with all my footwear it was no surprise.
Leather/Cordura outer for durability and comfort in hotter climates like we have in Florida. A Gore-Tex liner so I can keep my feet dry when the water isn’t deep enough for rubber boots. We often have storms that leave standing water that require wading. Eyelet and loop speed lace combination works great. It’s easy to fine tune the laces.
Goodyear welt construction with a replaceable Vibram outsole. Danner says this boot is recraftable meaning they can repair the boot but not in every case. Based on past experience a good cobbler may also fix issues if the factory wasn’t able or not available. Then there is a USMC reputation for durability and confidence when my or someone else’s life depends on it.
I made notes of wearing the boot in the blog Marine Expeditionary Boot: Notes of the First 7 Days I’ll make an update video/blog in six months. We’ll see how the boots are holding up and if my opinion changes. Also there is a video review below check it out. -13
*NOTE: Spenco Total Support Max will not fit this boot. After trimming the insole to match the factory insoles I attempted to put one into the boot. With or without the laces in place it was so difficult to get into place I was sure I would either break the plastic support of the insole or the edge of the plastic support would tear the inside of the boot or liner.
The insole seems like it might be too wide or inflexible to work properly with these boots. I was able to angle them into the boot after much trying, aggravation and fear of damaging something during the process. Once in the boot it was clear it would not work in any way at all. In place the insole wanted to push up down the length in the middle as if it was being folded in half. Not a drastic bend, just a small raised area from lateral compression making them unusable in the M.E.B.