Easy Camp Huntsville 500 Tent

CAMP DOWN THE RABBIT HOLE

I have not received compensation in any way for the video or this blog post.  I put this up because I could not find a non company post or video about this model of tent.  I want to provide useful information for those considering buying one.

IMG_6531

Another addition to Camp Down the Rabbit Hole is the Easy Camp Huntsville 500 5 Person Tunnel Tent.  It’s a 10′ x 15 1/2′ tunnel tent.  The tent comes in three pieces, the outer part of the tent, considered the rainfly, the floor and the interior enclosed room.  The rainfly is made from 190T 100% coated polyester with taped seams, the enclosed room from 100% uncoated polyester, the floor is 100% polyethylene.

There are five windows, two doors and vents.  The main door has two zippers with Velcro tabs to attach the bottom to the rainfly and a double zipper screen panel.  Both parts can be rolled up to the top of the entry and be held in place with toggles and loops.  There are two grommets on each corner of the door so that it can be held open with poles to act as a shade over the screened area.  On either side are small mesh screen vents that are held open with foam and fabric arms.  The side door also has a two zipper closing system where the bathtub floor can fold out flat.  There is no mesh screen.  The back or rear of the tent has a screened window that zips closed from the outside.

IMG_6525

Main entry, ventilation sleeves, vinyl window

Four of the windows are vinyl with no screen or way to open them.  Fabric covers for privacy can be opened or closed by separating them from the Velcro tabs.  The interior room insert is meant to create a separate room in the back section of the tent.  It is held in place with toggles attached to rings with elastic.  While it can offer privacy and an alternate to the open floor plan I don’t like it much.  It is not snug fitting to the sides of the rainfly.  When put in place there is about 6″ of space on the sides, top and back.  That is a lot of space lost.  Sometime in the future I may disassemble it so that only the door side attaches to the tent.  Then it would be useful.

IMG_6542

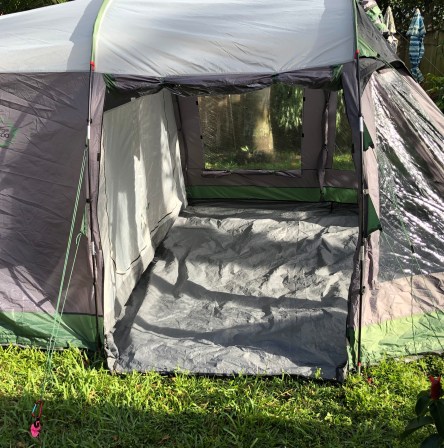
Main entry open, view to back of tent, ventilation vents

LS AID STATION

There are several reasons I choose this tent.  My main reason was to set it up as our heated or air conditioned in camp aid station.  There is enough space for two cots or stretchers on saw horses, medical supplies and equipment.  The side door floor folds out flat so that if hard plastic or plywood flooring was added a gurney could be wheeled in instead of carried.  And, it makes it easier to hand carry without having to step over the fabric threshold of the main door.  The vinyl windows don’t open making it easier to heat and cool without modifying them.

IMG_6548

View of interior room insert

I have changed a some things and added a few.   Two 8″ ventilation hose sleeves were added to facilitate use of a heater or air conditioner.  Velcro was sewn across the bottom of the rear window closure to reduce air exchange.  I sewed the floor onto the rainfly walls to keep the insects and unwanted wildlife out.  Velcro was also placed at the bottom of the side door.  The retaining straps that ran across the floor to hold the sides in place were removed so that the floor could expand and pull tight.  They had been placed there to prevent the sides from splaying before the floor was sewn in.  The tent seals up good.

IMG_6555

View of side door with floor folded down

Set up is easy enough that one person can do it in about 30 to 35 minutes.  There are 14 stakes for the tent and 14 for the guy lines.  I’ve had the most success setting it up by my self by laying the tent out so the footprint is mostly in place, staking the back corners down, then staking the front entrance center guy line.  Once those are in place the three fiberglass color coded poles are pushed though the sleeve then the ends are put over the metal pins connected to the tent body.  Moving from back to front the tent will begin to stand up and stay in place.

IMG_6528

Front entrance, taper is visible

Next the tent body stakes are placed.  To keep the tent in line stake and connect one side then move to the other.  Note the front entrance corners are tapered from the place where the poles connect making it a little difficult to line up without them shifted to one side or another.  I leave the front for last.  It seems easier to line the front up with the sides.  Although this tent is not heavy duty it will work well for the occasional use.  I’m satisfied how the modifications turned out and the tent itself.  Questions and comment are always welcome.  Check out the video below.  -13

Bass Pro Eclipse 6 Person Cabin Tent

I have not received compensation in any way for the video or this blog post.  I put this up because I could not find any post or video about this model of cabin tent.  Plus I want to provide useful information for those considering buying one.

CAMP DOWN THE RABBIT HOLE

I purchased two of the Bass Pro Eclipse 6 person cabin tents for a couple of reasons.  One, Camp Down the Rabbit Hole could offer quarters for housing one or two individuals for our alliance of like minds for camping.  Two, to be prepared with temporary quarters in the event our home was damaged in a natural disaster or we had evacuated for any reason.

IMG_6482

The tent is constructed with 190T polyester with a 600mm PU coating.  It has a bathtub style floor made with 120gm polyethylene.  There are two triangle mosquito net ventilation panels in the roof.  Four mosquito net windows with zip up privacy shades including the door.  The door has a double zipper and is roomy enough to walk through wearing your load bearing equipment.  There is also a port on the door side for electric power.

window

Window with privacy panel down for demonstration. Panel is usually neatly rolled up.

The footprint is 9′ x 10′.  The propaganda states that the floor plan is big enough to house to queen size beds and 6 persons.  When I’m in the tent it seems to me that it is more suitable for one or two adults, one maybe two camp chairs, a roll top camp table, some personal gear and a portable heater or air conditioner.  Not much else.  This would depend on how everything was organized.

IMG_6474

Fabric plenums.

1A76CF1F-4FA7-40CF-8E8A-BEAECAF40C8C

Vinyl window panel in place.

I made a few modifications to make it more usable.  Two fabric plenums were added for interior or exterior air conditioning or heating.  Vinyl panels were added using Velcro to quickly and easily attach or remove them.  The window coverings allow the privacy panels to be lowered providing a way to see outside and keep the heated or air conditioned air inside.  The triangle roof panels were also covered with the clear vinyl so they would seal up the tent yet allow light to pass though.

0291C320-7A9F-4665-B809-6C6EF96564A5

Pole elbows

21F00225-18AF-404F-9014-B87CD1B63242

Roof crossmember tie off point

The tent is set up using four metal and two fiberglass shock corded poles.  The fiberglass poles are used on the roof to give it strong arch support. While the metal poles support the fiberglass roof poles and sides of the tent at each corner with a plastic elbow.  Each corner elbow is marked with a 140° mark.  This is where the metal poles go.  The other end is too small for them and where the fiberglass poles attach.  The fiberglass poles cross at the top and are tied in at the center.  When putting the poles in place there is a metal pin attached at the corners that goes into the end of the pole.

PIn

Corner pole pin

The rainfly has a quick release buckle at each corner that adjust the tension of the fly.  There is also a pole that attaches to the rainfly over the door to maintain it’s shape and to offer an awning like structure.  The floor outline requires 6 stakes, the rainfly needs 7.  The rainfly must be used for stability.  It has all the attachment points and guy lines.  It takes about 15-20 minutes of uninterrupted time for one person to set the tent up.  Also of note is that the only place there is seam tape is the rainfly.  None of the seams on the tent body are seam taped.  I’ve only experienced mild rain and cannot tell how it performs in a heavy storm.

This video has mostly the same information and footage of the set up.  If you have experience with this tent or have questions post them here.  -13

Emergency & Disaster Preparedness – Bedside Commode / Toilet

Bedside commodes, a cost effective, multi-use way to collect human waste.  I’ve tried many different portable commodes from the ones that contain fresh water for flushing to the 5 gallon buckets with a toilet seat adapter.  I didn’t like any of them.

The water filled commodes require one to find a place to dump the liquid waste and resupply with fresh water plus the blue chemicals required.  The 5 gallon bucket type seat is too small and are prone to tipping over while in use.  Neither of them seem to account for men using them.  In order for the number two the reach the container the number one will be pressed onto and touching the collection bowl.  Not a good sanitary situation.  Simply, gross and nasty.

Those experiences led me to the bedside commodes typically used for medical purposes.  To start off, although the space is limited I don’t end up touching the bowl with my private parts.  A big plus for me.  The commodes have different features that make them very useful.

IMG_6504

Bedside commode over in house toilet

The commode is designed to use bedside for those who are convalescing in the home so they don’t have to travel far for relief.  The legs are height adjustable to make it easier to move onto it from a bed or place it over a bathroom toilet so that one can benefit from the arm rest.  Some arm rest are movable so that it will make it easier to move from a bed or wheelchair.

BUCKET BOWL

Covered bucket bowl with lid and liner.

They all have a covered bowl that uses disposable bags to collect waste and a splash shield.  The splash shield is used when the commode is placed over a toilet to funnel the waste into the bowl below.  This same configuration can also be used in combination with a lined 5 gallon bucket or in-ground hole or trench latrine.

SPLASH SHIELD

Splash shield

There are many types of bowl liners available.  I usually get the kit form that has the waste collection bag that contains the powder that causes the liquids to gel that once full can be placed into the included zip closed containment pouch.  I also use the bulk packaged liners designed for the bedside commodes then add the gelatin powder for the liquids.

FIVE GALLON

Splash shield, 5 gallon bucket combination

Currently we have  5 of these commodes.  One for each tent so one doesn’t have to travel through cold or rain soaked late night calls of nature.  Also one for each of our designated latrine tents.  Mostly they’ve been used for camping.  We have had one occasion to use them in the home when the main sewer drain line was broken by a tree root.  It took less that 10 minutes to get them out of storage and put in place where we used them for three days until the pipe was repaired.  Fortunately no one has had to use them for medical issues.

IMG_6492

Commode in our pop-up latrine tent

They are available at any home medical supply store, Freecycle Network, or from Craigslist.  They can be priced, depending on features, from little over $100.00 to free.  Whatever the price paid they are well worth having on hand.  On the topic of camp sanitation a good reference to have on hand is the military field manual FM MED 593 on field sanitation.  It has lots of good information for setting up different camp latrines.

I made a short video that shows set ups and features of the different commodes we use.  Let me know how you set up and what your experience has been with camp and emergency sanitation.  -13

Esstac 556 Kydex Magazine Insert

I receive no compensation for the video or blog post.  I’m posting this because I want others to know more about the product.  Preparedness is very important.


OLYMPUS DIGITAL CAMERA

If you’re like most American patriots you have the desire to be ready to defend your naturally born rights, family and property.  To do so requires owing and being proficient with capable firearms.  Good firearms and training mean basic ammunition load-outs, a way to carry and retain them on your person.

Alice01a (1)

Nylon ALICE LBE post Vietnam

When I first started using load bearing equipment(LBE) it was in the mid 1970’s using ALICE LBE.  ALICE magazine pouches work great but they to create unwanted bulk when worn forward of the lateral midline of the body.  Very much like we see now with the magazines being placed front and center on chest rigs.


IMG_5503

ALICE magazine pouch converted to PALS attached to an Air Force Defensor Fortis Load Carrying System

I no longer use the ALICE LBE unless it’s been converted to the Pouch Attachment Ladder System(PALS).  The ALICE magazine pouches are still on my LBE located in a more convenient place.  Their primary place has been taken by military surplus triple side-by-side pouches.


IMG_6520

Surplus triple side-by-side magazine pouch.

These pouches are fantastic for keeping a low profile but suck for shifting magazines or resupply.  They don’t hold their shape to maintain an opening that would make is easy to place a magazine in them without looking and two hands.  I had considered making some kydex inserts myself but don’t have a shop set up to make them to my quality standards.  That fact left me searching for something commercially made.


IMG_6518

Esstac 556 KYWI magazine insert.

There are several brands and makers out there, the prices vary considerably.  For the price I decided to try the Esstac 556 KYWI.  After several months of use I decided to purchase more.  They have a shape that once placed into the magazine pouch will snugly hold onto popular 30 round magazines such as the Troy and Pmag brands and of course USGI mags.  The insert has the hook part of hook & loop attached  to be used with their brand of magazine pouches and a drain hole in the bottom.


IMG_6522


The insert keeps the pouch open so that I can load the pouch without looking or having to use two hands.  The edges of the kydex are not what I’d call finished.  Meaning raw 90° edges.  At first I thought this might catch the edges of the magazines but it has not.  If it ever gives me a problem I’ll hand smooth them to a desirable angle.  So far the unfinished edges seem to help hold the insert in place.


IMG_6516


I’m satisfied enough with them to have all my triple pouches outfitted with them and a few spares.  Keep in mind that there are different height sizes depending on what you need.  Pay attention if you order some.  They also have them for 7.62 and pistol magazines.  I purchased mine from SKD Tactical however they can be purchased directly from Esstac.


Their use is demonstrated in the video.  I included an upside down shake test like you see in other review videos.  I however don’t plan on pulling off acrobatics in the field by doing somersaults or hanging upside down like a bat.  It has been my experience that the magazines will not dislodge from the pouch when jogging from one position to another or fly out when rapidly going prone.  Let me know if you’ve had a different experience with them or use something different.  -13

BMT Mooner J38-5 Moon Clip Loader

I receive no compensation for this post, this is my personal opinion and experience.  I’m sharing this because I think it may help people be more satisfied with their moon clip equipped revolver.

This post is for anyone with a revolver that uses moon clips.  Loading and unloading moon clips by hand can be a big hassle.  Sometimes simply loading or unloading can bend the clip making it useless.  With the BMT Mooner J38-5 I can load or unload rounds in seconds with a single twist of the device.  It is amazing how well the device works.  I made a video of this model since I couldn’t find one online.

This model is for the Smith & Wesson 5 shot J-frames.  There is another model available for the 5 shot J-frame as well, if you go to purchase one make sure you contact BMT to insure you get the right one.  There are also many more models for various popular revolvers on the market.  The cost for my J38-5 was around $100.00.  I couldn’t be more satisfied with the device.  -13

The link for the moon clip is http://www.bmtequipped.com/index.php

Front Yard Food Garden Now “Legal” in Florida. Short Rant!

Photo by Pixabay on Pexels.com

I was not aware of this until I read the link below.  Food gardens are now legal in Florida.  Never knew there was an issue with them because there shouldn’t be.  During World War 2 gardening was encouraged.  I’d like to know what kind of idiot would vote to make front yard food gardens illegal.  Only an idiot would support something that stupid.  Can we bring back tar and feathering?

Good on the couple and for the Institute For Justice suing Miami Shores.  Shame on the super lazy and nearly good for nothing Florida Supreme Court for not hearing the case.  Seems like they don’t want to take on cases like this where they’ll have to rule on our constitutional rights.  Enough ranting the good news is plant your garden Florida. -13


Miami Shores Couple Celebrate Beating Ban By Planting Garden

Blank page mayhem is an understatement.  More like total refresh-page, login chaos.  Several weeks ago and last week I tried to login to my WordPress page and this was all I could see.

Screen Shot 2018-08-21 at 8.15.26 PM

The image above is a screenshot of what I would see after logins and page refreshes. I’m sure over the time span hundreds of attempts were made. When I would get the page to load, any click would lead to a page like the one shown.  Looks like a WordPress page without anything.  No possible way to use their help because when I was able to click on it, same blank page.

It was maddening.  To make matters worse all I could find online about the same or similar problem was,  “WordPress White Screen of Death” and “professional debug” references.  Uh-oh!  After what seemed to be my ten thousandth attempt to reach a help page I did.

Not directly.  I searched for WordPress help and followed that link.  Finally I’d located a way to contact them for help on the issue.  Sent a note, then, woke up with a keyboard imprint on my face and computer mouse in my hand.  Wow did my neck hurt.  My face did too the keyboard makes a horrible pillow.  Hope I don’t do that again.  Go ahead and laugh its funny.

Awake it was time to work on 3-D, in the physical dimension projects.  Otherwise known as real life.  Now, not an hour after reading “I checked your site and I don’t see blank page, I see stats page, posts, pages and everything is working as Could you please retest after clearing browser’s cache https://en.support.wordpress.com/browser-issues/#clearing-your-browser-cache. If you still see the issue then please share screenshot https://en.support.wordpress.com/make-a-screenshot/ so we can check and investigate this further.” here it is.  Another blog about, every day life.  Included all the information in quotations it may help someone else.

A reference is made to a “screenshot” in the reply.  Something I’d normally send to aid in clarifying my problem.  The fact I didn’t send one shows me how sleepy I was.  Followed the suggestion to clear the cache and then logged in and it seems to have worked.  I had to search Apple help to learn how to do it.  Not as easy or detailed a process as when I maintain website information on a Windows based PC compared to the way I have to using Apple.

I’ll have to keep using WordPress to see what happens next.  If the same thing happens I’ll try the suggested remedy and see if it solves the issue.  What an experience it was to see the WordPress basic page layout but nothing else.  The screenshot says it all.

For now I’m here writing and working on catching up.  We’ll see what happens next.  -13


Micro Screwdrivers that Work on Eyeglasses!

Finally found something that works for those micro screws used on eyeglasses and other small items. The replacement dash cameras we’re using has two tiny screws that needed a few turns. No problem I thought I’ll get one out of my small screwdriver bag. Wasn’t one there that fit so I checked my eyeglasses repair kit and was quickly reminded I forgot to replace the junk bent ones that had been thrown away.

It also reminded me that I’ve never seen or used a good quality screwdriver for tiny screws.  From the eyeglasses repair kits to the jewelers screwdriver kit none of them held up.  The flat/slot blade always bent and the Phillips blades sheared or should I say smeared off with minimal use.  It was frustrating and maybe why I hadn’t gave the search much effort until recent needs forced me to do it.

Ready or not searching for replacements did not include anything I’d used in the past.  The junk jewelers and repair kit drivers shown above were out.  There had to be a better option but what and where to get it is always the issue.  As much as I would like to shop local I could  spend hours trying to find specialty tools where I live.  Searching the internet for tools led me to Amazon.

Over on the amazon site I consumed up the few hours “saved” looking for the tools online.  Spent a few minutes searching for drivers that met the size requirements then spent hours reading reviews.  The product reviews are priceless.  It is also easy to spot fake reviews.  In my experience the only ones that matter are the lowest with a comment.  Many of them had very useful information that completely influenced my purchase decision.

IMG_4396

Based on what I’d read in the reviews a Wiha 260 Slotted/Flat 1.5mm x 40mm and a Wiha 261 Phillips /PH000 x 40 was purchased.  Each tool was about double the cost of an eyeglasses repair kit.  Wonder how many of those useless screwdrivers I’ve thrown away over the years?

They are what I expected.  Plastic handled screwdrivers with tiny tips with a rotating cap for single handed use.  There does seem to be a quality difference compared to drivers used in the past.  I don’t expect them to last forever based on the size.  The quality so far seems to be good.  After multiple uses on the cameras and all of our sun and reading glasses they seem to be holding up.

I’m certain I could have purchased at least three sets of these over the years and still been better off for the reduced stress level alone.  They fit the hand well are easy to use way better than what was used in the past.  If I can get several years of stress free use it will be worth the peace of mind to have them around.

img_4454.jpg

I’m happy enough with them to purchase more in the near future.  For now these will be kept in our glasses repair kit.  The drivers can be seen in use in the video below.  -13