Bins 2 & 3, Updates 26, 27 and 28. Looks like I’ve gotten behind on update posting. I’ve been so busy completing other projects there has been little time to edit videos and write blog post since late 2019. Mostly everything has been going well in the bins
Over the last several months we’ve gone from hot to cool to more mild daily temperatures. Worm activity slowed down in the heat then they became more active when the cooler temperatures arrived. Conditions in the bins has been good, no foul odors at all. During update 28 I found a roach in bin 3 so I’ll have to make sure to monitor for new born roaches. If they are in there I’ll have to start up a new bin with the existing worms.
We’ve let some food items expire or go bad. Things like jelly, bread and canned chocolate icing. Those have been added over the last several months. The worms consume the coffee as expected. I wasn’t sure about the bread or jelly. The bread and jelly was gone telling me they made it disappear. They don’t consume the potato skins but they do eat the potato off of them. All that’s left is the skins.
I think the trouble I had when I put potatoes in before was there were too many and the decomposition may have been beyond what they would eat. The thing I want to know is if they will eat the chocolate icing. That was put in bin 3 only. Next update is in a few days I’ll get my answer then. Questions? Comments, contact me here. The videos of the updates are below. -13
I have not received compensation in any way for the video or this blog post. I put this up because I could not find a non company post or video about this model of tent. I want to provide useful information for those considering buying one.
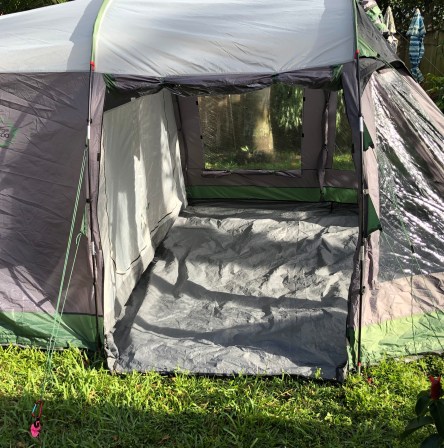
Another addition to Camp Down the Rabbit Hole is the Easy Camp Huntsville 500 5 Person Tunnel Tent. It’s a 10′ x 15 1/2′ tunnel tent. The tent comes in three pieces, the outer part of the tent, considered the rainfly, the floor and the interior enclosed room. The rainfly is made from 190T 100% coated polyester with taped seams, the enclosed room from 100% uncoated polyester, the floor is 100% polyethylene.
There are five windows, two doors and vents. The main door has two zippers with Velcro tabs to attach the bottom to the rainfly and a double zipper screen panel. Both parts can be rolled up to the top of the entry and be held in place with toggles and loops. There are two grommets on each corner of the door so that it can be held open with poles to act as a shade over the screened area. On either side are small mesh screen vents that are held open with foam and fabric arms. The side door also has a two zipper closing system where the bathtub floor can fold out flat. There is no mesh screen. The back or rear of the tent has a screened window that zips closed from the outside.
Main entry, ventilation sleeves, vinyl window
Four of the windows are vinyl with no screen or way to open them. Fabric covers for privacy can be opened or closed by separating them from the Velcro tabs. The interior room insert is meant to create a separate room in the back section of the tent. It is held in place with toggles attached to rings with elastic. While it can offer privacy and an alternate to the open floor plan I don’t like it much. It is not snug fitting to the sides of the rainfly. When put in place there is about 6″ of space on the sides, top and back. That is a lot of space lost. Sometime in the future I may disassemble it so that only the door side attaches to the tent. Then it would be useful.
Main entry open, view to back of tent, ventilation vents
There are several reasons I choose this tent. My main reason was to set it up as our heated or air conditioned in camp aid station. There is enough space for two cots or stretchers on saw horses, medical supplies and equipment. The side door floor folds out flat so that if hard plastic or plywood flooring was added a gurney could be wheeled in instead of carried. And, it makes it easier to hand carry without having to step over the fabric threshold of the main door. The vinyl windows don’t open making it easier to heat and cool without modifying them.
View of interior room insert
Toggle attachments
Room divider
I have changed a some things and added a few. Two 8″ ventilation hose sleeves were added to facilitate use of a heater or air conditioner. Velcro was sewn across the bottom of the rear window closure to reduce air exchange. I sewed the floor onto the rainfly walls to keep the insects and unwanted wildlife out. Velcro was also placed at the bottom of the side door. The retaining straps that ran across the floor to hold the sides in place were removed so that the floor could expand and pull tight. They had been placed there to prevent the sides from splaying before the floor was sewn in. The tent seals up good.
View of side door with floor folded down
Set up is easy enough that one person can do it in about 30 to 35 minutes. There are 14 stakes for the tent and 14 for the guy lines. I’ve had the most success setting it up by my self by laying the tent out so the footprint is mostly in place, staking the back corners down, then staking the front entrance center guy line. Once those are in place the three fiberglass color coded poles are pushed though the sleeve then the ends are put over the metal pins connected to the tent body. Moving from back to front the tent will begin to stand up and stay in place.
Front entrance, taper is visible
Next the tent body stakes are placed. To keep the tent in line stake and connect one side then move to the other. Note the front entrance corners are tapered from the place where the poles connect making it a little difficult to line up without them shifted to one side or another. I leave the front for last. It seems easier to line the front up with the sides. Although this tent is not heavy duty it will work well for the occasional use. I’m satisfied how the modifications turned out and the tent itself. Questions and comment are always welcome. Check out the video below. -13
I have not received compensation in any way for the video or this blog post. I put this up because I could not find any post or video about this model of cabin tent. Plus I want to provide useful information for those considering buying one.
I purchased two of the Bass Pro Eclipse 6 person cabin tents for a couple of reasons. One, Camp Down the Rabbit Hole could offer quarters for housing one or two individuals for our alliance of like minds for camping. Two, to be prepared with temporary quarters in the event our home was damaged in a natural disaster or we had evacuated for any reason.
The tent is constructed with 190T polyester with a 600mm PU coating. It has a bathtub style floor made with 120gm polyethylene. There are two triangle mosquito net ventilation panels in the roof. Four mosquito net windows with zip up privacy shades including the door. The door has a double zipper and is roomy enough to walk through wearing your load bearing equipment. There is also a port on the door side for electric power.
Window with privacy panel down for demonstration. Panel is usually neatly rolled up.
The footprint is 9′ x 10′. The propaganda states that the floor plan is big enough to house to queen size beds and 6 persons. When I’m in the tent it seems to me that it is more suitable for one or two adults, one maybe two camp chairs, a roll top camp table, some personal gear and a portable heater or air conditioner. Not much else. This would depend on how everything was organized.
Fabric plenums.
Vinyl window panel in place.
I made a few modifications to make it more usable. Two fabric plenums were added for interior or exterior air conditioning or heating. Vinyl panels were added using Velcro to quickly and easily attach or remove them. The window coverings allow the privacy panels to be lowered providing a way to see outside and keep the heated or air conditioned air inside. The triangle roof panels were also covered with the clear vinyl so they would seal up the tent yet allow light to pass though.
Pole elbows
Roof crossmember tie off point
The tent is set up using four metal and two fiberglass shock corded poles. The fiberglass poles are used on the roof to give it strong arch support. While the metal poles support the fiberglass roof poles and sides of the tent at each corner with a plastic elbow. Each corner elbow is marked with a 140° mark. This is where the metal poles go. The other end is too small for them and where the fiberglass poles attach. The fiberglass poles cross at the top and are tied in at the center. When putting the poles in place there is a metal pin attached at the corners that goes into the end of the pole.
Corner pole pin
The rainfly has a quick release buckle at each corner that adjust the tension of the fly. There is also a pole that attaches to the rainfly over the door to maintain it’s shape and to offer an awning like structure. The floor outline requires 6 stakes, the rainfly needs 7. The rainfly must be used for stability. It has all the attachment points and guy lines. It takes about 15-20 minutes of uninterrupted time for one person to set the tent up. Also of note is that the only place there is seam tape is the rainfly. None of the seams on the tent body are seam taped. I’ve only experienced mild rain and cannot tell how it performs in a heavy storm.
This video has mostly the same information and footage of the set up. If you have experience with this tent or have questions post them here. -13
I receive no compensation for the video or blog post. I’m posting this because I want others to know more about the product. Preparedness is very important.
If you’re like most American patriots you have the desire to be ready to defend your naturally born rights, family and property. To do so requires owing and being proficient with capable firearms. Good firearms and training mean basic ammunition load-outs, a way to carry and retain them on your person.
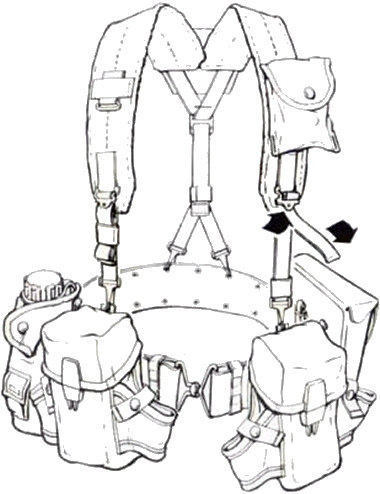
Nylon ALICE LBE post Vietnam
When I first started using load bearing equipment(LBE) it was in the mid 1970’s using ALICE LBE. ALICE magazine pouches work great but they to create unwanted bulk when worn forward of the lateral midline of the body. Very much like we see now with the magazines being placed front and center on chest rigs.
ALICE magazine pouch converted to PALS attached to an Air Force Defensor Fortis Load Carrying System
I no longer use the ALICE LBE unless it’s been converted to the Pouch Attachment Ladder System(PALS). The ALICE magazine pouches are still on my LBE located in a more convenient place. Their primary place has been taken by military surplus triple side-by-side pouches.
Surplus triple side-by-side magazine pouch.
These pouches are fantastic for keeping a low profile but suck for shifting magazines or resupply. They don’t hold their shape to maintain an opening that would make is easy to place a magazine in them without looking and two hands. I had considered making some kydex inserts myself but don’t have a shop set up to make them to my quality standards. That fact left me searching for something commercially made.
Esstac 556 KYWI magazine insert.
There are several brands and makers out there, the prices vary considerably. For the price I decided to try the Esstac 556 KYWI. After several months of use I decided to purchase more. They have a shape that once placed into the magazine pouch will snugly hold onto popular 30 round magazines such as the Troy and Pmag brands and of course USGI mags. The insert has the hook part of hook & loop attached to be used with their brand of magazine pouches and a drain hole in the bottom.
The insert keeps the pouch open so that I can load the pouch without looking or having to use two hands. The edges of the kydex are not what I’d call finished. Meaning raw 90° edges. At first I thought this might catch the edges of the magazines but it has not. If it ever gives me a problem I’ll hand smooth them to a desirable angle. So far the unfinished edges seem to help hold the insert in place.
I’m satisfied enough with them to have all my triple pouches outfitted with them and a few spares. Keep in mind that there are different height sizes depending on what you need. Pay attention if you order some. They also have them for 7.62 and pistol magazines. I purchased mine from SKD Tactical however they can be purchased directly from Esstac.
Their use is demonstrated in the video. I included an upside down shake test like you see in other review videos. I however don’t plan on pulling off acrobatics in the field by doing somersaults or hanging upside down like a bat. It has been my experience that the magazines will not dislodge from the pouch when jogging from one position to another or fly out when rapidly going prone. Let me know if you’ve had a different experience with them or use something different. -13
Bins 2 & 3, Update 25. When opening both bins I noticed the moisture was higher under the cardboard covering. The spiders seem to have been wiped out by the lizard visits. I didn’t see any in either bin. The small white dot insects are still in both bins in abundance seems like the moisture helped. I’d would like to try to capture a few one day and look at them under the microscope. They’re so small they look like tiny moving white dots in the bins.
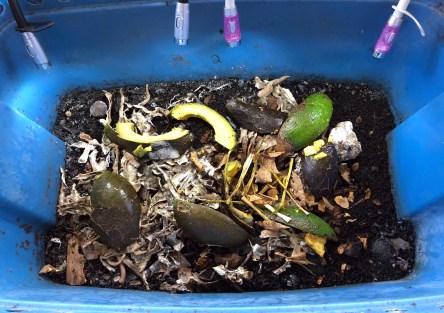
Bin 2 Oct. 29th
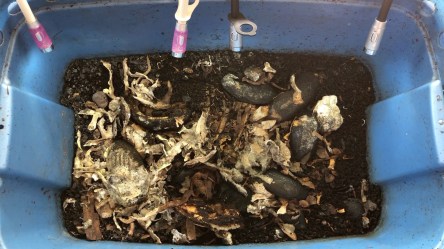
Bin 2 Nov. 16th
The other unidentified insects are also there but no as many as before. The heat may have been too much for them. Bin temperatures were 72.1° F. – 72.5° F. The ambient temperature was 72° F with 56% humidity. I watered both bins to get the moisture up at the surface. The hand sprayer sprung a leak because I left it under pressure and in the sun. Looks like its time for a new one. I used the 1 gallon garden sprayer as a substitute and may keep using that instead of the hand sprayer. I’ll use it next time and see how it goes.
Bin 3 Oct. 29th
Bin 3 Nov. 16th
One thing is for sure the worms really like the avocados. As long as they are not rotted or dried out they devour them. I still think their favorite is the mangoes and fresh greens. It seemed like the cardboard cover is thinning out I’ll add more next time I check the bins. -13
Bins 2 & 3, Update 24. All is well in the bins. Ambient temperature of 86°F, 70% humidity, bin temperature 82.5°F. The bin temp is a little higher than I’d like but there is no where else to keep them. No foul odors. Nothing out of the ordinary. There were few or no spiders. That makes me think there has been a lizard or two dropping by for a few snacks.
I’ve noticed but keep forgetting to mention, the other two insects usually seen in abundance in the bins are hardly visible. I think the continuous air flow and drying of the surface has had an effect on them. Next time I check the bins I’ll add more moisture and possibly add more cardboard in an effort to keep the moisture level higher. Maybe the other insects will flourish again.
Since there isn’t much potato on the potato skins I’ve started adding them back into the bins to simulate leaf litter. I’m also hoping the addition of moisture will keep them from drying out creating a more natural type environment for the worms. I’d like to see more activity at the surface again. Stopped using the fan since there has been small patches of moisture and discoloration on the floor next to it. It’s “winter” here in Florida so the ambient temps should be more mild. We’ll see! -13
Bins 2 & 3, Update 23. Looks like the bins are getting back to normal as well as the local temperatures. The heat wave has let up and the worms are becoming more active. Bin 2 temp was 81.8ºF, bin 3 was 82.2ºF with an ambient temperature of 86ºF, 69% humidity.
No foul odors to report in either bin. Both bins showed signs of the surface drying out. To remedy this I added more cardboard and made sure to push it down closer to the surface. This should help trap the moisture in. I’m sure the constant shop fan blowing on the bins the during the heat wave has contributed to the drying. Next time I check the bins I may add some water to keep it moist enough to keep the worms happy.
There was a gecko in bin 3 as shown in the video. It’s easy to see in both bins how few spiders there are in there. Don’t remember seeing any in bin 3.
These updates have been getting shorter in length since the bins are getting back to normal and I’m not trying much new with them. I’ve also decided to stop adding photographs to the updates unless I want to show something. I’ve been so busy with other projects I don’t have the patients or time required using an Apple computer and phone. Too many steps to do something that I could do much faster on a PC.
If I want to transfer photos and video from my iPhone onto my PC all I do is access the phone, highlight the items I want on the PC and drag them to the folder I want them in.
With Apple I have to open iMovie to get the photos and video to make the video. If I want to use the photos on this blog I have to open photos, transfer them to photos, then transfer them to another folder on my desktop. It’s become too much. Apple is not user friendly they want too much control over my property. Not cool.
I hope those few that do follow this part of my blog understand. It’s also why I make the videos, they have the same details. This blog is a place for me to write notes of the checkup and things I may have left out of the videos, and for future reference should YouTube disappear or the ban me. At least I’ll have some record. New video is below check it out. -13
Bins 2 & 3, Update 22. This is going to be a short update. Last week south Florida was preparing for hurricane Dorian. That created lots of clouds and rain. The lower temperatures brought the worms back to full speed and they devoured waste added from the last feeding. I had made preparations to bring the worms indoors if the hurricane was going to pass thru here but we were fortunate that it did not move into this area.
Gecko hidden in bin 3 handhold.
For update 22 the temperature in bin 2 was 83.3ºF, bin 3 was 81.8ºF with an ambient temperature of 85ºF, 70% humidity. There were no noticeable odors in either bin. We did have a couple of geckos in bin 3 but they fled the disruption. Everything is in the video. My favorite part of the updates are the before and after images that demonstrate how much waste those worms can consume when conditions are to their liking. Video is below. -13
Bins 2 & 3, Update 21. Hard to believe it’s been a month since checking the bins. I’ve been busy catching up on projects, updating supplies and equipment. In update 20 I had placed some pupae into a canning jar to contain them in an effort to identify them as shown in the photos below.
In my mind without scientific proof the photo below shows black solider flies. Wish I had remembered them before they died. I would have let them go to reproduce later so they could have benefited the area.
Bin 2
Bin 3
Bins 2 & 3 were in the same state. The ambient temperature was 88º with a soil temp of 80.9º in both bins. I forgot to look at the humidity percentage. There were no odors or any food waste left in either bin. There was a short break in the ambient temperature the last few weeks due to the volume of rain we had the heat is due to return with highs in the lower 90’s. I fed the bins fresh and decomposing waste. Also added some packing cardboard to see how that turns out. Since the waste used to feed the worms is kept indoors and the bins are kept in a screened in porch where did those solider flies come from? How did they get into bin 2? -13
Bins 2 & 3, Update 20. The heat is still on high in south Florida. There has been small break during the night hours when the temperature reaches the mid to high 70’s. It’s not much but I’ll take it.
As mentioned in my last notes I would gather several of the pupae I suspect are black solider flies and confine them so that if something does emerge from them hopefully it could be properly identified. I put a few into a ventilated mason jar then placed it back into the bin. I’ll leave in there for the next several weeks if nothing happens then I’ll put them in the outdoor compost bin.
The above set of photos are the exact same ones from update 19. I forgot to refresh the weather page so the video has incorrect information for the ambient temperatures. The estimated temperature was 87°F with 89% humidity. It was very wet feeling this morning. My shirt was drenched with sweat before I was finished. Surprisingly the bin internal temperatures were exactly the same as last week.
Bin 2 had no odors nor many spiders. There were worms on the ledge. I think it was getting warm in there. Maybe they were trying to cool down. It looks like all the waste had been consumed. There was a roach(palmetto bug) in there that was dispatched to another place and time. Sure hope there aren’t any eggs in there. Bin 3 had a slight odor from the left over mango. There were a few spiders in there it looks like the heat is effecting them as well. They usually fill the bin quickly once they find a way in.
I’ve managed to burn out one blender feeding the worms. I have a spare in storage but it is buried in our storage unit. I’d have to remove most of the contents to get it. That’s not going to happen anytime soon so I purchased a new one that already smells like it won’t last through the next cycle. I may have to rethink my plan.
I usually put vegetables like carrots that take a long time to decompose in the blender to make it more accessible to the worms. Items like avocados and fruits get cut up and placed in the bin mostly whole. Those items typically don’t need assistance, root vegetables usually do. When I do use scraps put into the blender I place the waste in a thick layer covering half or less of the surface. This helps the waste maintain moisture preventing it from drying out before it gets consumed.
I’ll check in with the bins in a week, week and half and see how things are progressing. -13
Better late than never? Over the last few years I’ve had to bring the worm bins into the house due to hurricanes expected to hit our area. I roll them over a ramp from the porch into the living room where they stay until the danger has past. Each time the house was infested by spiders within days. I think they detect air movement and move to those areas then start spinning webs.
After a friend was bitten on the forehead by an unknown species of spider I’ve been reluctant to bring them indoors for fear of someone getting bitten. There are many species of spider found commonly here in Florida that we frequently encounter. The bite wound my friend experienced left a scar that cannot be denied. It’s very concerning to not know what species it was.
Unknown species spider bite wound. Florida, USA
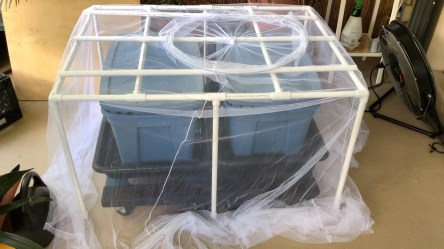
With that knowledge I couldn’t put others living here at risk. After thinking on the topic for a while I came up with the idea to make a PVC pipe frame then cover it with mosquito netting to contain the spiders within the confines of the enclosure. The PVC pipe should work well for this purpose, it won’t rust, is lightweight and can be put together without fasteners or glue. That makes the frame collapsible for easy storage and portable.
I chose mosquito netting made for a bed. It’s not heavy duty but should work well. As best as I can tell the netting does not contain any insect repellent that may interfere with or kill the worms. I’ve seen people buy mosquito netting for outdoor/camping use that killed their insects because the net contained repellent. I chose this particular net because it completely encloses the space without any openings. Plus the net was less than $12.00 on Amazon. An affordable way to experiment.
1/2″ 90° Tee Elbow
1/2″ Tee
1/2″ Slip Cap
To construct the frame I used 1/2″ pipe and fittings. I used 90° elbow tees on the corners, regular tees for support members and legs as well as slip caps to cover and protect the leg ends from damage and insects or wildlife. All fittings are dry fit so it can be taken apart easily since it won’t be used much. The cost of the pipe and fittings was $20.94 purchased from Lowes.
I started by measuring the areas I wanted to cover then cut the pipe to size. Once I cut them I put the frame together. Once together I cut the top cross-members to fit the frame. I installed the cross-members without fittings since it would be much easier and give me the ability to move them as necessary.
Net sag. Lattice may be the solution.
Once I had the netting installed it became obvious that a piece or two of plastic lattice would work well to help support the net to keep it from bridging the moat. The lattice would allow good air circulation. I see scraps in trash piles regularly so the next time I spot some I’ll recycle it for the project.
I purchased enough materials to extent the frame for one more bin setup. If I add another bin I’ll make the extension then. For now I’ll store the materials until needed. Overall I’m satisfied with the outcome of the project. The real test will be to bring the bins inside the house and see what happens with the spiders. The population of spiders is minimal presently so an experiment at this time is premature. Total cost for the project was $32.93. From staging the materials to clean up the project took approximately 40 minutes to complete. I’ll post an update if I test it or modify the project. -13
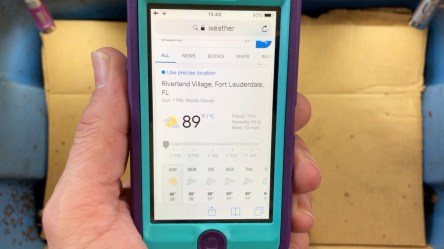
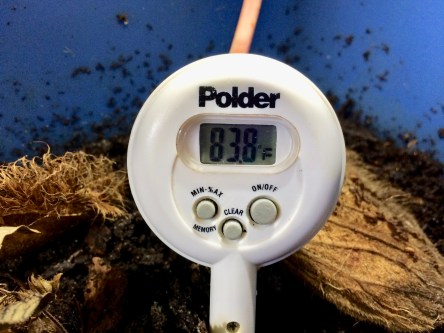
Bins 2 & 3, Update 19. The heat won’t stop. Although the temperature wasn’t as hot as other days it felt like it was much hotter that it was. The ambient temperature was 89°F with 61% humidity. Internal bin temperatures ran from 83.8°F to 83.1°F. It seems like the fan blowing on the bins has had some effect. There were no foul odors. The only smell that seems normal is the light earthy smell. Looks like most of last weeks waste was consumed. Otherwise not much to note about the bin conditions.
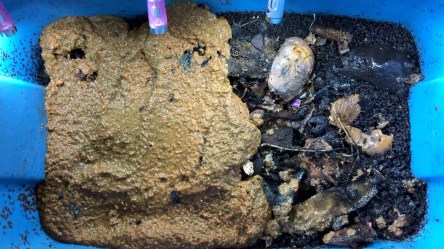
I had forgotten to put a photo of the pupae that attach to the bin walls after I’ve introduced fruit flies. If I leave what appears to be undamaged fruit such as mangos out after cutting the larvae seem to appear out of nowhere when there are no visible flies inside the house. Sure hate to think we’re eating these off the tree with fly larvae already inside.
I think it was last week after feeding waste I had noticed a new species that must have been introduced by me during a feeding. I think I’ve had these bins running for a little over 3 years at this point and have never seen them before now. I have seen them many times in the outdoor compost bins but never took the time to identify them. Since I can’t figure out where they came from my curiosity is up.
I thought they looked familiar but am not sure yet. After looking for answers online I think they may be black solider flies. The website I looked at from Texas A&M directed me to another site that makes me almost sure they’re Hermetia illucens – black solider flies. I’ll leave them in there and see how it turns out. I’m thinking of isolating several of them inside the bin for added assurance. If they hatch out in isolation that should get me the answer I want.
I recently ordered a cheap bed mosquito net from Amazon. My plans are to make a frame from PVC pipe to enclose the bins. Then cover the frame with the mosquito net. The frame will allow me to keep the moat from being bridged by the netting. This is the best idea I can come up with for now. The worms are surviving in this heat but I’m not sure they are thriving in it. If this plan works I’ll be able to move them into the air-conditioned house.
We usually bring them in for hurricanes. By doing this the spiders detect air flow then move out into the house. I’ve never photographed the webs that show up after a storm but find them everywhere shortly after. However I’ve been reluctant to bring them in since my friend received a spider bite getting into her van in December of 2017. The photo below is the bite wound as it was healing. Unfortunately we were never able to figure out what species spider it was. There are several commonly found here, it could have been any of them.
Why I wear gloves when working in the bins.
She is fortunate to have not been bitten on an eyelid. With this in mind I can’t risk infesting the house with unknown species that may impact residents of the house. My plan for the mosquito net would prevent the spiders from getting into the house reducing the possibility of a bite wound.
The bins are a rich source of small insects for the spiders which somehow find their way into the screened in porch. Since the heat wave I’ve been motivated to get my butt in gear and do something about it so they can be brought in safely. I’d rather sacrifice the worms than see someone injured. The next step will be to go to Lowes and pick up the pipe and fittings. I’ll film a video of how I make them. The new video is below. -13