The simple vacuum sealer. One of my favorite appliances made for home use. I’ve always wanted to have the ability to vacuum package my own stuff since I opened one in the 70’s. It might be survival supplies, clothing I want to stay dry and compact, or something good to eat. Around here seems like the sealer gets used for non-food items as much as repackaged food or snacks.
Sometime in 2016 I started to update our fire starting kits. In the past my fire starting kit included military surplus matches/trioxane fuel bars/toilet paper packet, flint/steel/char-cloth/extra cloth/in a tin, Bic brand lighter, a Doan Magnesium Firestarter, pine heart wood, magnifying glass, and wildcrafted tender that was constantly in need of replacement.
I always use the lighter first. All the rest of it backup or an aid when the flames needed a little help. The updated kit for everyday fire starting is very small, natural fibre tender, lighter and WetFire if the fire needs help.

The survival fire starting kit has more options based on the many fire starting failures and successes I’ve experienced over the years. I know what does and does not work for me. There is nothing like suffering as a motivator. If at all possible I won’t do without a heat source.
The updated kit is set up to be self contained within an individual survival kit or pack. All of the items within the kit are vacuum sealed individually. Each vacuum package is over size to allow the package to be reused after opening. The length is long enough to allow the end to be rolled up then held closed with a rubber band included in each package.
Not sure if this would work I tested to see if this would be enough to keep out rain or a dunk in water. Part of a paper towel was placed into the package. The torn edge was rolled then held in place with a rubber band. The sprayer on the sink set to high, water blasted on the package from every angle for a minute or so with no leak.
A similar test was set up for dunking. The same package used to test before was used for this test, nothing was changed on the package at all. The package was held underwater in a drywall compound bucket for about thirty seconds to a minute. I held it down by hand and moved it gently in the water to simulate a quick immersion in a body of water. Thinking as if this was in my pocket and I fell into water somehow and was able to get out quickly. Again, the result, dry.
Wouldn’t it be great if I’d filmed it. But no! It was an after thought. Not so much as a photograph. Getting used to that now. Better off doing your own testing for sure. The packing material rolled tightly along with the compression of the rubber band worked much better than I expected.
The contents are mostly modern. I’ve eliminated the old time flint-steel and military surplus trioxane/matches/T.P. The kits may still contain military surplus like a Doan’s firestarter or folding knife since those seem to last forever.
Added UCO matches to the standard book matches and Bic lighter. Anyone who has not seen the testing done on the UCO matches should see it then make up their own mind. If it gets down to lighting a fire with matches I think those are my best chance of getting it lit. They are the only match I know of that will still be lit if I manage to drop it in water.

Various types of tender. A tin of pine heart wood with a high pitch content, cedar and hardwood shavings, alcohol prep pads and WetFire cubes. Magnifying glass and fresnel lens. Swedish Fire steel purchased on sale with either a Camillus military stainless four blade folder or a Victorinox Pioneer knife.

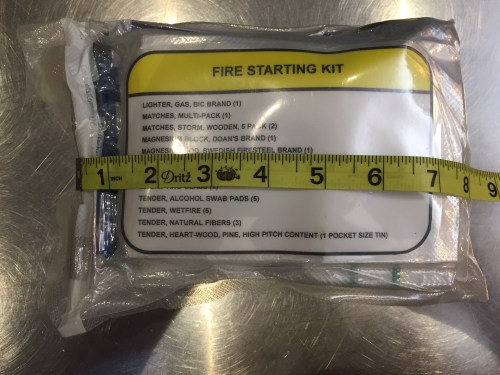
All of it packaged in a waterproof vacuum sealed pouch made at home. It measures roughly 5 1/2″ x 8″, 1lb 3oz or 540g. The kit will never be a problem to keep on hand. The last addition to the kit was a by accident item.
A friend came back from a professional convention and handed me several nylon carry bags. I looked at them, they had cord configured into a backpack. Didn’t think much of the flimsy things so I set them aside. About an hour later a thought smacked me in the head like a hammer.

I grabbed one, folded it a few times, it fit the fire starting kit profile. Like it was planned that way. The thought that hit me was how useful the bag would be in gathering all the small stuff needed to start a fire that is difficult to transport without loosing valuable resources. The thinking was what if the fire starting kit was the only survival item I had on my person a way to carry things would be very helpful.

Sure the bag is made of imported nylon and cordage. The thing is, all it has to do is work well once for a short period of time. If the bag is not overloaded I have confidence it will hold lightweight items for a few days until help arrived or conditions changed. The already made kit and the bag were added to another vacuum pouch then sealed. That way the bag can be retrieved without having to open the fire starting kit if its not needed.
Don’t forget the tear notch! Must have the tear notch no matter what your preference!

Tear notch samples
This video was filmed in early 2017 after getting all the items together. I noticed after making the package in the video I had left the knife out. That’s what I get for not making a checklist. It was not filmed but the knife was added as soon as I moved some of the stuff visible to the right in the video. The knife was covered by some it.
This is a kit I never want the need to use it. Because if I do need to use it, it means something has gone wrong. -13
The video.

Pingback: What? Why? Where? Firestarter Kit Contents -Part 2 | Unit-13 FREMSLT
Pingback: What? Why? Where? Firestarter Kit Contents -Part 1 | Unit-13 FREMSLT