Bins 2 & 3, Updates 26, 27 and 28. Looks like I’ve gotten behind on update posting. I’ve been so busy completing other projects there has been little time to edit videos and write blog post since late 2019. Mostly everything has been going well in the bins
Over the last several months we’ve gone from hot to cool to more mild daily temperatures. Worm activity slowed down in the heat then they became more active when the cooler temperatures arrived. Conditions in the bins has been good, no foul odors at all. During update 28 I found a roach in bin 3 so I’ll have to make sure to monitor for new born roaches. If they are in there I’ll have to start up a new bin with the existing worms.
We’ve let some food items expire or go bad. Things like jelly, bread and canned chocolate icing. Those have been added over the last several months. The worms consume the coffee as expected. I wasn’t sure about the bread or jelly. The bread and jelly was gone telling me they made it disappear. They don’t consume the potato skins but they do eat the potato off of them. All that’s left is the skins.
I think the trouble I had when I put potatoes in before was there were too many and the decomposition may have been beyond what they would eat. The thing I want to know is if they will eat the chocolate icing. That was put in bin 3 only. Next update is in a few days I’ll get my answer then. Questions? Comments, contact me here. The videos of the updates are below. -13
What could make a tent better when camping, working in remote locations or during a natural or man-made disasters? The ability to keep the resident comfortable. That is, cool in hot weather and warm in cold climates. As well as keep out insects and undesirable wildlife such as snakes. I’ve been using tents to reside in at infrequent intervals for various reasons since the mid 1970’s. My experience has taught me that the value of getting a good night rest and recuperation cannot be overstated.
Over the last 6 months all but 1 of our 20 year old tents have been replaced. That means we have tents in our inventory without air conditioner hose plenums or sleeves. Those sleeves would allow either an internal or external air source to blow or draw in air for cooling or heating. In the past if a screened window on a tent would zip closed to help keep in cool or warm air that is what was used. Keeping the window cover closed always kept occupant from seeing what was going on outside. I never did like that.
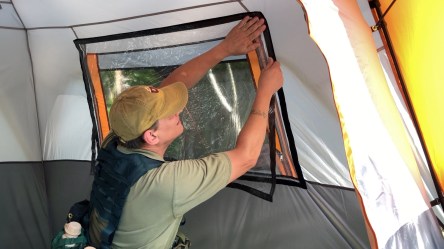
Window with Velcro sewn on
Being unhappy without a view I decided to change how I modify the tents. New tents with screened windows will now be outfitted with clear vinyl removable panels. For this project Velcro brand hook & loop will be sewn to the tent and vinyl panels. That way the original function of the window will still work as designed. The Velcro will allow changes to easily be made in minutes.
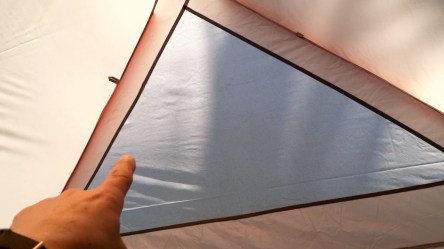
One of two triangle roof vents
The Eclipse tent also has two triangle screened panels on the roof. Those panels will be placed on the outside of the tent. That way it will help prevent sagging into the interior space. The ventilation sleeves will be 8″ to accommodate 6″ – 8″ hose typically used for smaller home size air conditioners and heaters. At the end of the hose sleeve will be a cinch cord that can be tightened around the hose to reduce air infiltration and keep the unwanted out.
Ventilation sleeves
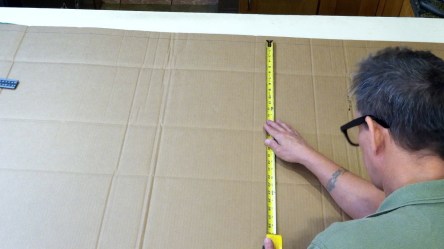
The first step for this project was compile a list of materials needed. Next, obtain them. I had the 210D nylon oxford fabric that I used for the ventilation sleeves on hand. I used about 1 1/2 yards at a cost of $4.99 a yard. The Velcro needed was about 20 yards per tent, cost for 50 yards of the hook and loop was about $100.00.
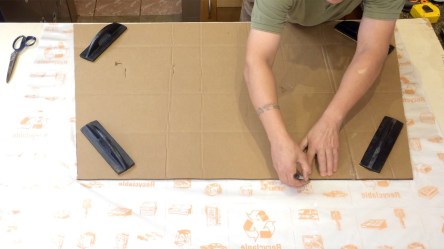
Making a template
The vinyl was purchased from Joann’s Fabric. I went to the store to buy some but they didn’t have a continuous length of 14 yards. I then looked for more locally on their website. Turns out that was a really good thing. If I had been able to get the 14 yards in store it would have cost $70.00. Making the purchase online I was able to pick the order up at another store with a cost of $43.00. That was a full 25 yard, 54″, 8 gauge roll. A really good deal, plus I’d have some left over for other projects or repairs.
Layout cut lines using a template
Using template to mark sew lines onto the tent
Once I had all the materials on hand I was eager to complete the project. I made templates so it would be easier to duplicate the vinyl panels for the window and triangles. Each panel was laid out then cut to size. After that the sew lines could be laid out onto the tent.
Sewing Velcro onto vinyl panels
With the panels cut out and the sew lines marked I sewed the hook side of the Velcro onto the vinyl. I used a Harbor Freight soldering gun I modified to function as a hot knife to cut out the ventilation sleeve hole. I then sewed the ventilation sleeve onto the tent. I learned the hard way that care must be used when sewing them because the fabric had partially been cut on the bias which would make it stretch out of place easily.
Cutting ventilation holes with a soldering iron hot knife.
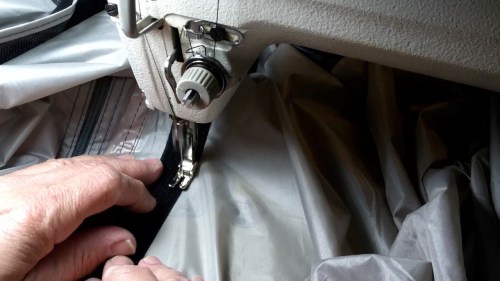
The most challenging part was next. Getting all the tent fabric though the sewing machine arm while the hook part of the Velcro was applied. That part of the project slowed my progress down a lot but it did go quicker than I expected. Once the ventilation sleeves and the window parts were complete it was time for testing.
Sewing ventilation sleeves onto tent wall.
The tent was set up and all the panels were installed. With few exceptions the panels fit well. I did have trouble in a couple of places where the tent fabric had shifted when the sew lines were laid out. Those were easily remedied by shifting the panels slightly one way or another. The project took about 20-22 hours once the materials arrived. The time and financial cost will be well worth it for the comfort level it will provide. This project was fun but I’m glad it is over.
Placing vinyl panel over an open window
I made a video of the project progress if you’re interested. If you’ve ever modified your tent what did you do? How well did it work out? Have a question or comment post it here. -13
Bins 2 & 3, Update 25. When opening both bins I noticed the moisture was higher under the cardboard covering. The spiders seem to have been wiped out by the lizard visits. I didn’t see any in either bin. The small white dot insects are still in both bins in abundance seems like the moisture helped. I’d would like to try to capture a few one day and look at them under the microscope. They’re so small they look like tiny moving white dots in the bins.
Bin 2 Oct. 29th
Bin 2 Nov. 16th
The other unidentified insects are also there but no as many as before. The heat may have been too much for them. Bin temperatures were 72.1° F. – 72.5° F. The ambient temperature was 72° F with 56% humidity. I watered both bins to get the moisture up at the surface. The hand sprayer sprung a leak because I left it under pressure and in the sun. Looks like its time for a new one. I used the 1 gallon garden sprayer as a substitute and may keep using that instead of the hand sprayer. I’ll use it next time and see how it goes.
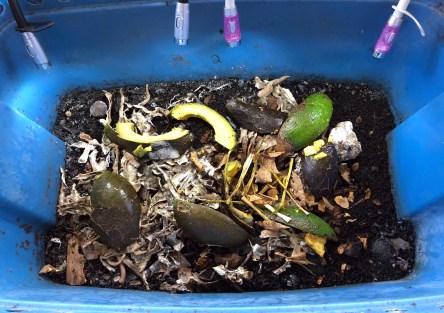
Bin 3 Oct. 29th
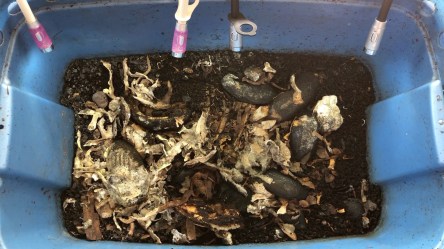
Bin 3 Nov. 16th
One thing is for sure the worms really like the avocados. As long as they are not rotted or dried out they devour them. I still think their favorite is the mangoes and fresh greens. It seemed like the cardboard cover is thinning out I’ll add more next time I check the bins. -13
Bins 2 & 3, Update 24. All is well in the bins. Ambient temperature of 86°F, 70% humidity, bin temperature 82.5°F. The bin temp is a little higher than I’d like but there is no where else to keep them. No foul odors. Nothing out of the ordinary. There were few or no spiders. That makes me think there has been a lizard or two dropping by for a few snacks.
I’ve noticed but keep forgetting to mention, the other two insects usually seen in abundance in the bins are hardly visible. I think the continuous air flow and drying of the surface has had an effect on them. Next time I check the bins I’ll add more moisture and possibly add more cardboard in an effort to keep the moisture level higher. Maybe the other insects will flourish again.
Since there isn’t much potato on the potato skins I’ve started adding them back into the bins to simulate leaf litter. I’m also hoping the addition of moisture will keep them from drying out creating a more natural type environment for the worms. I’d like to see more activity at the surface again. Stopped using the fan since there has been small patches of moisture and discoloration on the floor next to it. It’s “winter” here in Florida so the ambient temps should be more mild. We’ll see! -13
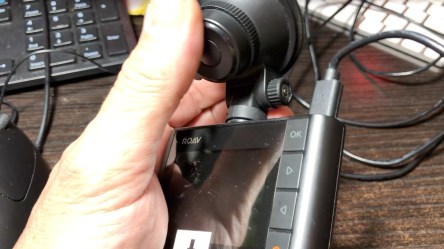
On 18 Octobrer 2019 our 4Runner was taken to Toyota Hollywood for maintenance. Before the vehicle left for the day I did what I do every day or two. Change out the SD card, clean the lens and check the position of the camera view. Everything was like it was supposed to be with a good camera view. When the 4Runner returned I started to change the SD card and noticed the camera was pointing in an upward direction.
Before camera is moved.
That’s odd I thought because for the camera to be moved into that position it would have to be forced that way. The mechanism that controls the vertical view of the camera has a knob that is tightened by hand. It also has indexing teeth so that the camera will stay in position once adjusted.
After camera is moved.
That then made me suspicious since the vehicle had maintenance that day. I loaded the footage on my computer. I was not surprised to see footage of the camera being manipulated. Someone started to move the 4Runner then slowed down as the camera was moved. The slow motion video demonstrates the indexing I was referring to. The clicks are visible in the footage. Adjusting the rear view mirror does not interfere with the camera.
The employee cannot claim it was bumped by a hand. I included a demonstration of how difficult it is to move the camera in the video I put together about what happened. So why would an employee of Toyota Hollywood be manipulating the camera without permission? Does the employee have something to hide. Does Toyota Hollywood? The camera is not a Toyota part. We put the camera in for our protection. They don’t have the authority to touch that camera or any other personal item. This makes me very suspicious of what is going on in their garage.
There is a guy that keeps showing up in the footage who is the one performing the maintenance. I’m not accusing the guy but do wonder if it was he who moved that camera. Whoever it was I want to make sure that person never has access to any of our vehicles again. The only person that could have moved the camera was the one who was driving it at the time.
I made a video record of the event that includes all the recordings from the time the 4Runner arrived at Toyota Hollywood to the time the person performing the work parked it outside. Nearly all of the footage playback speeds have been changed to move though the timeline faster. I included footage of me manipulating the camera angle and some slow motion to see movement detail.
For now all we can to is let the management know what happened so the issue can be addressed. I’m posting this video so the management can see the actions that bring us concern. As well as letting people know what took place there. We are shocked and disappointed this happened.
We want to know who did it so we can assure that person never accesses our vehicles again. That camera is set to turn off after the engine stops. In the future when maintenance is performed the camera will be set to continuously record once it arrives at the garage. Video is below. -13
Bins 2 & 3, Update 23. Looks like the bins are getting back to normal as well as the local temperatures. The heat wave has let up and the worms are becoming more active. Bin 2 temp was 81.8ºF, bin 3 was 82.2ºF with an ambient temperature of 86ºF, 69% humidity.
No foul odors to report in either bin. Both bins showed signs of the surface drying out. To remedy this I added more cardboard and made sure to push it down closer to the surface. This should help trap the moisture in. I’m sure the constant shop fan blowing on the bins the during the heat wave has contributed to the drying. Next time I check the bins I may add some water to keep it moist enough to keep the worms happy.
There was a gecko in bin 3 as shown in the video. It’s easy to see in both bins how few spiders there are in there. Don’t remember seeing any in bin 3.
These updates have been getting shorter in length since the bins are getting back to normal and I’m not trying much new with them. I’ve also decided to stop adding photographs to the updates unless I want to show something. I’ve been so busy with other projects I don’t have the patients or time required using an Apple computer and phone. Too many steps to do something that I could do much faster on a PC.
If I want to transfer photos and video from my iPhone onto my PC all I do is access the phone, highlight the items I want on the PC and drag them to the folder I want them in.
With Apple I have to open iMovie to get the photos and video to make the video. If I want to use the photos on this blog I have to open photos, transfer them to photos, then transfer them to another folder on my desktop. It’s become too much. Apple is not user friendly they want too much control over my property. Not cool.
I hope those few that do follow this part of my blog understand. It’s also why I make the videos, they have the same details. This blog is a place for me to write notes of the checkup and things I may have left out of the videos, and for future reference should YouTube disappear or the ban me. At least I’ll have some record. New video is below check it out. -13
Bins 2 & 3, Update 22. This is going to be a short update. Last week south Florida was preparing for hurricane Dorian. That created lots of clouds and rain. The lower temperatures brought the worms back to full speed and they devoured waste added from the last feeding. I had made preparations to bring the worms indoors if the hurricane was going to pass thru here but we were fortunate that it did not move into this area.
Gecko hidden in bin 3 handhold.
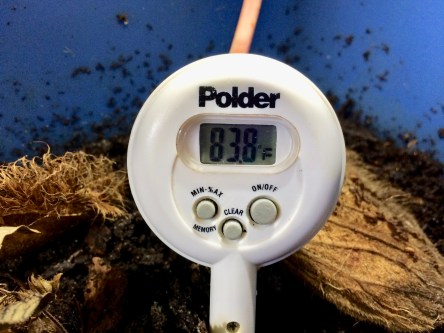
For update 22 the temperature in bin 2 was 83.3ºF, bin 3 was 81.8ºF with an ambient temperature of 85ºF, 70% humidity. There were no noticeable odors in either bin. We did have a couple of geckos in bin 3 but they fled the disruption. Everything is in the video. My favorite part of the updates are the before and after images that demonstrate how much waste those worms can consume when conditions are to their liking. Video is below. -13
107-110 are posted on the South Florida Driving 101 YouTube channel. I still find it amazing how much footage is generated by our dash cameras. If you’re ready for more jets, zombies, cut-offs, crazy exits and merges, and stupid we have it on video. Over a 110 videos so far with the specials. I’ve also recently found multiple dashcam channels on YouTube in Florida. They’re listed in our Featured Channels links on our front page go check them out and subscribe. Enjoy the crazy drivers -13
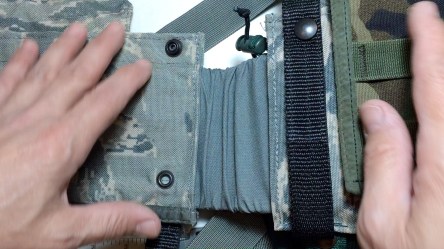
Once again another DF-LCS (Defensor Fortis Load Carrying System) modification. This time it’s for the elastic that connects the rear section to the two front sections. After using the DF-LCS I was unhappy with the unused space created by the elastic connection and wanted a solution. I had a surplus fighting load carrier (FLC) on hand when it dawned on me to break it down into individual components and reuse the parts to fill the space.
Elastic connector between front and rear DF-LCS sections.
The PALS (pouch attachment ladder system) panels on the FLC would be perfect with little modification necessary. Once they were removed from the rest of the assembly it would be easy to cut the parts to size, sew on the recycled edge binding, then sew the free ends together. This would allow them to slip over the elastic connector then be laced to the front and rear section of PALS webbing with military spec paracord.
PALS filler panel over elastic connector, laced onto front and rear sections.
The idea works well for the ALICE M-16 pouches I converted to MOLLE. So far those have performed as expected when the ALICE magazine pouches are fully loaded with gear. I did have to tighten the lace up to eliminate the slight sagging issue.
Front view ALICE magazine pouch attached to PALS panel.
Rear view of ALICE magazine pouch and PALS panel on a DF-LCS.
I don’t have a lot of detail here because it’s in the video. The video moves from FLC disassembly, to layout, then sewing and finally how to make it work with the LCS. Video below. -13
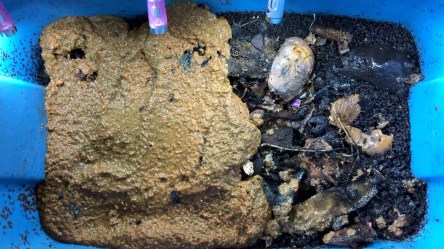
Bins 2 & 3, Update 21. Hard to believe it’s been a month since checking the bins. I’ve been busy catching up on projects, updating supplies and equipment. In update 20 I had placed some pupae into a canning jar to contain them in an effort to identify them as shown in the photos below.
In my mind without scientific proof the photo below shows black solider flies. Wish I had remembered them before they died. I would have let them go to reproduce later so they could have benefited the area.
Bin 2
Bin 3
Bins 2 & 3 were in the same state. The ambient temperature was 88º with a soil temp of 80.9º in both bins. I forgot to look at the humidity percentage. There were no odors or any food waste left in either bin. There was a short break in the ambient temperature the last few weeks due to the volume of rain we had the heat is due to return with highs in the lower 90’s. I fed the bins fresh and decomposing waste. Also added some packing cardboard to see how that turns out. Since the waste used to feed the worms is kept indoors and the bins are kept in a screened in porch where did those solider flies come from? How did they get into bin 2? -13
Time for some gear updates. After switching from my old favorite ALICE LBE to MOLLE DF-LCS I experienced a couple of issues. When using the LCS it would inch it’s way over my pants belt and push down creating discomfort. I also noticed when in a sitting, crawling or in a prone position the rig would tend to climb toward my chest. After thinking of a solution the only one I could think of was to attach straps that would keep the LCS from moving away from my waistline.
Right segment of DF-LCS before adding belt keepers.
The idea came from my experience wearing a duty belt with belt keepers that were designed to hold the duty belt in line with my pants belt. With this in mind I measured the area I wanted to place the keepers, doubled the length then added a inch and a half. The extra length would give my fingers a place to work the snaps I intended to use. Once I had the dimensions for the strap I cut six lengths of poly webbing, folded them in half and sewed them so the two halves would work as one.
Right segment of LCS after belt keeper straps were added.
After sewing the keeper straps together they were sewn onto the three segments of the LCS. Next the holes were punched then the snaps were added. It was an easy project taking no more than 45-60 minutes to complete. After testing the idea seems to work well to prevent the LCS from moving around and causing me trouble. The LCS rig still has some movement/flexibility however it won’t move away from my waistline. I made a short video, the link is below.
I also modified what was labeled as a MOLLE flashlight holster to meet PALS specifications so I could attach it to my quick response belt. The holster had the vertical snap strap but did not have the ladder webbing. To fix this issue I removed the belt loop strap, opened the sewn seam to join the holster, added the new ladder section, then sewed the piece back together. Time spent was about a half hour. I made a how-I-did-it video the link its below. -13
Bins 2 & 3, Update 20. The heat is still on high in south Florida. There has been small break during the night hours when the temperature reaches the mid to high 70’s. It’s not much but I’ll take it.
As mentioned in my last notes I would gather several of the pupae I suspect are black solider flies and confine them so that if something does emerge from them hopefully it could be properly identified. I put a few into a ventilated mason jar then placed it back into the bin. I’ll leave in there for the next several weeks if nothing happens then I’ll put them in the outdoor compost bin.
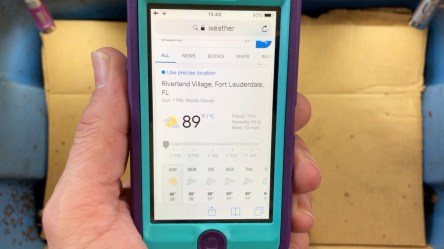
The above set of photos are the exact same ones from update 19. I forgot to refresh the weather page so the video has incorrect information for the ambient temperatures. The estimated temperature was 87°F with 89% humidity. It was very wet feeling this morning. My shirt was drenched with sweat before I was finished. Surprisingly the bin internal temperatures were exactly the same as last week.
Bin 2 had no odors nor many spiders. There were worms on the ledge. I think it was getting warm in there. Maybe they were trying to cool down. It looks like all the waste had been consumed. There was a roach(palmetto bug) in there that was dispatched to another place and time. Sure hope there aren’t any eggs in there. Bin 3 had a slight odor from the left over mango. There were a few spiders in there it looks like the heat is effecting them as well. They usually fill the bin quickly once they find a way in.
I’ve managed to burn out one blender feeding the worms. I have a spare in storage but it is buried in our storage unit. I’d have to remove most of the contents to get it. That’s not going to happen anytime soon so I purchased a new one that already smells like it won’t last through the next cycle. I may have to rethink my plan.
I usually put vegetables like carrots that take a long time to decompose in the blender to make it more accessible to the worms. Items like avocados and fruits get cut up and placed in the bin mostly whole. Those items typically don’t need assistance, root vegetables usually do. When I do use scraps put into the blender I place the waste in a thick layer covering half or less of the surface. This helps the waste maintain moisture preventing it from drying out before it gets consumed.
I’ll check in with the bins in a week, week and half and see how things are progressing. -13