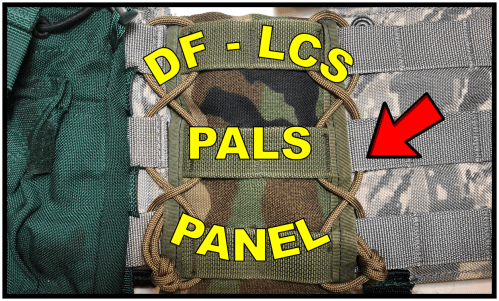
Once again another DF-LCS (Defensor Fortis Load Carrying System) modification. This time it’s for the elastic that connects the rear section to the two front sections. After using the DF-LCS I was unhappy with the unused space created by the elastic connection and wanted a solution. I had a surplus fighting load carrier (FLC) on hand when it dawned on me to break it down into individual components and reuse the parts to fill the space.
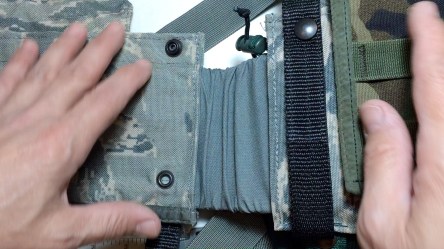
Elastic connector between front and rear DF-LCS sections.
The PALS (pouch attachment ladder system) panels on the FLC would be perfect with little modification necessary. Once they were removed from the rest of the assembly it would be easy to cut the parts to size, sew on the recycled edge binding, then sew the free ends together. This would allow them to slip over the elastic connector then be laced to the front and rear section of PALS webbing with military spec paracord.
PALS filler panel over elastic connector, laced onto front and rear sections.
The idea works well for the ALICE M-16 pouches I converted to MOLLE. So far those have performed as expected when the ALICE magazine pouches are fully loaded with gear. I did have to tighten the lace up to eliminate the slight sagging issue.
Front view ALICE magazine pouch attached to PALS panel.
Rear view of ALICE magazine pouch and PALS panel on a DF-LCS.
I don’t have a lot of detail here because it’s in the video. The video moves from FLC disassembly, to layout, then sewing and finally how to make it work with the LCS. Video below. -13
Time for some gear updates. After switching from my old favorite ALICE LBE to MOLLE DF-LCS I experienced a couple of issues. When using the LCS it would inch it’s way over my pants belt and push down creating discomfort. I also noticed when in a sitting, crawling or in a prone position the rig would tend to climb toward my chest. After thinking of a solution the only one I could think of was to attach straps that would keep the LCS from moving away from my waistline.
Right segment of DF-LCS before adding belt keepers.
The idea came from my experience wearing a duty belt with belt keepers that were designed to hold the duty belt in line with my pants belt. With this in mind I measured the area I wanted to place the keepers, doubled the length then added a inch and a half. The extra length would give my fingers a place to work the snaps I intended to use. Once I had the dimensions for the strap I cut six lengths of poly webbing, folded them in half and sewed them so the two halves would work as one.
Right segment of LCS after belt keeper straps were added.
After sewing the keeper straps together they were sewn onto the three segments of the LCS. Next the holes were punched then the snaps were added. It was an easy project taking no more than 45-60 minutes to complete. After testing the idea seems to work well to prevent the LCS from moving around and causing me trouble. The LCS rig still has some movement/flexibility however it won’t move away from my waistline. I made a short video, the link is below.
I also modified what was labeled as a MOLLE flashlight holster to meet PALS specifications so I could attach it to my quick response belt. The holster had the vertical snap strap but did not have the ladder webbing. To fix this issue I removed the belt loop strap, opened the sewn seam to join the holster, added the new ladder section, then sewed the piece back together. Time spent was about a half hour. I made a how-I-did-it video the link its below. -13
Note: this post contains affiliate links, proceeds support this website.
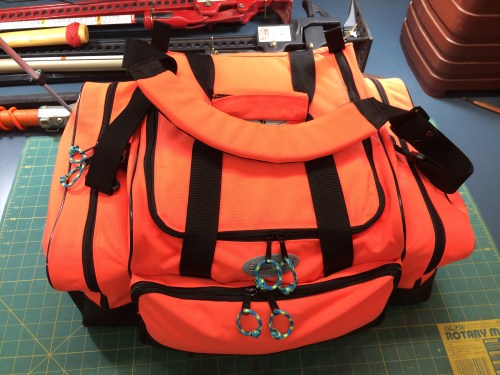
I finally got around to finishing this bag and making a video! On June 3rd of 2016 I posted a product review video of the Mega Medic bag. At the time it was sitting empty, we had decided our medical supplies and equipment needed to be changed and updated based on how the use of the kits evolved over the previous 5-8 years. Most of the kits had been used out of a rescue truck for a project we were working on.
When I made the review video I gathered various medical items that fit into the different parts of the bag to demonstrate the possibilities of what could be kept there. The items shown weren’t a set up ready-to-go kit. I already had a list for the kit contents but didn’t have everything I wanted. Some of the items on hand had reached it’s useful life.
Recently after reading a video comment on the kit I had never seen before I checked to see what was needed to finish this kit. Triangle bandages. That was all. Trying to keep track of medical inventory without a computer may put me in a straight jacket. After replacing and restocking items the kit was finally ready. How is that for a swift kick in the pants?
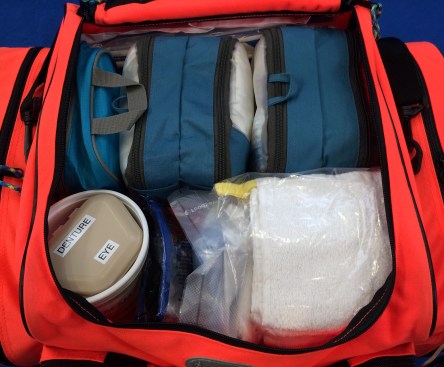
B Compartment
The kit is an extension of the aid bag. This is considered our Trauma Kit and builds on splinting, bandaging, eye, dental, large wounds, burns. Can be resupply or used as is. It is based on several kits from past experience. It may be hard to imagine but nearly every item in this kit could be expended on one incident.
Some of the kits from the past using the same bag had more of the bandaging and splinting materials. Those kits had been based on, in part, by proximity to a military base and a direct flight path where helicopters and transport aircraft that could hold hundreds of soldiers could and sometimes did go down.
Then there is the, being the only one there and no one is coming. To the rural 20,000 person county, only 5 people qualified to operate two ambulances with the nearest mutual aid unit 30 minutes away, no air support. Standing there after a mass casualty incident looking around and seeing empty aid bags and bandaging supply wrappers among the carnage leaves a lasting impression.
Alpha compartment, why we use those pouches
During the same time we were updating our kits we were able to find several different type packing organizers on sale at Marshalls store. After using a few of them we went back to that store and many others within our local area and bought whatever stock they had in the store.
Those finds allowed us to keep items protected in ziploc bags and create mini kits without having a kit full of ziploc bag mess. Multiples of one type item or a kit made of several different components they’ll work well for many common items.
Double side bandaging pouch (Go Travel Packing Pouch no.3)
The bag above was one of the last pouches found. As it’s packed it works very well, 8 rolls Kerlix, 12 5×9 Surgipads, 20 4×4 sponges. I’ve looked for more and can’t find them. The pouch below is what was used before we found the pouch above. The dressings were packed the same way they are shown, the Kerlix was packed like the double side pouch, 8 rolls in a ziploc bag.
Single side bandaging pouch (Travelon Packing Organizers Set-Small)
CD Case
I’ve been looking at ways to store the instant hot and cold compresses for years. When the portable CD cases became available I found out they worked well. If the internal storage sleeves are removed there is room for two instant compresses. All I had to do to get this type case to work was remove the sleeves from the rivets that were simple to pull out by hand.
At first I used a metal case but it added weight and was too stiff to fit in multiple spaces. When these softer type plastic cases became available I tried one. Discovered that I liked it better. It has more flexibility and can fit into tighter spaces than the metal case. For the type of compress and CD case chosen its simple to get them into the case. First, I arrange the liquid part of the compress in one half of the bag and the dry ingredients in the other then, fold in half.
Case open showing how compress is packed
Place both compresses in the case then close it. As shown below it works good. The compress is protected from punctures and abrasion and it’s easy to see the contents. I usually look for things like this at the outlet stores but ordered these off eBay for consistency.
Case packed with 2 compresses
This kit has one 18″ and two 36″ SAM splints that can be used in many different ways and can be custom cut with the trauma shears. Very handy to have on hand. They beat the old ice cream scoop, vinyl covered wood, blow-up doll, waxed cardboard splints any day.
FareTec CT-6
REEL Splint
The two photos above show the traction splints kept in or with the trauma kit. The FareTec and the REEL splints are surplus finds. If you’re looking to stock your kit check out eBay and the surplus stores. Make sure all the parts are there before you buy, get new if at all possible. Couldn’t give a price on either of these. eBay as I shockingly found out only keeps auction records for 3 years not a running tally like Amazon.
Dental / Eye Kit
In the photo above are the contents of the dental and eye kit. The denture case can be used for dentures, loose teeth or prosthetic eyes. There is a scleral cup for removing contacts and prosthetic eyes. A case for contact lens and a 10x magnified mirror.
Two eye shields and two food service 16 ounce deli cups for covering injured eyes. Those things can work well for keeping eyes protected. Some of the eye injuries I’ve seen makes me want these in stock at all times. Not shown are the sterile eye cups, the Sal-jet rinse 30ml saline vials or the Refresh Plus eye drops.
Most items in the kit have multiple uses. Dressing like the trauma and surgipad make good splint padding. The surgical CSR wraps in the kit to make clean working space can be used to protect wounds. A mylar blanket as an occlusive dressing. The list is endless.
Security Sealed Kit
Security seals are an important part of our medical system. The seals are tightly controlled and numbered. A strict system is in place, only a couple of people here are allowed to seal a kit. That way when one of the kits need to be used and the seal is intact we can be assured the contents will be there.
The seals used in the video are not the same seals used on our bags. They’re from old stock and are used for training. They work the same as fire extinguisher seals, twist or pull on the seal and it will break easily. If you get some, get numbered if possible it will help in case someone else has the same type/color seals.
A word of caution, be careful where they are placed on zippers they can break zipper parts easy.
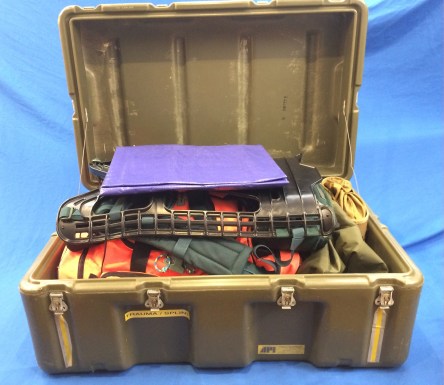
Hardigg AL3018-0905
The Trauma Kit is kept in a cabinet or could be stored and transported in a heavy duty case with the REEL splint, a MOLLE 2 pack frame, various color pack covers, a quick litter in a dump pouch and a small tarp to place the contents onto. The case is stored with the gasket out, if left in place it compresses under the weight of the other cases and is not as effective over time.
Seems like that covers the items I felt I left out of the video. I don’t want to repeat the video here. I would rather people watch the video, then read the blog after to see what was left out. Clearly I don’t write scripts for these videos, just an item name, maybe a note. If there are any changes or updates in the future they’ll be posted. The new video is below. -13
Other video project featuring the Mega Medic bag are below.
Update is an understatement. After browsing the other project blogs and watching the videos made at the time I realized I could do it a little better. Instead of having multiple blog post on the project it would be much easier to use one page and keep updating it as necessary.
The videos were not so good. Information was missing, unnecessary video, bad audio and, experimental editing. I was using poor quality microphones. Thought I was getting one microphone for $10.00, it was actually 3 for 10. Junk! Those microphones and an old phone as my recorder had me sounding like a teenager reaching puberty. Too funny. At first I didn’t recognize who it was when editing the original videos.
I thought for sure someone would give me some shit about it but no one ever did. Boring! It may be because not many were watching the videos. After watching many YouTube videos I thought anyone watching the project progress videos compared the new one would have a much more informative experience.
All the original footage and photos available, it seemed like the thing to do was edit a long play new version. Skip the multi part versions on projects like this. Maybe this one is better? One thing for sure is the audio is much different. Hope it helps motivate someone have a fire plan and a way to deal with it. -13
New Video
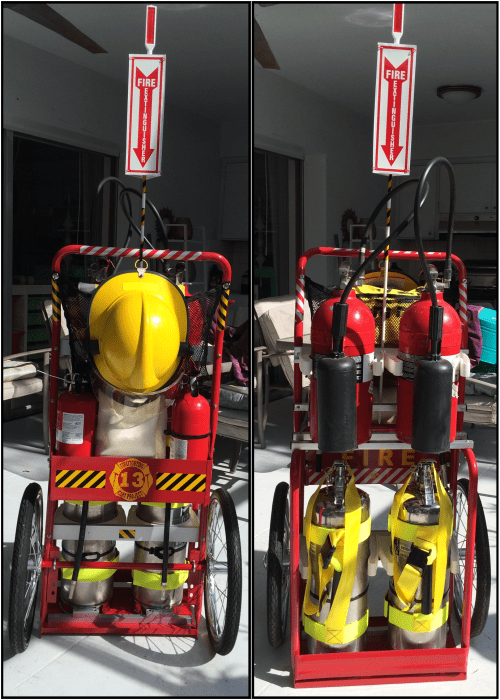
Firefighting Cart: Mission – Grand Tour
This is the last update on the firefighting cart project. I have all the parts in place. Well on second thought, almost. I unexpectedly want flat free tires since the ones on it won’t hold air. So this may not be the last update, time will tell. Otherwise everything is mostly like I planned it. I don’t currently have any tire tools so I can’t check or change out the valve stem core so that will have to wait, for now it’s “fill ‘er up!” with air. This video is different in a few ways. First I remembered how the old surf and ski documentary’s if that’s what they’re called, would run the music credits at the beginning of each song instead of at the end in the credits where its hard to figure out what’s playing if it’s not familiar. There is much more detail from the action featured to the text that has cost or important project details. I also tried to make my videos as concise and information filled as I can so you make the most of your time when watching my videos. I hope you find this project, informative and inspiring. Don’t forget to make fire prevention and protection part of your homestead everyday life. Thank you for checking out my blog! -13
Firefighting Cart: Final Modifications
All of the major modifications and additions have been made! More to follow. -13
27JUN16: When I posted this the other day I didn’t have the energy or clarity to write much then, now I’m ready to write. The last of the modification have been made! I was thinking I would be able to complete the project in days. Not the several weeks it has taken. The reason it took me longer than expected was I needed to figure out what I wanted for ABC extinguishers, where and how to mount them on the cart as well as other details.
Once I decided on small 5lb. extinguishers it was an easy choice on how and where to mount them. I had one 5lb here already and found another rechargeable extinguisher at Costco. There is a rectangle box mounted on hinge pins for storage on the cart. I could simply place the extinguishers in there and be done with it but they’re top heavy and they want to tip out with the hinged box. To solve that problem I ground off the welds, popped out the pins then bolted the box to the brackets. That took care of that now I have a place for two 5lb. ABC extinguishers and a welding blanket.
I also added some reflective tape for visibility in some of the most obvious, visible places on the cart. Found a place on eBay to order custom reflective lettering and also a cool custom Maltese cross specific to the project. I also found a three pack of fire extinguisher signs that I’ll mount on a dowel and spring clamp to mark the cart from multiple angles. I think it will work out well can’t wait to see how it turns out.
The other thing I wanted on this cart was turnouts so I or anyone could use the extinguishers on the cart much more effectively and safely. I chose to recycle an old wildland firefighting jacket, welding gloves from Harbor Freight and recycle a structural firefighting helmet. Not ruling out anything available locally or online as a way to mount those items on the cart I settled on SCUBA mesh for a bag to hold the gloves and jacket. I liked that I could see at a glance that the gloves and jacket were on-board the cart without having to open up a bag and look in. After sewing a bag together and testing I had a little trouble getting the jacket out of the bag so I added webbing with velcro tabs, problem solved. The tabs wrap around a support and hold the lower part of the bag down. Works really good.
After much thought I’m surprised I settled on the velcro cord-wrap as the way to mount the helmet. I did it because it held well, was simple to use, easy to apply without tools, was already in the stock inventory and stuck the use-what’s-available school of thought. I think it will work well, plus I have two rolls. Time will tell the outcome.
Must have those water cans! And, a better way to move them. I found a SCUBA tank carry strap at a local dive shop on sale so I bought three. Two for the cart, one for my POV. They only had a hand carry handle so I sewed lengths of 2″ heavy duty seat belt web with a quick buckle so I could have an over the shoulder way to secure and carry one or both of them. After several test they work really well.
For now I’ll wait for the decals to arrive. -13
Firefighting Cart: Brackets
Originally posted May 29, 2016 @ 13:28 on WordPress.
I was able to find the bracket rail at a dive shop! Progress report coming soon. -13
Originally posted May 30, 2016 @ 22:31 on WordPress.
Time for a little update on the homestead firefighting cart. Lucky me. I was able to source the extruded aluminum rail that the SCUBA tank brackets slide into at local Diver’s Direct. Another trip to Home Depot for a metal capable countersink and Lowes to search for hardware which I chose flat aluminum stock and pop rivets for the cantilever instead of the diamond plate aluminum they had a Home Depot. The 3/4″ end caps were in already here in the mail.
I was so excited after sourcing the bracket rail that I went to work on the project as soon as I got it home. Things went well without major problems. What I did notice was it sure does slow me down to not have a shop or utility truck to work out of. Frustrating, but it will change. I really miss the precision of tools like a chop box and drill press. Beats using a hack saw and cordless any day of the week.
The first issue was after I mounted the tank brackets to the lower half. When I tried to pull the cans out the bottom kicked out with nothing to brace onto making the cans very difficult to remove. To solve this I used one of the 3/4″ square stock pieces to rivet onto the bottom of the cart as a stop. This wasn’t successful because the 3/4″ was too low so I had to add another shorter piece for a double stack. That solved the problem.
The other problem was that the upper brackets pushed out the extinguishers so that almost half was hanging off the only two cross braces I was able to install. The curvature of the cart frame uprights won’t let me place a piece of the square stock out far enough. That’s when I decided to go with the flat stock. I would have chose the diamond plate but it came down to having a way to machine the piece. With the flat stock all I have to do is make a straight cut.
My original plan to have the upper extinguishers set on 3 pieces of square stock was changed because of that bump out and curvature. That turned out well because I ended up needing the extra to use as backstops to make the brackets functional as extinguisher holders. Now they’re being held by the friction of the bracket yet still immediately accessible during an emergency. I think I have somewhere between 8-12 hours on this project so far and a little over $300.00. More on that when I tally my receipts.
I made a video diary of the progress. Really have get it together and remember to empty the memory and charge the batteries on my iphone-cameras “before” I start so I can shoot more video instead of stills. That would be called, a, clue. The cart is usable at this point. I plan on adding a few more ABC extinguishers and some protective equipment. My next plans are to finish off the cart then make a video tour of the who, what, when, where, and why.
Really happy to have the peace-of-mind that goes with being prepared. -13
Firefighting Cart: Axle modification
After sweat-working several hours in the gnarly tropical climate here in Hollywood, Florida setting up tools, measuring, checking twice, filming, grinding, I did it! Yes! Wasn’t sure it was going to work out, but, it did! My major concern was being able to solder the washers back on and it worked out much better than I anticipated. I was able to grind off all of the washer with few issues. I had started off with a grinder wheel on my grinder then switched to a cut-off wheel to reach the tight spaces and preserve as much of the washers as possible. I cleaned off the paint where I wanted the washers to go then soldered them on exactly where I wanted them. It worked surprisingly well. Beginners luck. Once I did that I put the axle on the frame and it took several tries to get everything the way I wanted but it was worth it. I think I cut a little over 1 1/4″ off the axle which makes the tolerances very tight.
There was an issue with the paint. After proper cleaning, surface preparation and priming I was surprised when I applied the second coat of paint to watch the factory paint crinkle instantly. It was bizarre to watch the paint pucker up like that. Looks like I shouldn’t have been so lazy and striped the paint off the whole thing and started fresh. I wonder why it did that though. In my dream shop I’d media-blast it clean then powder coat it.
The good news is I can get through all the doors I want and need to. Next steps are to modify the cart to accept and hold the extinguishers I have set aside for the cart project. I also made a video diary of the modification hope you find it informative and inspiring. -13
Firefighting Cart: On the bench or in transit
Ok, better document some of the progress or I’ll miss the chance. One of my biggest dilemmas with the homestead firefighting cart project was how to mount the extinguishers to the cart. I have woodworking skills so I thought about using wood but it’s metal so there are the issues of joining the wood to the metal, that can be solved easy enough but I don’t have a wood shop or the tools I’m used to working with.
I’ve worked in a couple of shops that had any woodworking tool you would want, a woodworkers dream. I couldn’t believe I was lucky enough to work in them. So no shop/tools and if I can’t make it a particular way then I don’t want to do it. I don’t want it to look like crap. So that rules out the wood. My other option, metal.
Yeah, I’ll just get some tube stock, cut it, bent it, weld it, powder coat it, then call it done. Only a couple of problems with that idea as well. It’s pure fantasy and now I’m coming back to reality. First I’m back to the no shop thing. Then only metal working tools I have are a hack saw and an angle-grinder I use with a cut-off wheel. The only knowledge I have of welding is watching a friend of mine do it. So picking up a cheapo welder from harbor freight and faking it isn’t my idea of fun. Or a way to make something that’s high quality, looks good and not totally cobbled together. Now what?
Find a no shop, no wood, no weld required, minimal tool solution. I really wanted to fabricate something but there is reality. I would love to learn welding but there is the time it takes to learn what I need too and the equipment investment isn’t in the budget at this time. If I’m going to buy a welder then I’m going to invest in a really good one. The only welders worth my money are expensive and for good reason. I love how when I’m in a predicament like this and necessity forces me to see a different solution.
After all the maze chasing of ideas in my head I end up on ebay. Search for “tank bracket” So simple. And there it is. SCUBA tank brackets! That fit the 80 tanks. Which happen to be nearly the same diameter as the extinguishers but just a little bigger. Ok looking good so far because the best part is the brackets slide into a rail that can be screwed or bolted in anywhere along the rail. This is really good news. It solves all of the issues I was going to have. Using the rail/bracket system eliminates the welding and the wood. Plus I need a minimum of tools, cordless drill, a wrench and sockets and a way to cut the rail. This will work out very good.
The other problem to solve was how to create the top level for setting the 10lb. Co2 extinguishers on. I was able to find some 3/4″ aluminum square stock at Home Depot. They don’t carry end caps for those so I ordered some from ebay. That will solve that now I have to order the rail for the brackets. -13
Firefighting Cart: Door clearance issues
The Harbor Freight Welding Cart(65939) I chose to convert into a firefighting cart has some issues getting through household doorways. In every door in the house I’m in now it appears to be about 1/2″-3/4″ too long. There looks like there is going to be enough to cut off about 1 1/2″ length of tubing. One wheel has 1/4″ play in the hub the other side is about the same. The tubing needs to be shorter and the alignment washers need to be moved then welded back into place. Since I don’t weld or have a welder I’m hoping I’ll be able to solder the washers where I want them. If not I’ll have to go to a welding shop.
The next thing I’ll do is pull the axle, grind off the washers. Clean up the paint then attempt to solder on the washers. -13
Harbor Freight Welding Cart Model 65939 to be converted into a homestead Firefighting Cart. More in my next post. -13
From the Laboratory of Insane Schemes. ALICE military surplus has been my load bearing choice since the mid 1970’s. Not perfect for sure but it was a great place to carry my canteens and other items that would fit into ALICE 30 round magazine pouches. Cut off the grenade pouch and they fit together nicely on an issue pistol belt.
Moving into the 2000’s. After checking out some of the PALS / MOLLE surplus available I decided to change over. Although the webbing can be hot and heavy the PALS way of attaching pouches or attachment of any kind to LBE or packs is a good one that almost makes the attached item a part of what it’s attached to.
Moving forward left unused canteen and ALICE magazine pouches packed in boxes and me wishing I had a better way than the adapters made to use ALICE on MOLLE. The adapter still leaves the pouch flopping around like its on a pistol belt. Not a very good solution.
I had the idea recently after a resupply to take apart an ALICE magazine pouch and see if I could convert it over to a MOLLE pouch. If it would work it would fit perfectly on the space fillers on the DF-LCS rig elastic section I’d made from a zippered FLC purchased to salvage for parts.
Inside view of FLC adapter/filler and “new” MOLLE magazine pouch attached.
First I had to figure out where the attachment straps would be placed near the top of the pouch and where to snap it on. At the top I chose the hinge point for the lid so it wouldn’t interfere with access. Snaps on the bottom. When the snaps are on the back of the pouch they tend to push it out due to the bulk of the snap. If snap popping becomes an issue they can always be changed to lift-the-DOT. We’ll see what happens in the future.
Finished pouch.
Location of snaps
The web straps were the same length. Doubled, folded in half and sewn together. Measuring the magazine pouches for the PALS webbing I discovered that the pouch width could vary as much as a 1/4″ between 4 pouches. I chose the widest width and cut all the pieces that size. There are no actual dimensions in here because the variation in pouch width, measuring devices and points of measurement may not be the same as mine. Duplicating it exactly may cause problems.
After lots of seam ripping and thread picking the pouch was in half and the ALICE webbing was removed. Laying out the PALS is as simple as can be 1″ x 1 1/2″. Since the pouch is so small I sewed a center line and the edges like I’ve seen on some issue pouches. Sew the straps to the hinge point. Keep it simple.
Although the snaps used and the Pres-n-Snap are designed to cut through the fabric without punching a hole, I did punch because the amount of pouches were small and I wanted more precise location of my snaps. I’ve had puckering and slight movement of the snap post under pressure from the hand press that the finished snap was visibly off mark times I haven’t punched a hole first. It’s also much easier on the body with a hand press if the hole has been punched.
With the holes punched and the webbing sewn on, the stud part of the snap was installed on the bottom of the pouches. I try to leave them until the end of the project or leave them off for as long as possible. In the past I’ve put them on early thinking I’m saving time but they were in the way of the sewing machine on many occasions or were scratched up.
Once the snap half was in place the pouches could be sewn back together again. The top and bottom received four stitch lines and the whole side of the pouch received two stitch lines. That complete, the other half of the snaps were installed on the web straps and that was it. Those are the steps I took to convert ALICE to MOLLE. Now I have some of my favorite pouches to use again. There’s a video below of the process. -13
Materials used: Mil Spec DOT snaps, poly webbing, sunbrella thread.
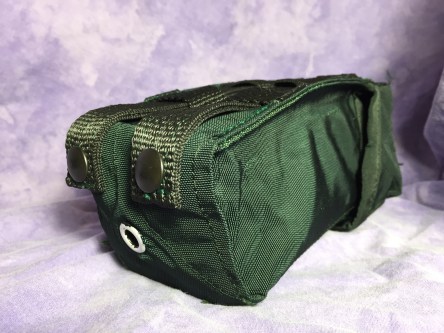
The Dyna-Med Mega Medic bag is one of my favorite bags to use. Only problem is when I pack the bag it gets heavy. Sometimes 35+ pounds. I need a better way to move the bag than hand or over shoulder carry with that kind of weight.
I have a broken MOLLE 2 pack frame I like to use for experiments so I don’t break a good one. By chance I laid the frame next to the mega medic bag setting on a table one day. It was easy to notice how close they were in size so I set the bag on top of the frame and this is the result.
A video how I modified the mega medic bag to attach to the MOLLE 2 pack frame. It’s not a how-to, it’s a how I did it video. The process was simple but time consuming.
Put the bag on the frame, pick the best spots to attach webbing. Mark it, get the dimensions for the webbing, mark, then cut the pieces. That process took maybe 45 minutes to an hour. Once the webbing is ready its sewing time.
I knew sewing was going to go slow. The pieces I’ve added would have been sewn on much sooner in the assembly process reducing the time drastically. The time was no problem since quality/accuracy is more important to me than speed. The webbing straps make it easy to attach to the MOLLE 2 frame. Think this took more like an hour plus but I’m not sure.
I did notice over the last few videos how bad the audio is so I’ll attempt to make it better. Several issues there that must be addressed. After I’ve updated the kit contents I’ll make another video about the bag to include kit content and modifications. -13
Aspirator, one medical device I do not want to be without when I need it. In an effort to be prepared I wanted to have several options. Every once and a while something will catch my eye as potentially useful for this purpose.
One item is the FreshSaver battery operated hand held vacuum pump and another, a Harbor Freight transfer pump. Something battery operated and something manual. I was fairly confident the FreshSaver would work but had no faith in the transfer pump because of the quality.
By drilling out the hole on the FreshSaver I was able to retain the plastic seal. It works perfectly on the tapered fittings on any suction canister. It had very strong suction. When I was experimenting with it I covered the inlet and let the vacuum draw on the unit and believe it has adequate suction to work well. The battery may not last very long but it might last enough to get though a bad situation. I like the way it worked so well I’ve added the FreshSaver to my aspirator kit as a backup.
The transfer pump worked much better than expected. Didn’t have much trust in it but it worked. The video footage demonstrates it. Battery operated is fine, however I always want a manual way that doesn’t include batteries or electricity. The transfer pump connected to any standard suction canister will be effective in my mind as long as all the connections are leak free. Another one added to the aspirator kit for backup.
Some things to remember, when the vacuum pump is connected the canister will be top heavy so it must be accounted for. Also the nipple connected to the pump could snap off from the weight of the pump or by getting bumped. In the video I had configured the pump to connect via hose instead of directly to the nipple. This reduces the risk of both the top heavy issue and snapping of the nipple. I felt this configuration would work best because it makes the control to the vacuum more accessible.
It was a challenge to sync the videos so I could get the best audio but it worked. I have an experiment in mind using clapping and will use it next time I make a multi camera video. Below is a video I filmed when I made this experiment. I used three old iPhones, one i5 and two i4’s. Footage shot above from the front looked like it was recorded on a VCR from an antenna fed television in the 1980’s. So we’re stuck with a partially blocked screen side view and a very clear side/front view. Surprisingly the angles caught all of it. -13
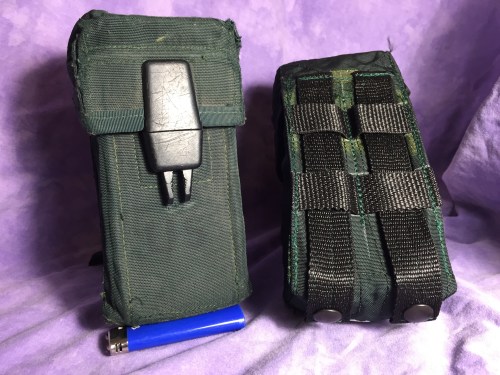
This Preparedness – Prepper – Hiker Vacuum Sealer Tip may get you arrested. Sensational title but true. Those of us who take multiple pills whether they’re prescription medications or supplements often use those multi-dose/day pill containers. Doing so could get you arrested, maybe prosecuted. Prescription medications are supposed to remain in their original container according to the law as I understand it.
There are all sorts of possibilities which is why the only advise I ever give anyone is, seek the advise of legal counsel and medical professionals before you do whatever it is you’re up to.
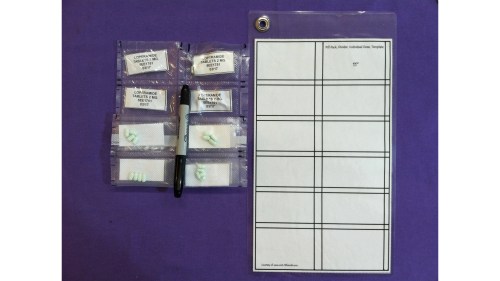
I made these pill packs originally for backpacking/hiking trips and as a way to carry a small amount of vital medications on my person at all times. Ever miss your ibuprofen, antihistamine or whatever because you didn’t have it with you? Yeah me too but no longer. Plus it helps save money buying in bulk and having to not throw out medications stored improperly.
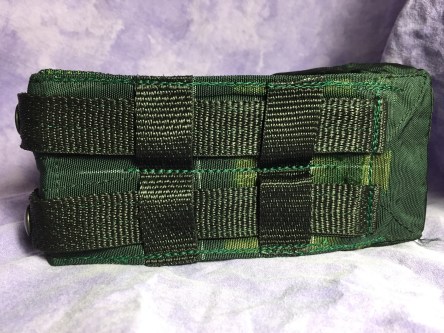
I make up a new pack/s every time I have to open bulk meds. Usually fill one or two of the individual pouches and then put the rest in a larger pouch for long-term storage. I always include the name of the drug/supplement, type/concentration, lot number and expiration date. I never separate this information from anything I place in these pouches until I’d consumed the contents. It’s very important to keep them together.
Things I find helpful to have on hand, a red sharpie makes it easier for me to see the marks so I can line them up with the heat sealer portion of the vacuum sealer. A funnel helps with precise placement of the pills. I have a short extension of soft plastic tubing but couldn’t find it for the video. It’s good for reaching to the deepest part of the pouch when trying to get pills that want to grab the pouch material instead of slide.
I laminated my second printing for durability because the first one was getting beat up from use, and also added a grommet to hang up or bind with other similar items.
Expired meds shown in the video are kept past their expiration date if preserved correctly following the DoD Shelf Life Extension Program. I would include a link but the government has removed them. Not sure how you’ll get that info now I don’t have anything to share at the time of this posting. Research it maybe you’ll find something.
Everything else I think, is in the video. Check it out. -13
I can hardly believe the numbers. I’ve been messing around over at YouTube getting things in order over there, trying to understand things better and clicked on the wrong button. It went to the first page of my videos. When I was checking out the views on the videos listed I couldn’t believe how many views my compost sifter had. It’s really exciting to see that there are many people interested in composting and possibliy organic gardening. Really hope my video inspires and lifts people up. -13
After nearly 2 months of sourcing materials and ordering new suspension liners the firefighting-rescue helmets are up to date! I’ve constructed sweat band liners with a thin foam pad that uses elastic to hold it in place. Ratchet covers with another thin layer of foam with snap closures like the originals. Crown pads with a layer of foam with Velcro holding it onto the original pad. The double fold bias trim I made was difficult to finish and make look good due to the thickness, its easy to see it in the crown pad photo. Not perfect but will work just fine for our needs.
At first I was reluctant to add foam of any kind. I ordered some any way to test it then decide if I’d use it on my project. After doing a burn test on the 1/8″ foam and watching the product be almost completely consumed by the flame turning into a thin black stream of smoke with no dripping or melting of any kind I decided I would be willing to take the risk. What sold me was there was no dripping or melting, plus I would have all of the foam be completely enclosed in Nomex twill. Plus I could easily blow out and snuff out with a bare finger the open flame emitted when freely burning.
The end result is I have a much more comfortable helmet. And a bag full of extra replacement parts in case I need to clean them, or replace them for some reason. I like the fact that I can now outfit a completely new or unfamiliar Phenix First Due 1500 in a matter of minutes and be back in service quickly. I can use this on any of the 1500’s and from the looks of it maybe all of Phenix Helmet lines.
Thats all for now on the helmet updates. I will be searching for new 1 x 4 Reflexite Helmet Strips to replace the seeming good old ones. The old ones reflect light perfectly it’s the typical edge curling I always see with aging reflexite helmet strips. Look at any helmet that has had them on for more than I’d guess 2 years and you’ll see the edge curl. I really like those things except for that pesky fact. I’ve also learned over the years to buy a sheet of them not just what you think you will need. They will come off unexpectedly and end up in your hair or other weirdness sometimes so it pays to be ready.
I think the Scotchlite brands works as well to reflect light, they just don’t have the same
eye appeal to me as the way the Reflexite strips do. The appeal to me is the sort of electric feel they have when I see them as opposed to the more dull look of the Scotchlite brand. So, soon I’ll do a search for replacements. I think that’s all. -13
Sweatband.
Setting snaps in the ratchet cover.
Ratchet cover complete.
Rear view of ratchet cover.
Inside view of ratchet cover.
Crown pad cover layout from original.
1/8″ Foam used throughout project
Crown pads complete with Velcro attachment. Note the not so perfect binding.
The finished kit- crown pad, sweat band, ratchet cover, earlaps and storage bag made for our Phenix 1500 helmets.
Helmets complete! What it all looks like when I finished.
“Improvised, Field Expedient, Emergency, Metered Dose Inhaler, Asthma, Spacer-Chamber”. My goodness what a title!
Finally made a video on the MDI-spacer I made from parts I had on hand. Every single item used in the making of the kit was already in the homestead inventory. When I set out to make it I was surprised that I had everything I needed. It took me I think most of a day to collect all the items then think it through to come up with the kit in the video.


![IMG_0064[1]](https://unit13fremslt.com/wp-content/uploads/2017/06/img_00641-e1497973867175.jpg?w=287&h=216)