If you haven’t’ subscribed yet you may want to if you’re into organic gardening, homestead living, animal husbandry, austere medicine, homestead fire prevention/protection, do-it-yourself and stuff about everyday life. Go check it out, don’t forget, it’s free. If you really like it share it with your friends or those of like mind. Not much there yet, but more is on the way. -13
Homesteading
Video Projects: Organic gardening, my homemade compost sifter experience.
After the marathon style cut and paste the other night I noticed that I never wrote much about my experience and had only made a video. So, now I’m feeling kind of motivated so here it goes. I’m into organic gardening, that requires compost, lots of it if you’re into producing a large amount of food for canning/storage purposes. I found a great local source for horse manure, fresh, steaming, shoulder-level piles of it. Moving 5 pick-up truck loads of horse manure by hand and wheel barrow will make you feel healthy. That’s moving all the organic material more than three times. Once at the point of collection, back at the homestead into the compost pile and then again before it gets used. One shovel and wheel barrow at a time.
A little sore after all that an individual needs a way to sift all the unwanted trash and unprocessed organic material so it doesn’t end up in your garden-of-plenty. Being on the low budget, do-it-yourself kind of mindset I decided to check out YouTube for some inspiration. Lucky me I found it. I cannot remember what I searched for but do remember the first video I watched on a homemade compost sifter made by Desert Garden Prepper with a Harbor Freight cement mixer. It was so creative the way the parts were machined and reconfigured into a compost sifter. Completely motivated by that I couldn’t wait to make my own.
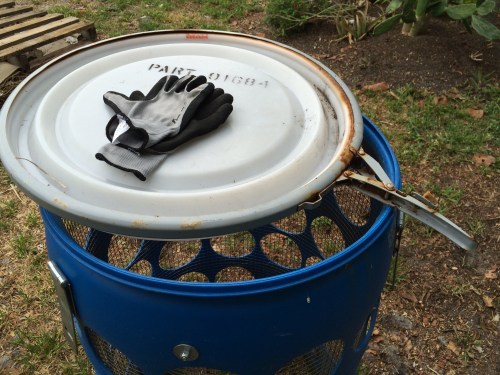
I wanted to make one like Desert Garden Prepper had made but don’t have the tools or knowledge to weld. That made me look at other mixers. I remembered one I had seen a Lowes store and when I looked it up online the instant I saw it the crazy idea came into my head that one of those blue barrels would fit onto the end of the mixer. I felt like I knew it would just fit. Imagine how shocked and surprised I was when it fit so well. I almost couldn’t believe it but it was right in front of me so I had no choice.
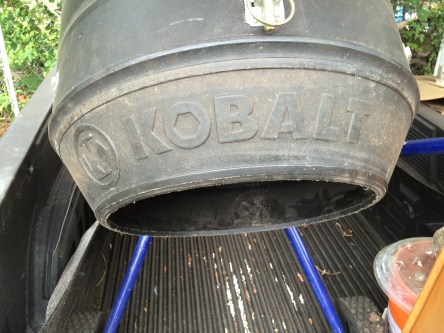
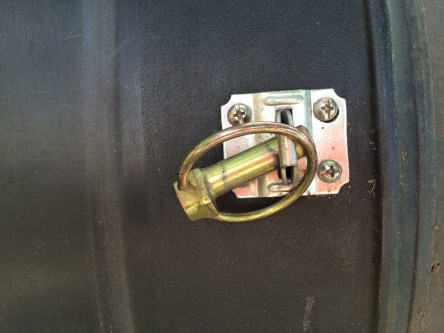
Since the barrel and mixer fit together so well without modification it made it easy to mount it in place with simple lock hasp and lynch pins. Okay that gets the barrel to the mixer and it turns. That leaves the barrel and how/what to do with the waste and out-feed.
The barrel was a little bit of work. It came with a ring lid which is what I wanted so I could have a factory formed edge meet with the mixer. On the out feed part of the barrel, the bottom, I used a jig saw to cut just inside the rim. That removed the bottom. Next I had to make a way for the material to pass through and be sifted. This involved using a 5″ circle template I printed off my computer to mark the circle cutouts in no particular order. I tried to space them as evenly as possible to retain as much structural integrity and strength as possible. After marking the holes I drilled pilot holes then used a jig saw to cut out the circles.
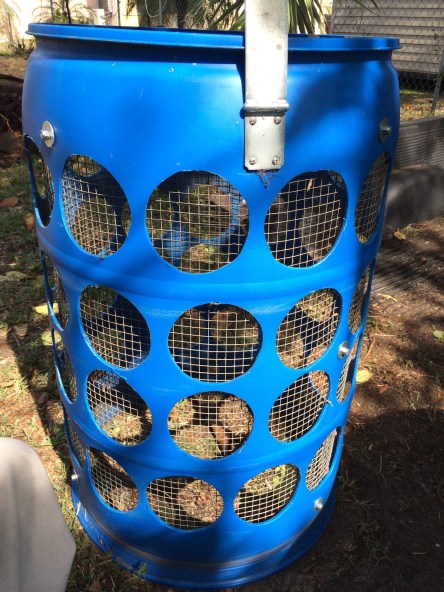
Once the circles were complete I lined the inside with 1/2″ hardware cloth and bolted it in with stainless steel bolts and locking nuts. At first I was going to make two, one for 1/4″ and one for the 1/2″. After lining the barrel I realized that all I had to do to make this barrel sift smaller material was to just put the smaller size cloth inside the barrel with the 1/2″ cloth and use bolts and wingnuts to hold it in place. A real easy and quick change over requiring much less storage space than two or more barrels. Most everything goes through the 1/2″ screen anyway so a change over is rare.
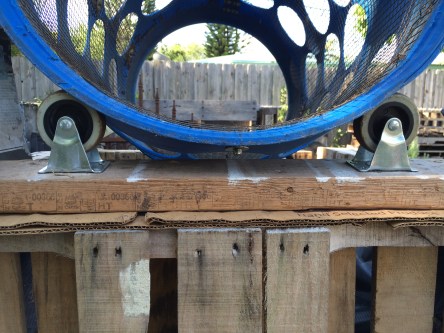
The other part of the sifter is where will the waste go and how will I move it. To solve that I had the barrel set at an angle to dump waste into a wheelbarrow. The barrel rest on two casters affixed to a scrap of pallet spring clamped onto the wheelbarrow with a cardboard scrap underneath it to keep out processed compost. The spring clamps seem to provide enough holding power yet will give away if there is any real stress applied. I’m hoping that if there is some type of problem it will pop apart and not damage anything. On one end of the pallet scrap I have a hole drilled to hold one of those green garden stakes sold at local nursery’s. That holds a piece of cardboard which acts as a deflector to keep the unprocessed materials out of the processed materials.

I noticed when first using this sifter that the materials were passing through so that not all or even most of the material was getting sifted. To solve that I decreased the angle of the out flow to reduce the speed at which the material reached the out feed end of the barrel. So far everything seems to be working well because I’ve put much more through it that the original 5 manure loads. After watching several videos on YouTube I do not think this would be good for sorting worms. I believe the weight of the organic material would slam down on top of them and cause trauma to the worms every turn they made. Just my opinion though.
I really like how it works, the portability I can process every where I can plug into electricity, plus it’s either an organic material processer or a cement/soil mixer. It will be interesting to see how long it last and how good the idea was over time. -13
Construction Zone: Why I’m back on WordPress
I came back to wordpress to blog because I was not getting the hits on blogger. I also found it hard to find things, people, information. As I have been copying my information over the last few hours, I noticed I have received more views in that short time than all of the last six months on blogger. I wonder if I didn’t do something over there that would have brought more traffic. It doesn’t matter my focus and expectations are much different this time from wordpress. Time will tell. -13
Helmet Project: Update complete!

After nearly 2 months of sourcing materials and ordering new suspension liners the firefighting-rescue helmets are up to date! I’ve constructed sweat band liners with a thin foam pad that uses elastic to hold it in place. Ratchet covers with another thin layer of foam with snap closures like the originals. Crown pads with a layer of foam with Velcro holding it onto the original pad. The double fold bias trim I made was difficult to finish and make look good due to the thickness, its easy to see it in the crown pad photo. Not perfect but will work just fine for our needs.
At first I was reluctant to add foam of any kind. I ordered some any way to test it then decide if I’d use it on my project. After doing a burn test on the 1/8″ foam and watching the product be almost completely consumed by the flame turning into a thin black stream of smoke with no dripping or melting of any kind I decided I would be willing to take the risk. What sold me was there was no dripping or melting, plus I would have all of the foam be completely enclosed in Nomex twill. Plus I could easily blow out and snuff out with a bare finger the open flame emitted when freely burning.
The end result is I have a much more comfortable helmet. And a bag full of extra replacement parts in case I need to clean them, or replace them for some reason. I like the fact that I can now outfit a completely new or unfamiliar Phenix First Due 1500 in a matter of minutes and be back in service quickly. I can use this on any of the 1500’s and from the looks of it maybe all of Phenix Helmet lines.
Thats all for now on the helmet updates. I will be searching for new 1 x 4 Reflexite Helmet Strips to replace the seeming good old ones. The old ones reflect light perfectly it’s the typical edge curling I always see with aging reflexite helmet strips. Look at any helmet that has had them on for more than I’d guess 2 years and you’ll see the edge curl. I really like those things except for that pesky fact. I’ve also learned over the years to buy a sheet of them not just what you think you will need. They will come off unexpectedly and end up in your hair or other weirdness sometimes so it pays to be ready.
I think the Scotchlite brands works as well to reflect light, they just don’t have the same
eye appeal to me as the way the Reflexite strips do. The appeal to me is the sort of electric feel they have when I see them as opposed to the more dull look of the Scotchlite brand. So, soon I’ll do a search for replacements. I think that’s all. -13

Sweatband.

Setting snaps in the ratchet cover.

Ratchet cover complete.

Rear view of ratchet cover.

Inside view of ratchet cover.

Crown pad cover layout from original.

1/8″ Foam used throughout project

Crown pads complete with Velcro attachment. Note the not so perfect binding.

The finished kit- crown pad, sweat band, ratchet cover, earlaps and storage bag made for our Phenix 1500 helmets.

Helmets complete! What it all looks like when I finished.
Austere Medicine: Improvised, Field Expedient, Emergency, Metered Dose Inhaler, Asthma, Spacer-Chamber

“Improvised, Field Expedient, Emergency, Metered Dose Inhaler, Asthma, Spacer-Chamber”. My goodness what a title!
Finally made a video on the MDI-spacer I made from parts I had on hand. Every single item used in the making of the kit was already in the homestead inventory. When I set out to make it I was surprised that I had everything I needed. It took me I think most of a day to collect all the items then think it through to come up with the kit in the video.

Video Projects: Old videos found. Snake in the fence.

Originally posted May 26, 2016 @ 23:41 on WordPress.
An old video I found looking for something else. This has to be one of my most favorite snake experiences ever. Watching that snake slither through chain-link fence was so amazing and just cool! Too bad for the crappy camera work huh! Having fun with iMovie.
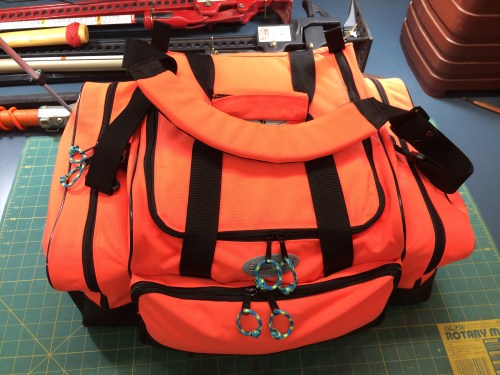
Austere Medicine: Dyna Med Mega-Medic Bag Model: BG169
Originally posted Jun 4, 2016 @ 00:27 on WordPress.
I’ve been wanting to make a product review video on the Dyna Med Mega-Medic Bag Model: BG169 for a long time. I’ve seen several videos on the bag but they never show the features or dimensions. The most important parts. They usually just show the items they keep in them and never expose the interiors very well. Hopefully this video will address those issues and help others decide whether this bag will suit their needs.
I first noticed this bag in the Dyna Med catalog I used to get back in the mid 80’s and have been using this model ever since then. There have been replacements due to zipper failures. That doesn’t bother me much because most of the zipper problems were actually human ones. It’s a bag design I really like a lot. It functions well and can be customized and configured for any of your needs. It can be used as a trauma/bandage bag, splint bag, helmet bag, airway/aspiration management bag, etc.
I can’t think of any project notes. So I’ve either forgot something or I actually got it all in the video. Not so sure about that part. Let see what happens. -13
Helmet Project: Earlaps & goggle cover making.

Originally posted Jun 9, 2016 @ 01:24 on WordPress.
Earlaps and goggle cover finished! I had no idea how difficult it would be to film or photograph a project as I worked on it. Stopping during the process doesn’t work so well. I’ll have to do more staging then let the cameras capture whatever. I only want to capture the action and essential information. Leave out the filler, and me.
I replaced the suspension liner in our Phenix First Due helmets within the last couple weeks since the other ones had deteriorated so much and unexpectedly. Phenix needs to look into the longevity of the foam choices because they don’t hold up over time. The liners are old, 10 years, but I expected as well as I take care of my helmet that the foam would not turn to powder. My helmet wasn’t the only one.
I didn’t want to pay 20+ for earlaps and didn’t like the way they looked or mounted so I decided to make my own. Two for each helmet that way we can always have one available while the other is getting laundered, repaired or replaced. I also didn’t like the velcro-tab mounting option so I used snaps. Not sure how but I managed to mess up the snap placement on one side. It’s not perfect but it works. The important thing is the cover is in place and no burned earlobes and or any ear part or my neck!
Plus I get to choose the materials against my skin. I’m picky about materials with skin contact. I used 4.5 oz. Drifire fabric for the inside of the earlap and a 7 oz. nomex/cotton blend twill outside and flame retardant cotton/nylon for the binding, nomex thread. I recycled velcro from other helmets. I had new binders to work with and material so I made the goggle cover first.
For the goggle cover I recycled the bag the goggles came in. Ripped out the seams and sewed that rectangle to a piece of nomex the same size. Then used one of the new binders I just purchased and bound the edges. Went well but I’d like to be able to finish the ends a little better. The reflective material was recycled from an old safety vest.
The next projects for the helmets will be a cover that goes over the ratchet, a cover for the chinstrap leather and a crown pad. -13


Austere Medicine: Aesculap / Riester Otoscope – Ophthalmoscope
Originally posted Jun 9, 2016 @ 02:05 on WordPress.
If anyone is thinking of getting one of these surplus otoscope/ophthalmoscope kits check out my video maybe it will assist you in your decision making. They are fine quality German made. Glad I got them when I did. I have three total. Two in use in kits and one that is for parts. Purchased on eBay for $35.00 each plus shipping. The one I bought for parts was only $13.00 including shipping on eBay. If you plan on using this as a primary tool then I’d suggest getting two good working ones because it may be the only place to get spare parts.
I hope I’ve covered the most important information in the video. A note on the ear specula not mentioned in the video is I also tried the “Uni” version from Riester and it was slightly to large. The metal sleeve was much to tight to use in my otoscope head. So much so that after I tried to put it in it became stuck and pulled the sleeve out of the speclua leaving it in the head itself. I had to use pliers to get it out. Really surprised and disappointed to find the specula so difficult to source. The veterinary specula are from R.A. Bock Diagnostics, they may carry the human specula for it I never asked. The other important thing I do not know yet is if any other brand head will fit the battery handle. If I ever do get a chance to test other heads on my handle I’ll do it and update this page with the info.
It’s nice to have the peace of mind that goes along with being prepared. Now we can see what and when we need to. -13
Video Projects: First YouTube channel video
Check out this Video Projects: Organic gardening, my homemade compost sifter experience.
Here is it the first video made for my YouTube channel. It was inspired by what I had seen Desert Garden Prepper had made. -13
