South Florida Driving 101. Experience all that driving in south Florida has to offer. Heart pounding cut-offs, pedestrian-zombies, package-twine-mattress-haulers, crisscrossing-panics. Get your South Florida Driving safety education from the experts in rude, incompetent, insane, dumb and dangerous driving. All for free. Just ride along with us. For this ride you don’t need a seatbelt or insurance and rear-seat drivers are welcome to.
Great title and funny text for my new and sure to continue video project. Why didn’t I think of this before now? To think of all I’ve deleted of such good footage of horrible driving is disappointing. The close calls, the laughs, the anger, the mayhem.
No more. I’m going to starting running several cameras while I’m on the road and outfit my friend’s car since she drives everywhere down here and always has great stories. We’re going to capture them on video if we can then add them to the project.
The idea came to me once again while I was listening to the jingles on iMovie and YouTube audio libraries. It seem to me there were a lot of good jingles under 2 minutes that would be perfect for featuring the madness we all see when driving. I feel the time is perfect for making these videos because most things only last seconds and 2 minutes is not too long to watch. Also many videos need to be repeated and slowed down so we can see the action. It all seems like a perfect fit.
This video is my first one of the project. I had a lot of fun editing this one with the many transitions, slow motions, text, all of it. The beginning is my favorite with the animated map and water splash type opening. I think it’s really cool what can be done with iMovie, a dash cam and some old iPhones. Welcome aboard, hope you enjoy the ride! -13
Anyone looking for an aspirator that will function in austere conditions may find the Rico RS-6 will work for them. I’ve used these before for military and civilian applications and have never had problems. What I like most about this suction unit is how it is made to be portable or stationary and can be powered by engine, electric or hand. It doesn’t get much better when looking for something for austere conditions in my mind. This one was an eBay item that I was lucky enough to get for $43.00. A really great price.
Although it is portable it is not ideal to be hauling around by hand and would be better suited for mounted applications that required the occasional use away from your transportation/station whatever/wherever it may be. The way I have this unit set up is a connection in my POV since it’s the designated medical/emergency response vehicle for our homestead.
The other way this set up works good for us is a backup in an aid-station or in camp to the electric/battery operated aspirator that usually uses disposable collection basins. Or this could be connected as the collection basin for the electric portable aspirator in place of the disposable ones. Although I would not want to use this without the disposable liners it can be and is designed to if necessary. The other surprising item that works well with a little modification to power the Rico RS-6 is the little FoodSaver handheld like the one below. It works so well that it is part of our emergency aspirator kit. I’ll have a video/blog on that as soon as I put the footage together.
Here is a video that’s just under ten minutes that shows all the items that originally came with the Rico RS-6. I’ve cut most of the ramble out to save you some time. Another item of interest for those who may need the information is the scanned PDF of combined printed material that was with the original packaging. That link is just above the video. -13
This goofy video was totally inspired by the Jingle track playing with the video. When I was making a longer version of a video with the same topic I was searching through iMovie’s sound library for a little intro sound. As I was listening to the tune this video idea popped into my head. I thought it would be cool to try to communicate similar information in the 36 seconds it takes the tune to play without a voice speaking over the track.
I went back to my improvised shop set up in the living room and recorded this in about 15 minutes and spent about an hour editing. It’s kind of silly and dumb and totally low-budget but I actually like it and it was fun from beginning to end to make. Have fun hope you enjoy it. -13
Several years ago I packaged an emergency kit in vacuum sealer packaging. Tested it, and was completely shocked to discover how tough the packaging is and how difficult it can be to open without using some other instrument or object. Attempting to open one of them by hand-only proved impossible to do without assistance. It also made me realize how important and useful the tear-notch on freeze dried meals made for backpacking could be.
An individual, with an injured hand and/or dentures/front dental work would be at risk for not being able to open the package without assistance from an object or the tear-notch. With a tear-notch it may be possible place part of the package underfoot and tear with the uninjured hand. I know this for sure, I cannot do it without the tear-notch.
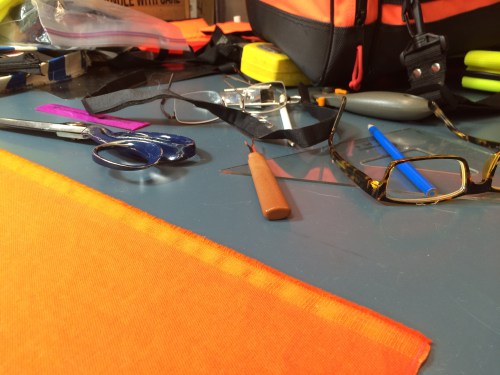
The first experiments with nothing more than a simple straight cut with the scissors worked fairly well. I noticed though when I decided to cut a “V” shape into the margin on the packaging that it was easier to open and the tear didn’t seen to veer off like the single cut did. Sometimes when I was testing the single cut way the tear would not always follow into and open the package, it would follow the margin and made it just as difficult to open.
I like the V cut over the single cut because it is more visible and easier to use. There are a few things I don’t like about the V cut. First it takes two cuts to make, that is a lot of cutting when making multiple packages and more than one tear-notch for each package. The cut must be more accurate to ensure that the two cuts meet at the V point, if they don’t it may create another more difficult package to open. It works great but it’s much more time consuming and requires a certain degree of accuracy unlike the single cut.
Not happy with either of those things I searched for another more efficient way to make those notches. I was trying to think of what to search for online when I remembered something I had seen in a sewing supply catalog I had but couldn’t remember what it was. Lucky me I had kept the catalog and found it. The item is a pattern notcher.
A, Style-45N, 1/16″ x 1/4″ Pattern Notcher. Turns out it works perfectly for this purpose. It cuts the perfect notch for getting the package open plus all one needs to do is put the margin edge of the packaging into the notcher until it stops then close the notcher with your hand and done! Wow what a really fantastic solution! I can quickly and accurately place the notch and make the cut in seconds then move onto the next pressing homesteading project.
I made a short video about my experience and demonstrate the way that “Works for me”. Hope you find this information useful. -13
If you haven’t’ subscribed yet you may want to if you’re into organic gardening, homestead living, animal husbandry, austere medicine, homestead fire prevention/protection, do-it-yourself and stuff about everyday life. Go check it out, don’t forget, it’s free. If you really like it share it with your friends or those of like mind. Not much there yet, but more is on the way. -13
After the marathon style cut and paste the other night I noticed that I never wrote much about my experience and had only made a video. So, now I’m feeling kind of motivated so here it goes. I’m into organic gardening, that requires compost, lots of it if you’re into producing a large amount of food for canning/storage purposes. I found a great local source for horse manure, fresh, steaming, shoulder-level piles of it. Moving 5 pick-up truck loads of horse manure by hand and wheel barrow will make you feel healthy. That’s moving all the organic material more than three times. Once at the point of collection, back at the homestead into the compost pile and then again before it gets used. One shovel and wheel barrow at a time.
A little sore after all that an individual needs a way to sift all the unwanted trash and unprocessed organic material so it doesn’t end up in your garden-of-plenty. Being on the low budget, do-it-yourself kind of mindset I decided to check out YouTube for some inspiration. Lucky me I found it. I cannot remember what I searched for but do remember the first video I watched on a homemade compost sifter made by Desert Garden Prepper with a Harbor Freight cement mixer. It was so creative the way the parts were machined and reconfigured into a compost sifter. Completely motivated by that I couldn’t wait to make my own.
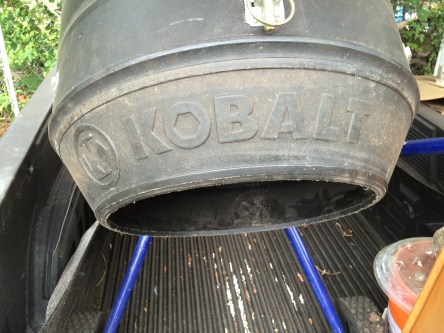
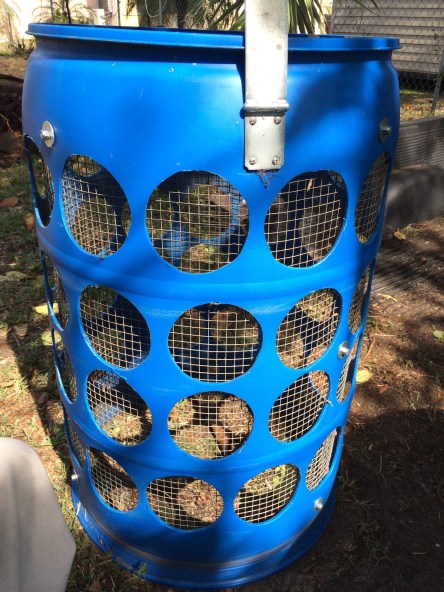
I wanted to make one like Desert Garden Prepper had made but don’t have the tools or knowledge to weld. That made me look at other mixers. I remembered one I had seen a Lowes store and when I looked it up online the instant I saw it the crazy idea came into my head that one of those blue barrels would fit onto the end of the mixer. I felt like I knew it would just fit. Imagine how shocked and surprised I was when it fit so well. I almost couldn’t believe it but it was right in front of me so I had no choice.
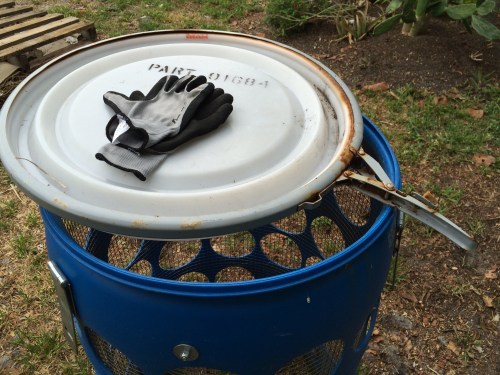
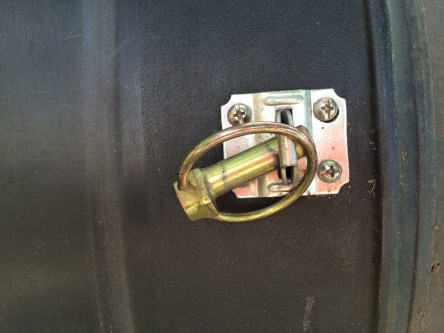
Since the barrel and mixer fit together so well without modification it made it easy to mount it in place with simple lock hasp and lynch pins. Okay that gets the barrel to the mixer and it turns. That leaves the barrel and how/what to do with the waste and out-feed.
The barrel was a little bit of work. It came with a ring lid which is what I wanted so I could have a factory formed edge meet with the mixer. On the out feed part of the barrel, the bottom, I used a jig saw to cut just inside the rim. That removed the bottom. Next I had to make a way for the material to pass through and be sifted. This involved using a 5″ circle template I printed off my computer to mark the circle cutouts in no particular order. I tried to space them as evenly as possible to retain as much structural integrity and strength as possible. After marking the holes I drilled pilot holes then used a jig saw to cut out the circles.
Once the circles were complete I lined the inside with 1/2″ hardware cloth and bolted it in with stainless steel bolts and locking nuts. At first I was going to make two, one for 1/4″ and one for the 1/2″. After lining the barrel I realized that all I had to do to make this barrel sift smaller material was to just put the smaller size cloth inside the barrel with the 1/2″ cloth and use bolts and wingnuts to hold it in place. A real easy and quick change over requiring much less storage space than two or more barrels. Most everything goes through the 1/2″ screen anyway so a change over is rare.
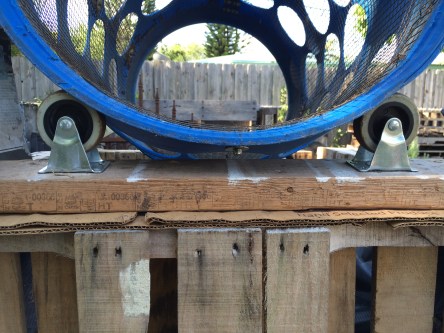
The other part of the sifter is where will the waste go and how will I move it. To solve that I had the barrel set at an angle to dump waste into a wheelbarrow. The barrel rest on two casters affixed to a scrap of pallet spring clamped onto the wheelbarrow with a cardboard scrap underneath it to keep out processed compost. The spring clamps seem to provide enough holding power yet will give away if there is any real stress applied. I’m hoping that if there is some type of problem it will pop apart and not damage anything. On one end of the pallet scrap I have a hole drilled to hold one of those green garden stakes sold at local nursery’s. That holds a piece of cardboard which acts as a deflector to keep the unprocessed materials out of the processed materials.
I noticed when first using this sifter that the materials were passing through so that not all or even most of the material was getting sifted. To solve that I decreased the angle of the out flow to reduce the speed at which the material reached the out feed end of the barrel. So far everything seems to be working well because I’ve put much more through it that the original 5 manure loads. After watching several videos on YouTube I do not think this would be good for sorting worms. I believe the weight of the organic material would slam down on top of them and cause trauma to the worms every turn they made. Just my opinion though.
I really like how it works, the portability I can process every where I can plug into electricity, plus it’s either an organic material processer or a cement/soil mixer. It will be interesting to see how long it last and how good the idea was over time. -13
I came back to wordpress to blog because I was not getting the hits on blogger. I also found it hard to find things, people, information. As I have been copying my information over the last few hours, I noticed I have received more views in that short time than all of the last six months on blogger. I wonder if I didn’t do something over there that would have brought more traffic. It doesn’t matter my focus and expectations are much different this time from wordpress. Time will tell. -13


![IMG_2528[1]](https://unit13fremslt.com/wp-content/uploads/2017/03/img_25281.jpg?w=444)