Tent Modification – Bass Pro Eclipse Cabin Tent

What could make a tent better when camping, working in remote locations or during a natural or man-made disasters?  The ability to keep the resident comfortable.  That is, cool in hot weather and warm in cold climates.  As well as keep out insects and undesirable wildlife such as snakes.  I’ve been using tents to reside in at infrequent intervals for various reasons since the mid 1970’s.  My experience has taught me that the value of getting a good night rest and recuperation cannot be overstated.

Over the last 6 months all but 1 of our 20 year old tents have been replaced.  That means we have tents in our inventory without air conditioner hose plenums or sleeves.  Those sleeves would allow either an internal or external air source to blow or draw in air for cooling or heating.  In the past if a screened window on a tent would zip closed to help keep in cool or warm air that is what was used.  Keeping the window cover closed always kept occupant from seeing what was going on outside.  I never did like that.

window

Window with Velcro sewn on

Being unhappy without a view I decided to change how I modify the tents.  New tents with screened windows will now be outfitted with clear vinyl removable panels.  For this project Velcro brand hook & loop will be sewn to the tent and vinyl panels.  That way the original function of the window will still work as designed.  The Velcro will allow changes to easily be made in minutes.

TRIANGLE

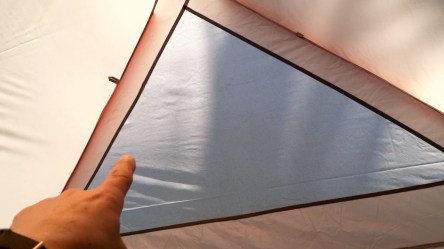
One of two triangle roof vents

The Eclipse tent also has two triangle screened panels on the roof.  Those panels will be placed on the outside of the tent.  That way it will help prevent sagging into the interior space.  The ventilation sleeves will be 8″ to accommodate 6″ – 8″ hose typically used for smaller home size air conditioners and heaters.  At the end of the hose sleeve will be a cinch cord that can be tightened around the hose to reduce air infiltration and keep the unwanted out.

IMG_6474

Ventilation sleeves

The first step for this project was compile a list of materials needed.  Next, obtain them.  I had the 210D nylon oxford fabric that I used for the ventilation sleeves on hand.  I used about 1 1/2 yards at a cost of $4.99 a yard.  The Velcro needed was about 20 yards per tent, cost for 50 yards of the hook and loop was about $100.00.
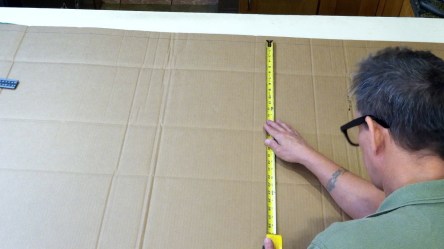
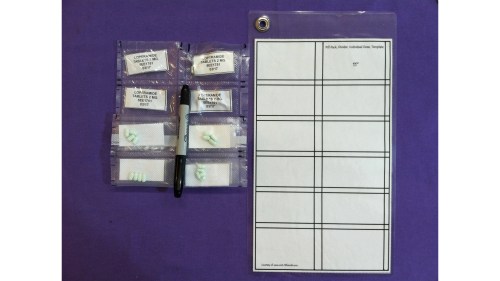
PATTERN

Making a template

The vinyl was purchased from Joann’s Fabric.  I went to the store to buy some but they didn’t have a continuous length of 14 yards.  I then looked for more locally on their website.  Turns out that was a really good thing.  If I had been able to get the 14 yards in store it would have cost $70.00.  Making the purchase online I was able to pick the order up at another store with a cost of $43.00.  That was a full 25 yard, 54″, 8 gauge roll.  A really good deal, plus I’d have some left over for other projects or repairs.

LAYOUT

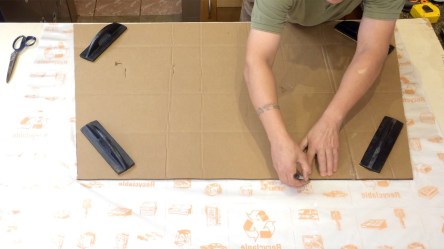
Layout cut lines using a template

LAYOUT TENT

Using template to mark sew lines onto the tent

Once I had all the materials on hand I was eager to complete the project.  I made templates so it would be easier to duplicate the vinyl panels for the window and triangles.  Each panel was laid out then cut to size.  After that the sew lines could be laid out onto the tent.

SEW VINYL

Sewing Velcro onto vinyl panels

With the panels cut out and the sew lines marked I sewed the hook side of the Velcro onto the vinyl.  I used a Harbor Freight soldering gun I modified to function as a hot knife to cut out the ventilation sleeve hole.  I then sewed the ventilation sleeve onto the tent.  I learned the hard way that care must be used when sewing them because the fabric had partially been cut on the bias which would make it stretch out of place easily.

HOT KNIFE

Cutting ventilation holes with a soldering iron hot knife.

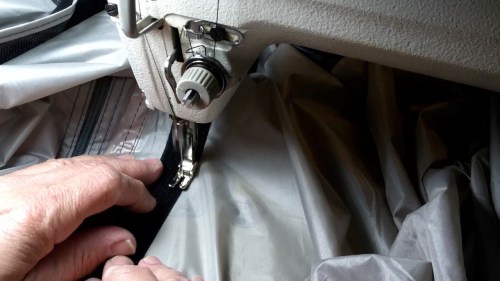
The most challenging part was next.  Getting all the tent fabric though the sewing machine arm while the hook part of the Velcro was applied.  That part of the project slowed my progress down a lot but it did go quicker than I expected.  Once the ventilation sleeves and the window parts were complete it was time for testing.

SEW A:C

Sewing ventilation sleeves onto tent wall.

The tent was set up and all the panels were installed.  With few exceptions the panels fit well.  I did have trouble in a couple of places where the tent fabric had shifted when the sew lines were laid out.  Those were easily remedied by shifting the panels slightly one way or another.  The project took about 20-22 hours once the materials arrived.  The time and financial cost will be well worth it for the comfort level it will provide.  This project was fun but I’m glad it is over.

HANG WINDOW

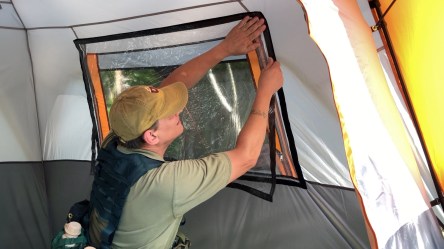
Placing vinyl panel over an open window

I made a video of the project progress if you’re interested.  If you’ve ever modified your tent what did you do?  How well did it work out?  Have a question or comment post it here.  -13

Blank page mayhem is an understatement.  More like total refresh-page, login chaos.  Several weeks ago and last week I tried to login to my WordPress page and this was all I could see.

Screen Shot 2018-08-21 at 8.15.26 PM

The image above is a screenshot of what I would see after logins and page refreshes. I’m sure over the time span hundreds of attempts were made. When I would get the page to load, any click would lead to a page like the one shown.  Looks like a WordPress page without anything.  No possible way to use their help because when I was able to click on it, same blank page.

It was maddening.  To make matters worse all I could find online about the same or similar problem was,  “WordPress White Screen of Death” and “professional debug” references.  Uh-oh!  After what seemed to be my ten thousandth attempt to reach a help page I did.

Not directly.  I searched for WordPress help and followed that link.  Finally I’d located a way to contact them for help on the issue.  Sent a note, then, woke up with a keyboard imprint on my face and computer mouse in my hand.  Wow did my neck hurt.  My face did too the keyboard makes a horrible pillow.  Hope I don’t do that again.  Go ahead and laugh its funny.

Awake it was time to work on 3-D, in the physical dimension projects.  Otherwise known as real life.  Now, not an hour after reading “I checked your site and I don’t see blank page, I see stats page, posts, pages and everything is working as Could you please retest after clearing browser’s cache https://en.support.wordpress.com/browser-issues/#clearing-your-browser-cache. If you still see the issue then please share screenshot https://en.support.wordpress.com/make-a-screenshot/ so we can check and investigate this further.” here it is.  Another blog about, every day life.  Included all the information in quotations it may help someone else.

A reference is made to a “screenshot” in the reply.  Something I’d normally send to aid in clarifying my problem.  The fact I didn’t send one shows me how sleepy I was.  Followed the suggestion to clear the cache and then logged in and it seems to have worked.  I had to search Apple help to learn how to do it.  Not as easy or detailed a process as when I maintain website information on a Windows based PC compared to the way I have to using Apple.

I’ll have to keep using WordPress to see what happens next.  If the same thing happens I’ll try the suggested remedy and see if it solves the issue.  What an experience it was to see the WordPress basic page layout but nothing else.  The screenshot says it all.

For now I’m here writing and working on catching up.  We’ll see what happens next.  -13


iDye Poly Experiment: Military Surplus

After seeing videos on YouTube and having my own experience with dying military surplus thought I’d make a video about it.  iDye Poly Kelly was used for this experiment if you’re looking for a source.  Hope this helps others decide to dye or not. -13

Vacuum Sealer Project: Pill Pack for Medication

This Preparedness – Prepper – Hiker Vacuum Sealer Tip may get you arrested.  Sensational title but true.  Those of us who take multiple pills whether they’re prescription medications or supplements often use those multi-dose/day pill containers.  Doing so could get you arrested, maybe prosecuted.  Prescription medications are supposed to remain in their original container according to the law as I understand it.

There are all sorts of possibilities which is why the only advise I ever give anyone is, seek the advise of legal counsel and medical professionals before you do whatever it is you’re up to.

I made these pill packs originally for backpacking/hiking trips and as a way to carry a small amount of vital medications on my person at all times.  Ever miss your ibuprofen, antihistamine or whatever because you didn’t have it with you?  Yeah me too but no longer.  Plus it helps save money buying in bulk and having to not throw out medications stored improperly.

I make up a new pack/s every time I have to open bulk meds.  Usually fill one or two of the individual pouches and then put the rest in a larger pouch for long-term storage.  I always include the name of the drug/supplement, type/concentration, lot number and expiration date.  I never separate this information from anything I place in these pouches until I’d consumed the contents.  It’s very important to keep them together.

IMG_0064[1]

Things I find helpful to have on hand, a red sharpie makes it easier for me to see the marks so I can line them up with the heat sealer portion of the vacuum sealer.  A funnel helps with precise placement of the pills.  I have a short extension of soft plastic tubing but couldn’t find it for the video.  It’s good for reaching to the deepest part of the pouch when trying to get pills that want to grab the pouch material instead of slide.

To make the pill packs I use an 11″ vacuum sealer roll like the rolls in this link.  2 Pack – SimpleHouseware 11″ x 50′ Commercial Vacuum Sealer Rolls Food Storage Saver Compatible to Foodsaver Sous Vide (total 100 feet) To make the template I used microsoft publisher then converted it into a downloadable PDF file located here.  PILL PACK DIVIDER INDIVIDUAL DOSE TEMPLATE  When looking at the template the top  and bottom two boxes are larger than the center boxes.  They’re larger to account for the various size factory sealed edges.

I laminated my second printing for durability because the first one was getting beat up from use, and also added a grommet to hang up or bind with other similar items.

Expired meds shown in the video are kept past their expiration date if preserved correctly following the DoD Shelf Life Extension Program.  I would include a link but the government has removed them.  Not sure how you’ll get that info now I don’t have anything to share at the time of this posting.  Research it maybe you’ll find something.

Everything else I think, is in the video.   Check it out. -13


Wow over 10,000 views on my compost sifter video! I can’t believe it!

I can hardly believe the numbers.  I’ve been messing around over at YouTube getting things in order over there, trying to understand things better and clicked on the wrong button.  It went to the first page of my videos.  When I was checking out the views on the videos listed I couldn’t believe how many views my compost sifter had.  It’s really exciting to see that there are many people interested in composting and possibliy organic gardening.  Really hope my video inspires and lifts people up.  -13

Vacuum Sealer Project: Another easy-open packaging video!

Another video about how to make your vacuum sealer packaging easier to open with a pattern notcher.

This goofy video was totally inspired by the Jingle track playing with the video.  When I was making a longer version of a video with the same topic I was searching through iMovie’s sound library for a little intro sound.  As I was listening to the tune this video idea popped into my head.  I thought it would be cool to try to communicate similar information in the 36 seconds it takes the tune to play without a voice speaking over the track.

I went back to my improvised shop set up in the living room and recorded this in about 15 minutes and spent about an hour editing.  It’s kind of silly and dumb and totally low-budget but I actually like it and it was fun from beginning to end to make.  Have fun hope you enjoy it. -13


Vacuum Sealer Project: How to make your packaging easy to open

Several years ago I packaged an emergency kit in vacuum sealer packaging.  Tested it, and was completely shocked to discover how tough the packaging is and how difficult it can be to open without using some other instrument or object.  Attempting to open one of them by hand-only proved impossible to do without assistance.  It also made me realize how important and useful the tear-notch on freeze dried meals made for backpacking could be.

An individual, with an injured hand and/or dentures/front dental work would be at risk for not being able to open the package without assistance from an object or the tear-notch.  With a tear-notch it may be possible place part of the package underfoot and tear with the uninjured hand.  I know this for sure, I cannot do it without the tear-notch.

The first experiments with nothing more than a simple straight cut with the scissors worked fairly well.  I noticed though when I decided to cut a “V” shape into the margin on the packaging that it was easier to open and the tear didn’t seen to veer off like the single cut did.  Sometimes when I was testing the single cut way the tear would not always follow into and open the package, it would follow the margin and made it just as difficult to open.

I like the V cut over the single cut because it is more visible and easier to use.  There are a few things I don’t like about the V cut.  First it takes two cuts to make, that is a lot of cutting when making multiple packages and more than one tear-notch for each package.  The cut must be more accurate to ensure that the two cuts meet at the V point, if they don’t it may create another more difficult package to open.  It works great but it’s much more time consuming and requires a certain degree of accuracy unlike the single cut.

Not happy with either of those things I searched for another more efficient way to make those notches.  I was trying to think of what to search for online when I remembered something I had seen in a sewing supply catalog I had but couldn’t remember what it was.  Lucky me I had kept the catalog and found it.  The item is a pattern notcher.

IMG_2525

A, Style-45N, 1/16″ x 1/4″ Pattern Notcher. Turns out it works perfectly for this purpose.  It cuts the perfect notch for getting the package open plus all one needs to do is put the margin edge of the packaging into the notcher until it stops then close the notcher with your hand and done!  Wow what a really fantastic solution!  I can quickly and accurately place the notch and make the cut in seconds then move onto the next pressing homesteading project.

I made a short video about my experience and demonstrate the way that “Works for me”.  Hope you find this information useful. -13