Pineapple- Added skin cutting/core of one pineapple, worms found within a day, completely consumed within a week in both bins. Next time I’ll either photo or video the experiment.
Onion- Added end pieces to both bins. At day 2 the underside had many of the smaller worms but the adults seemed to stay away. I’m sure they weren’t larvae of something else. Will take photos or video next time.
Broccoli- Added several stalks. Next day the odor was noticeable several feet away from the bin. I noticed that day the worms were all over the waste in the bin. By the next day they had all withdrawn below all of the waste they were feeding on. I removed as much as possible to the compost bin. Follow up will be in the next post. I’ll never put broccoli in my worm bins again, only the outdoor compost.
Cucumber- I didn’t think there would be any issues with cucumbers in the worm bin. I wasn’t sure the vinegar soaked ones would go over well so added one small slice in a couple of the corners of the bin. Surprisingly they had disappeared. There was about half a cucumber left so I divided it between the bins. By the 3rd day it was all gone. I’ve noticed that with most of the food the worms will be eating from the underside, but not with the cucumbers. Each time I’ve put it in the bin they are all over it.
Uh-oh, another, thought I’d done this already! What the hell is going on in my head!
On topic! Here is my Works-For-Me moon clip carrier. Cannot believe how well it works! For me. Thinking mostly everything is in the video so I’ll make some brief notes here.
S&W 642 J-Frame size.
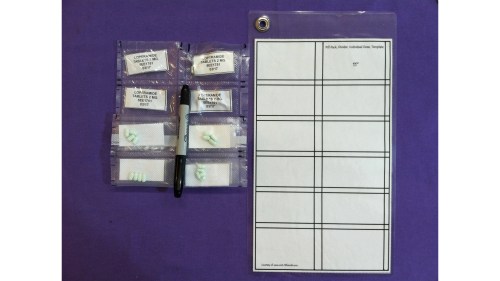
I had everything on hand for this project. The medicine bottles, specimen tubes, hot melt glue and small screws.
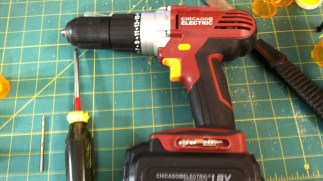
Tools required, some type of saw that will saw brittle plastics. A way to drill. A screwdriver.
The reason I didn’t make the specimen tube shorter (2″) is because the bullet part of the round came into contact with the tube lid. In addition, the bottle seems to be tapered, so the further the rounds were inserted the tighter they became. To much for a quick release.
Next ones I’ll make will use larger stainless screws. So far I have not had any problems with these at all. Currently I’m experimenting with bat grip tape wrapped around the bottle. So far the results are promising but time will tell. Let me know what you think. Thank you for checking out my stuff. -13
This Preparedness – Prepper – Hiker Vacuum Sealer Tip may get you arrested. Sensational title but true. Those of us who take multiple pills whether they’re prescription medications or supplements often use those multi-dose/day pill containers. Doing so could get you arrested, maybe prosecuted. Prescription medications are supposed to remain in their original container according to the law as I understand it.
There are all sorts of possibilities which is why the only advise I ever give anyone is, seek the advise of legal counsel and medical professionals before you do whatever it is you’re up to.
I made these pill packs originally for backpacking/hiking trips and as a way to carry a small amount of vital medications on my person at all times. Ever miss your ibuprofen, antihistamine or whatever because you didn’t have it with you? Yeah me too but no longer. Plus it helps save money buying in bulk and having to not throw out medications stored improperly.
I make up a new pack/s every time I have to open bulk meds. Usually fill one or two of the individual pouches and then put the rest in a larger pouch for long-term storage. I always include the name of the drug/supplement, type/concentration, lot number and expiration date. I never separate this information from anything I place in these pouches until I’d consumed the contents. It’s very important to keep them together.
Things I find helpful to have on hand, a red sharpie makes it easier for me to see the marks so I can line them up with the heat sealer portion of the vacuum sealer. A funnel helps with precise placement of the pills. I have a short extension of soft plastic tubing but couldn’t find it for the video. It’s good for reaching to the deepest part of the pouch when trying to get pills that want to grab the pouch material instead of slide.
I laminated my second printing for durability because the first one was getting beat up from use, and also added a grommet to hang up or bind with other similar items.
Expired meds shown in the video are kept past their expiration date if preserved correctly following the DoD Shelf Life Extension Program. I would include a link but the government has removed them. Not sure how you’ll get that info now I don’t have anything to share at the time of this posting. Research it maybe you’ll find something.
Everything else I think, is in the video. Check it out. -13
I can hardly believe the numbers. I’ve been messing around over at YouTube getting things in order over there, trying to understand things better and clicked on the wrong button. It went to the first page of my videos. When I was checking out the views on the videos listed I couldn’t believe how many views my compost sifter had. It’s really exciting to see that there are many people interested in composting and possibliy organic gardening. Really hope my video inspires and lifts people up. -13
Grainger.com price jumps after registering online. How does that work? I’m confused. I’ve been ordering online and from Grainger for many years now and I can never remember the price getting higher after I registered at any website. Not once. Until now.
I casually clicked over to Grainger.com. Typed “garden hose fittings” into the search box. Found what I was looking for placed it in the cart. I thought I was ready to check out so the site wanted me to register to continue. Thought I had done this but may not have because I’m tired of having to log onto sites, keep track of passwords/login and would rather not use the website to store any information. I certainly won’t leave cashless type card information on file anywhere. It’s safer to have to enter it each time.
Enough of security measures ramble. Registering raised the price $2.41 per part. At first I thought I had remembered the price wrong. I had switched to another tab to follow the register procedure so I could place the order. For a moment I forgot about the other tab that was open with the original search because I went on a search tangent from the second tab looking at all the stuff Grainger is known for.
When I realized what I was doing I stopped the tangent. Started to check out and was looking at the price of the items and thought something didn’t look right. I thought for a moment then remembered the other tab with the price difference. I was surprised to see that they were different in price, much different to my eye.
For now I made this blog and a video to document the experience and will search for other sources for heavy duty garden hose parts. I do not mind paying a higher price for quality parts that will last. A quick look at any of my gear or equipment will prove it. I do have a problem paying more after registering at the online site.
I could call or contact the company but have such a distrust of corporate representatives that I believe about 95% of what they say is complete crap or should I be more clear, lies. That is based on the many years of hearing it over and over. I do like Grainger, they have so many products it’s hard to wrap around the scale of it. They have an excellent reputation on all the farms and ranches I’ve ever been to.
However we end up back at the corporate group think and how it will always be to cover their asses. I’m curious to know what other’s experiences have been. And where can one find heavy duty, I mean fit for using around large animals, tractors or at a fire station, hose end parts that will fit heavy duty 3/4″ garden hose lines.
Several years ago I packaged an emergency kit in vacuum sealer packaging. Tested it, and was completely shocked to discover how tough the packaging is and how difficult it can be to open without using some other instrument or object. Attempting to open one of them by hand-only proved impossible to do without assistance. It also made me realize how important and useful the tear-notch on freeze dried meals made for backpacking could be.
An individual, with an injured hand and/or dentures/front dental work would be at risk for not being able to open the package without assistance from an object or the tear-notch. With a tear-notch it may be possible place part of the package underfoot and tear with the uninjured hand. I know this for sure, I cannot do it without the tear-notch.
The first experiments with nothing more than a simple straight cut with the scissors worked fairly well. I noticed though when I decided to cut a “V” shape into the margin on the packaging that it was easier to open and the tear didn’t seen to veer off like the single cut did. Sometimes when I was testing the single cut way the tear would not always follow into and open the package, it would follow the margin and made it just as difficult to open.
I like the V cut over the single cut because it is more visible and easier to use. There are a few things I don’t like about the V cut. First it takes two cuts to make, that is a lot of cutting when making multiple packages and more than one tear-notch for each package. The cut must be more accurate to ensure that the two cuts meet at the V point, if they don’t it may create another more difficult package to open. It works great but it’s much more time consuming and requires a certain degree of accuracy unlike the single cut.
Not happy with either of those things I searched for another more efficient way to make those notches. I was trying to think of what to search for online when I remembered something I had seen in a sewing supply catalog I had but couldn’t remember what it was. Lucky me I had kept the catalog and found it. The item is a pattern notcher.
A, Style-45N, 1/16″ x 1/4″ Pattern Notcher. Turns out it works perfectly for this purpose. It cuts the perfect notch for getting the package open plus all one needs to do is put the margin edge of the packaging into the notcher until it stops then close the notcher with your hand and done! Wow what a really fantastic solution! I can quickly and accurately place the notch and make the cut in seconds then move onto the next pressing homesteading project.
I made a short video about my experience and demonstrate the way that “Works for me”. Hope you find this information useful. -13


![IMG_0064[1]](https://unit13fremslt.com/wp-content/uploads/2017/06/img_00641-e1497973867175.jpg?w=287&h=216)


