Worm bin notes: Gecko Chaos, All Is Well & Censorship?

Bins 2 & 3, Update 10, 20 July  It dawned on me editing the video that this is a good subject for school kids and I like cussing, so I’ll cuss as much as usual. Or, add a few extra to keep your on your toes, the only difference is I’ll bleep it out.  I won’t use the normal bleep sound.  There are all kinds of interesting and fun sound effects that are a much better substitute.  I’d rather be me, do the bleeps and still have something that may have educational value that a family could watch together.

CENSORED

Since that’s why I started all this to begin with.  Documenting examples of things I did not see on video/photo.  There are always lots of words often with no photographs or video.  I’ve thrown several food waste items in my bins I’m not sure how many times over the last two years successfully.  Then read online at various websites how this or that is a never, no-no, ever! kind of thing.  The worms in these bins have a different opinion on what they find acceptable.

Following no dogma, I like to see for myself, the who, what, when and where.  Then share what is discovered with video/photographic examples.  Much is edited out of my videos for brevity.  I don’t want to waste time with unnecessary footage that doesn’t add anything or document an actual event.  Update 10 video for bins 2 & 3 has more footage than usual because extraordinary events did happen.  It will show more detail how the bins are maintained and recorded.

Bin 2 starts with a little excitement when I discover a gecko in the bin.  Didn’t notice it when the cardboard was moved all the spiders were distracting me.  While I was trying to figure out where and what to do the with more than 20 spiders I spotted a gecko in the bin.

IMG_0588

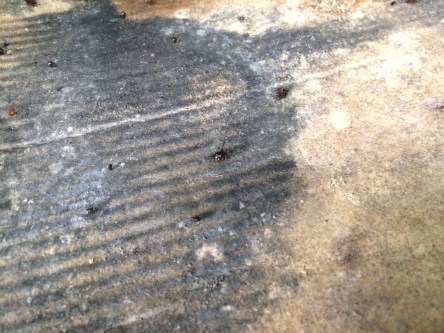
20 July Spiders do well in bin 2

Once you see them you have to move fast or loose your chance to catch them.  When this happens I’m usually able to catch it and let it go outside.  This time all the chaos and my unsuccessful attempt at capture and release was recorded.  Maybe next time.  Hope I get it before the cats do.

IMG_0592

20 July Bin 2 Gecko

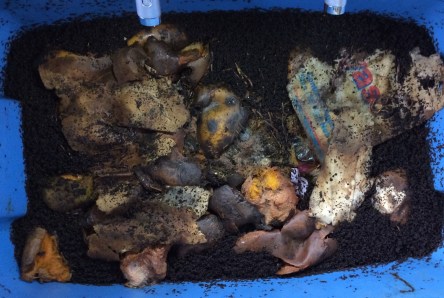
As can be seen in the photos in this blog and in the video, the worms and other insects have picked everything clean.  It’s amazing to see.  The mangos want to grow don’t they?  It looks like a nursery for mangos seedlings.

IMG_0606

20 July Bin 2 Mangos reaching for the sun

There was no noticeable odor or roaches.  Overall it looks good inside bin two.  The addition of more worms has clearly worked.

IMG_0602

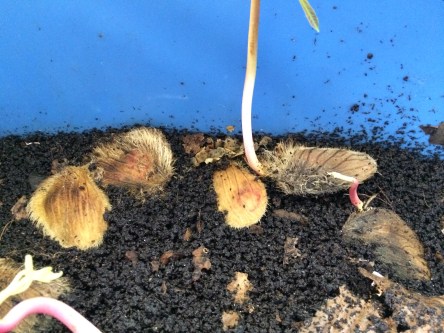
20 July Bin 2 Picked clean mango seeds

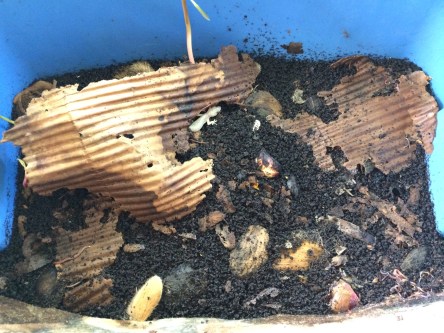
Bin 3  Not much to note about this bin.  No odor, no roaches or chaos.  A single mango seedling trying like all the others.
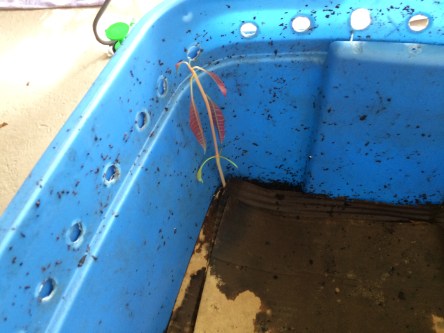
IMG_0626

20 July Bin 3

There must be a lot of worms in bin 3 because they clean the waste in there like a boss.  Look at the photo below or better, the video.  What an amazing transformation.

IMG_0489

July 7 Bin 3

IMG_0628

20 July Bin 3

The video has as much as the fun and excitement as the camera could capture. Would liked to have caught the lizard and moved it off the porch to think if the cats get it leaves me unsettled. But that is life in or on any porch in Florida, a deathtrap for lizards when there is no food source or in many cases, they’re on the menu.  Seems like I have a few regular viewers and readers of the blog.  That’s a surprise.  Hope you find something useful here while you visit. -13

Worm bin notes: Roach Rodeo Arrives, Chaos Ensues

Update 8, Bin 1, 10th July.  Need to remove the dead grass out of a planter and recycle it into the bin.  Everything set up to film, before recording began I removed the lid to make sure everything was in frame when the pursuit began.  Caught a roach off guard.  After tearing through all the cardboard caught the only roach in sight and ended it there.  Searched the bin several times and saw nothing.

IMG_0505

10 July  After Roach Rodeo Chaos

The video starts soon after the roach rodeo ended.  Not very good footage of the transfer.  Doing any task while watching it though the camera is not as easy as one might think.  No offensive odors to note.  Did not add any waste there was plenty from last time.

IMG_0512

10 July  After photo.  Patch of grass added.

20th July  Time to check bin conditions.  Set up to film, hit record before I started this time.  Roach rodeo part two begins as the cardboard is removed.  It nearly escaped me it moved so fast.  All the gory details caught on video.  There was another roach in the cardboard that was taken out of the bin and set aside.  Caught that roach and it is on its way to somewhere.

IMG_0552

20 July More Roach Rodeo Chaos Aftermath

The overall condition of the bin looks like its progressing well.  There are worms dispersed throughout the waste.  The roly-polys are thriving the evidence is visible in the bin.  There are maybe 50 or more.  It’s hard to tell for sure.  Plenty of white dot bugs wish I could see them under magnification.  No foul odors.

An observation on onions in all of my bins over time.  An onion, no not just the onion, most of the root/underground grown plants take much longer to decompose in the bin.  The thing to note about the onion is while it looks like not much is happening from a top view, when turned over the bottom will be full of small earth worms.  Not sure if I have footage yet in any of the videos.  It appears that the younger worms are attracted to them.

IMG_0535

Those mangos like theses bins.

To wrap it up, added a small amount of mangos and greens.  Covered it with cardboard as usual.  Didn’t add water this time the humidity level looked good.  There isn’t much soil at this point so moisture levels have to be maintained and monitored.  I’ve seen the top layer dry before.  It helps to keep the cardboard close to the surface of the waste yet still have air flow.

Filmed a short video inside the bin.  Not much to see.  Close up view of how I like to see this bin with all the activity.  Next time we’ll see if there’ll be another uninvited Roach Rodeo in town.  For now everything looks good in the bin.

The title of the video was another topic I wanted to cover.  I had come up with two.  First was “Invaders caught, 3 Dead, Search continues” all of it true and clickbait as it gets.  Sounds like and inspired by local headlines.  The other choice was “Roach Rodeo Comes To Town”.  That one is fun but not as headline dramatic as the first one.  The next Worm bin notes will be more challenging and fun to title.  Another reason why this is called the Vermicompost Experiment. -13

All Good In The Wood by Audionautix is licensed under a Creative Commons Attribution license.  For more check out the artist at: http://audionautix.com/


Note: 23 July 2018, as an experiment I changed the title of the video and blog to “Worm bin notes: Roach Rodeo Arrives, Chaos Ensues”.  Lets see what happens.  -13

Worm bin notes: More trash than you can eat? Call friends!

Update 9 for bins 2 & 3.

1JUL2018- Bin 2 & 3, moving worms from bin 3 over to 2.  There is a noticeable difference in consumption between the bins.  Both bins have an odor from the mangos.  The smell is only noticeable when removing the cardboard layer and expected at this point in the process.  Surprising how there is no smell only feet away.

IMG_0450

Bin 3 1JUL2018

IMG_0454

Bin 2 1JUL2018

There was a buildup of moisture on the lid and cardboard in 3.  Looked like it was about to rain.  The amount of worms were not as visible as I thought they might be so I only scooped up a few handfuls to move over to bin 2.  See how this affects the bins before moving more.  They’re usually more concentrated making it easier to move with less casting loss from the donor bin.

This time the food was evenly distributed and it seems so were the worms.  In the past they did not receive as much as once so they gathered in more concentrated groups.  Easy pickings when it’s time to move them.  They’re in bin 2 now so lets see what happens next.

8JUL2018- Bins 2 & 3, clearly the addition of worms from bin 3 over to 2 made a big difference.  The before and after shown in the video is amazing to see and demonstrates why it was a necessity.  When opening the bins there was no foul odors and it looks like I’m keeping the roaches out.

Forgot for refill my water sprayer before I started so none of the bins were sprayed this time.  I’ll give them a spray Monday or Tuesday they won’t need much.  Bin 2 didn’t look like I’d added anything except that all the excess was leveled.  Bin 3 had the low spots created when removing worms on JUL1 that will slowly even back out.  By the next time they’ll be close to unnoticeable. It is another interesting thing to see happen in these bins.

Wasn’t much to do but add more waste and let both bins equalize with all the changes.  I have to get better at taking stills for all the reasons I use them.  When I don’t it bites me in the ass every time, that and the autofocus. Check out the video below for some good close ups of the worm transfer.  -13

Worm bin notes: One meal at a time

Update 7, Bin 1, One meal at a time and lots of poop is how it will be built. Watching this process is fascinating.  Waste in, waste out, soil.  No foul odors or unwanted insects.  Looks like the population is growing.  There were plenty of the roly-polys and a few worms visible.  Didn’t want to disturb much so they will settle in.  When they’re hard to see like that they are usually directly under a food source.  Rather leave them be so they can flourish.

I’ll wait another few weeks or so before digging around in there to see how the worms are doing.  Next time I film these bins I’ll try some different views for a closer look inside the bins.  Check out the state of bin 1 in the video below.

Worm bin notes: Undisturbed they settle in

Update 6, bin 1.  This update starts with a seedling mango tree trying to compete for food with the worms getting put in its place.  Then, not much.  No foul odors or unwanted insects.  All left undisturbed so they can settle in and start building without interruption.

Added new waste to shallow end to see how long it takes to build up to the other higher level.  This is my favorite bin at this point due to the nature of the experiment.  Unknown worms and other insects from an unknown source plus the roly-poly stray adoption along the way.  From the smallest worm find until now it keeps getting more interesting as they increase in size and population. -13

Short video below check it out.

Worm bin notes: Give them enough time

Update 8 for bins 2 & 3.  Bin 2.  Need to add more worms and will within days.  No foul odors looking good.  Insect populations flourishing.  No roaches visible.

Bin 3 is in the same state as bin 2.  There is more waste consumed validating my need to move more worm into bin 2.  The good news is there is not much to note. -13

Video of Bin 2  & 3 progress.

Worm bin notes: Death of a roach

Update 7 for bins 2 & 3.  Bin 2 is looking good.  No foul odors.  Looks like there is a notable amount of waste left in here than in bin 3.  This is indicating I need to move more worms from bin 3 over.  The difference is clear to see.  Moisture level seems good.  I’ll need to add more cardboard soon.  Better add some sand next feed time.

Bin 3 is working like a well oiled machine.  It’s unimaginable how much they can change the landscape inside the bin.  Somehow they move half a mango to make it look like it’s sinking into the soil.  Totally amazed by that.  Seems like there are more of the white dot and skinny bugs in bin 2 than in this bin.  Maybe they’re subsoil when the waste gets that low.  I can see them move in and out of the soil when I watch them.  Mostly I see them on top.  No foul odors.

IMG_3983

Last post I mentioned roaches.  Thought it was going to be a big hassle to find it.  Wow was I wrong.  As I was moving the cardboard out of the bin the roach ended up in my hand.  At first I didn’t know it was there because it was in the gloved hand.  I then noticed something kind of squishy.  Thinking it was a small pile of worm bunched up I quickly looked where my fingers sensing the difference.

It was the roach, or a new one.  I was in disbelieve it was that easy.  Couldn’t have planned that in a million years.  Once I realized my luck I threw it on the floor and killed it.  The cats sitting there supervising me.  Hope that was all of them.  -13

Video Update 7 Below

Worm bin notes: They aren’t alone

Update 5, bin 1.  Amazing progress.  There are worms everywhere in that bin.  I thought they would be concentrated in the thicker soil under all the food waste I’ve been feeding.   What a surprise to find then in numbers under the decaying grass introduced last week.  They all look healthy.  The roly poly are also doing well I could see many smaller ones running around in there indicating reproduction.  They might overrun the bin.  If they do I let them loose on my yard compost pile.  It is an experiment.

When I lifted part of a mango I found another unidentified insect alongside the worms.  Was able to get a close up on video.  It looked like something I’ve seen when pulling bark off a rotting tree.  Maybe I’ll be able to figure out what it is.  Guessing it was in the soil that the worms were in when I introduced them to the bin.

Can’t remember if I was going to start putting waste on the thinner soil side this soon.  After seeing the number of worms under the grass I will.  Start building it up.  Couldn’t be more fascinated by this bin and it’s progression.   The distribution and number of worms, rapidly reproducing roly polys and a new species.  Added strawberries, sprayed a good rain to keep the moisture up seemed a little dry in there.  The hard part at this point is knowing how much waste to put in without creating a stinking mess.  Don’t want to over do it.  -13

Video Update 5 Below

Vacuum Sealer Project: FIRESTARTER

The simple vacuum sealer. One of my favorite appliances made for home use. I’ve always wanted to have the ability to vacuum package my own stuff since I opened one in the 70’s.  It might be survival supplies, clothing I want to stay dry and compact, or something good to eat.  Around here seems like the sealer gets used for non-food items as much as repackaged food or snacks.

Sometime in 2016 I started to update our fire starting kits.  In the past my fire starting kit included military surplus matches/trioxane fuel bars/toilet paper packet, flint/steel/char-cloth/extra cloth/in a tin, Bic brand lighter, a Doan Magnesium Firestarter, pine heart wood, magnifying glass, and wildcrafted tender that was constantly in need of replacement.

I always use the lighter first.  All the rest of it backup or an aid when the flames needed a little help.  The updated kit for everyday fire starting is very small, natural fibre tender, lighter and WetFire if the fire needs help.

FS IMG_1575

The survival fire starting kit has more options based on the many fire starting failures and successes I’ve experienced over the years.  I know what does and does not work for me.  There is nothing like suffering as a motivator.  If at all possible I won’t do without a heat source.

The updated kit is set up to be self contained within an individual survival kit or pack.  All of the items within the kit are vacuum sealed individually.  Each vacuum package is over size to allow the package to be reused after opening.  The length is long enough to allow the end to be rolled up then held closed with a rubber band included in each package.

Not sure if this would work I tested to see if this would be enough to keep out rain or a dunk in water.  Part of a paper towel was placed into the package.  The torn edge was rolled then held in place with a rubber band.  The sprayer on the sink set to high, water blasted on the package from every angle for a minute or so with no leak.

A similar test was set up for dunking.  The same package used to test before was used for this test, nothing was changed on the package at all.  The package was held underwater in a drywall compound bucket for about thirty seconds to a minute.  I held it down by hand and moved it gently in the water to simulate a quick immersion in a body of water. Thinking as if this was in my pocket and I fell into water somehow and was able to get out quickly.  Again, the result, dry.

Wouldn’t it be great if I’d filmed it.  But no! It was an after thought.  Not so much as a photograph.  Getting used to that now.  Better off doing your own testing for sure.  The packing material rolled tightly along with the compression of the rubber band worked much better than I expected.

The contents are mostly modern.  I’ve eliminated the old time flint-steel and military surplus trioxane/matches/T.P.  The kits may still contain military surplus like a Doan’s firestarter  or folding knife since those seem to last forever.

Added UCO matches to the standard book matches and Bic lighter.  Anyone who has not seen the testing done on the UCO matches should see it then make up their own mind.  If it gets down to lighting a fire with matches I think those are my best chance of getting it lit.  They are the only match I know of that will still be lit if I manage to drop it in water.

FS IMG_1596

Various types of tender.  A tin of pine heart wood with a high pitch content, cedar and hardwood shavings, alcohol prep pads and WetFire cubes.  Magnifying glass and fresnel lens.  Swedish Fire steel purchased on sale with either a Camillus military stainless four blade folder or a Victorinox Pioneer knife.

FS IMG_1595

All of it packaged in a waterproof vacuum sealed pouch made at home.  It measures roughly 5 1/2″ x 8″, 1lb 3oz or 540g. The kit will never be a problem to keep on hand.  The last addition to the kit was a by accident item.

A friend came back from a professional convention and handed me several nylon carry bags.  I looked at them, they had cord configured into a backpack.  Didn’t think much of the flimsy things so I set them aside.  About an hour later a thought smacked me in the head like a hammer.

IMG_4035

I grabbed one, folded it a few times, it fit the fire starting kit profile.  Like it was planned that way.  The thought that hit me was how useful the bag would be in gathering all the small stuff needed to start a fire that is difficult to transport without loosing valuable resources.  The thinking was what if the fire starting kit was the only survival item I had on my person a way to carry things would be very helpful.

IMG_4056

Sure the bag is made of imported nylon and cordage.  The thing is, all it has to do is work well once for a short period of time.  If the bag is not overloaded I have confidence it will hold lightweight items for a few days until help arrived or conditions changed.  The already made kit and the bag were added to another vacuum pouch then sealed.  That way the bag can be retrieved without having to open the fire starting kit if its not needed.

Don’t forget the tear notch!  Must have the tear notch no matter what your preference!

IMG_2520

Tear notch samples

This video was filmed in early 2017 after getting all the items together.  I noticed after making the package in the video I had left the knife out.  That’s what I get for not making a checklist.  It was not filmed but the knife was added as soon as I moved some of the stuff visible to the right in the video.  The knife was covered by some it.

This is a kit I never want the need to use it.  Because if I do need to use it, it means something has gone wrong. -13

The video.

Video Projects: Correcting my mistakes: MOLLE 2 Pack Belt

Correcting my mistakes.  That is what I made this video about.  While recently dyeing a surplus MOLLE 2 pack belt to check the progress and color of it was placed in the sink.  My thought was run cold water over it to cool it so it could be easier to handle.  That turns out was the wrong thing to do.

When the belt was taken out of the dye bath it was in it’s original shape and retained the cushioning properties.  After the belt was placed in the sink, the cold water was turned on.  The moment the cold water hit the molded foam part of the belt it collapsed in an instant.  I was watching when it happened.  It looked like a vacuum sucked all the air out of it.

Total disbelief and amazement.  I stood there and stared at it for a moment because of the shock.  After that?  Time to fix it.

The materials were on hand to make the belt useable again.  Closed cell foam that won’t absorb liquids and 1000D Cordura to cover it with binding on the edges with military spec DOT brand snaps.  At first I thought that I could  cover a single piece of foam, attach it and I’m on my way.  That was not going to work because of the geometry.  I decided to make the pads in three pieces attached by snaps.  Both item I can repair or remake in my shop.

The video was made over a year ago so the first microphone I was using will sound much different than the microphone I used to do the voiceover.  The difference will be noticeable.  Nearly all of the video and many others from that time frame had music playing in the background that would for sure get a copyright claim on YouTube.

Lessons learned, turn the music down when I’m speaking/recording so I can save myself the hassle of fixing it later.  And, don’t run that molded foam under cold water when removing it from the hot dye bath! -13

Here’s the repair video.

Austere Medicine: Improvised Aspirator

Aspirator, one medical device I do not want to be without when I need it.  In an effort to be prepared I wanted to have several options.  Every once and a while something will catch my eye as potentially useful for this purpose.

One item is the FreshSaver battery operated hand held vacuum pump and another, a Harbor Freight transfer pump.  Something battery operated and something manual.  I was fairly confident the FreshSaver would work but had no faith in the transfer pump because of the quality.

By drilling out the hole on the FreshSaver I was able to retain the plastic seal.  It works perfectly on the tapered fittings on any suction canister.  It had very strong suction.  When I was experimenting with it I covered the inlet and let the vacuum draw on the unit and believe it has adequate suction to work well.  The battery may not last very long but it might last enough to get though a bad situation.  I like the way it worked so well I’ve added the FreshSaver to my aspirator kit as a backup.

The transfer pump worked much better than expected.  Didn’t have much trust in it but it worked.  The video footage demonstrates it.  Battery operated is fine, however I always want a manual way that doesn’t include batteries or electricity.  The transfer pump connected to any standard suction canister will be effective in my mind as long as all the connections are leak free.  Another one added to the aspirator kit for backup.

Some things to remember, when the vacuum pump is connected the canister will be top heavy so it must be accounted for.  Also the nipple connected to the pump could snap off from the weight of the pump or by getting bumped.  In the video I had configured the pump to connect via hose instead of directly to the nipple.  This reduces the risk of both the top heavy issue and snapping of the nipple.  I felt this configuration would work best because it makes the control to the vacuum more accessible.

It was a challenge to sync the videos so I could get the best audio but it worked.  I have an experiment in mind using clapping and will use it next time I make a multi camera video.  Below is a video I filmed when I made this experiment.  I used three old iPhones, one i5 and two i4’s.  Footage shot above from the front looked like it was recorded on a VCR from an antenna fed television in the 1980’s.  So we’re stuck with a partially blocked screen side view and a very clear side/front view.  Surprisingly the angles caught all of it. -13

VIDEO BELOW

Worm bin notes: Life is good in the bin

Update 6 for bins 2 & 3.  Bin 2 is progressing along nicely.  The worms from bin 3 seem to help keep the balance so I can put an equal amount of waste in.  It appears healthy and moist.  I may add more worms from 3 later but am still watching the consumption rate.

Bin 3, doesn’t seem to have any noticeable difference in the consumption rate since I moved the worms.  The soil is moist.  There’s an abundance of the smaller insects that usually inhabit the bins.  Everything seems to be fine.

I did notice a roach on the cardboard when I was editing the video and have yet to locate it.  Here I go again with the roaches.  I haven’t introduced anything questionable to the bin lately so there hasn’t been much to note.  I’ll keep taking before/after stills and video to track the consumption rates, and when I introduce a questionable item that I haven’t filmed before.  Time to hunt for roaches. -13


Video Update 6 Below