United States Postal Service Fairy Magic or Amazon Fairy Tales?

I almost don’t know where to start with this one.  I’ve been sitting on it for some time now trying to figure it out.  Over the last year or so I’ve been watching how the United States Postal Service (USPS) and Amazon do business.  It is not making me happy what I’m seeing/experiencing.

T-1

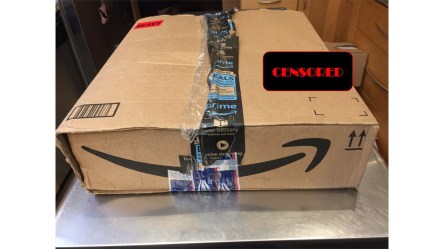
Replacement order package. Personal information censored.

Before I start dissecting them I’ll make it clear.  If I like doing business with a company I’ll do things to help them.  A few examples are, give them a good recommendation, pick up an item off the floor that I didn’t put there and place it back on a shelf or notify an employee of a slip hazard such as water on the floor before some lawsuit zombie shows up.  One thing I will not do is enable a company to stay in business if I believe they’re doing something illegal, harmful to others or crappy business practices.  I want to have a good experience with a business to share it with others so they are successful.

T-2

Replacement order other corner damage.

I grew up where everyone in the post office knew me by name.  Watched me grow up.  I know the USPS can do better.  Previous experiences with the USPS in recent years has led to disappointment.  I lived at an address where the carrier would have the package in the truck, yet deliver the mail with a “missed you” notice.  The notice stated we weren’t available so they left the notice.

T-3

Bottom of replacement order package.  Properly taped it works like this.

Only problem with that was I was tracking the packages.  Sitting in the front room waiting so I could watch the mail carrier walk up to the front door.  I did watch the carrier.  He got out of the truck with a handful of mail in hand, quickly walked past the front door to the mail box, dropped in what he had brought and left as quickly as he arrived.  After that he delivered mail to the other houses in the area.  Several times.  Of course I didn’t film it.

T-4

These air cushions don’t hold up well with heavy or sharp products.  Many are flat.

He was there and gone before I realized he had left the notice.  I then checked the tracking information to verify I had not misunderstood.  Called the post office they said it was on the truck.  Weren’t interested in why the carrier would leave a notice without trying first.  I was sitting there watching him!  I finally got the package.

T-5

Replacement order package inside damage.

Shift to the more recent experience with Amazon and USPS.  Tracking my package because I need what I ordered.  Morning -package out for delivery.  Midday -not here. Almost 5pm not here.  Sometime after 6pm package delivered.  That’s odd I thought, I never heard a knock, the door bell and the dogs never said a thing.  The tracking information said it was delivered so I went outside to look around from the mailbox to the front door I could not find a package.

B-1

Original order package as left at the front door.  Personal information censored.

Aware of the package thievery going on I was sure someone had taken it between the time it was delivered and the moment I looked for it.  As soon as I realize the package was not here I contacted Amazon.   I told them the package was not here. They said the package was here.  In the mail box.  I’m thinking, what like the one in the featured image? If not there it might be a the neighbors house.

B-2

Original order package.  Personal information censored.

So lets follow that, I’m at home, no one knocks, rings the bell or does anything to alert my dogs then decides to leave the package at the neighbors house?  I asked how would that happen given the fact I was at home.  Did the carrier decide to suddenly take it next door without leaving a notice?  What the…..?  So now I’m supposed to walk around the neighborhood and try to figure out where it package is.

B-3

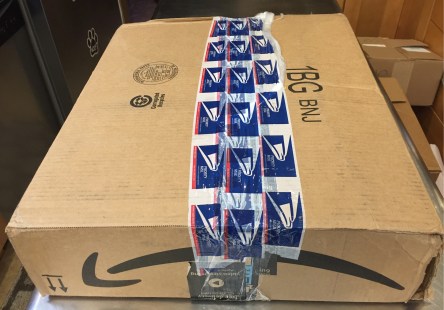
Bottom of original order package.  3 tapes and stretch wrap visible.

So much for the “delivered to your front door” idea.  And, hell, no I am not going to look for a package not delivered as agreed.  The reason I say delivered to the front door is because the package will not fit into a mailbox.   The largest mailbox I’ve seen won’t handle that size box.

B-4

Close up of corner damage.

Back to the Amazon call.  I let Amazon know I was not looking for packages around the neighborhood like an easter egg hunt.  That I wanted them to resend the order.  They did.  It was there early the next day to their credit.  Here is the major problem as I see it.

B-5

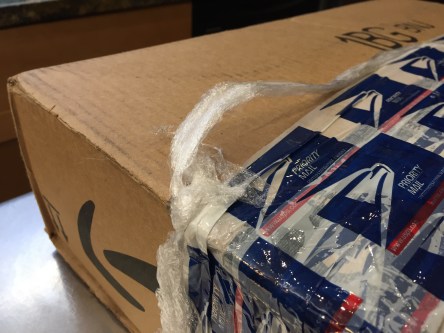
Close up of USPS tape, stretch wrap.

Enabling.  Integrity.  As the Amazon employee was reordering my missing items I was able to ascertain the following practice by the USPS clearly condoned by Amazon.  The employee stated that I might want to wait until the next day to see if the package would be delivered.  Said that the USPS will mark a package as delivered when it has not been then make the delivery the next day.

B-6

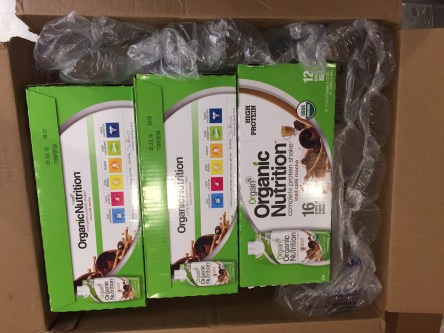
Deflated packaging.  This is how it looked when I opened the package.  Nothing was touched before the photo was taken.

That to me demonstrates a complete lack of integrity by anyone participating  in the practice.  I repeated back to confirm what I had heard and the employee did confirm I understood correctly.  Twice!  If a representative from either one of them reads this and attempts to explain it away remember this, “I repeated back to confirm what I had heard and the employee did confirm I understood correctly.  Twice!”

B-7

The shinny side of tape.  Workers who use paper tape dispensers know what this means.  Notice the cardboard box below it.  Not a hint of adhesion.

We have the USPS marking packages as delivered when they clearly have not been and Amazon telling customers to wait for their “already delivered” packages until the next day for it to be –delivered!

B-8

The place where the cardboard is disturbed is where the clear and USPS tapes were applied to the box.  The paper tape properly applied should to the same thing to the box.

NO and NO!  Not only is it a total lie it looks like fraud.  An attempt to deceive.  Are they doing it so they don’t have to refund shipping fees or to keep up quotas?  There is something going on.  I won’t participate in crap like that.  This reminds me of when I was an investigator.  I always seem to stumble onto some kind of crap going on when I’m not looking for it.

B-9

Shinny paper tape and nearly no damage on the box where it would have been attached.  Why I think the box was not delivered that day.

More on the delivery.  Next day, I’m at my desk, the dogs and I alert when we hear an unfamiliar dropping sound near our front door.  We investigate.  I notice two packages at the front door.  The top package looked ok with a little damage the one on the bottom was trashed.

There they were.  My original order and the replacement setting on top.  Somehow my original order magically appears at my front door.  The package falling apart.  The box had Amazon tape and what looks like three other types of tape and stretch wrap on it.  The contents were undamaged.  That was a surprise considering what the box looked like.

Based on my experience using a tape dispenser it looks like the Amazon tape did not get either enough or any water on it so it did not stick.  A few of the photos show how shinny the tape is on the adhesive side.  If the tape had the proper moisture on it, it would have stuck to the box.  My photos aren’t that great but it can be seen. Have to check the water level on those dispensers or this kind of thing will happen.  I know from using one.

I want the USPS practice of marking packages as delivered when they have not been to stop.  It’s fraud and lying in my view.   I want Amazon to package their products better and stop using the USPS as long as they do business like that.  I’ve stopped ordering from Amazon and using the USPS for shipping anything other than everyday mail.

Wasn’t sure what to do with this now. It’s all here.  Sorry it’s taken me this long. -13

Austere Medicine: Mega Medic Bag / MOLLE 2 Pack Frame Attachment Points

The first video I made on this bag.


The Dyna-Med Mega Medic bag is one of my favorite bags to use.  Only problem is when I pack the bag it gets heavy.  Sometimes 35+ pounds.  I need a better way to move the bag than hand or over shoulder carry with that kind of weight.

I have a broken MOLLE 2 pack frame I like to use for experiments so I don’t break a good one.  By chance I laid the frame next to the mega medic bag setting on a table one day.  It was easy to notice how close they were in size so I set the bag on top of the frame and this is the result.

A video how I modified the mega medic bag to attach to the MOLLE 2 pack frame.  It’s not a how-to, it’s a how I did it video.  The process was simple but time consuming.

Put the bag on the frame, pick the best spots to attach webbing.  Mark it, get the dimensions for the webbing, mark, then cut the pieces.  That process took maybe 45 minutes to an hour.  Once the webbing is ready its sewing time.

I knew sewing was going to go slow.  The pieces I’ve added would have been sewn on much sooner in the assembly process reducing the time drastically.  The time was no problem since quality/accuracy is more important to me than speed.  The webbing straps make it easy to attach to the MOLLE 2 frame.  Think this took more like an hour plus but I’m not sure.

I did notice over the last few videos how bad the audio is so I’ll attempt to make it better. Several issues there that must be addressed.  After I’ve updated the kit contents I’ll make another video about the bag to include kit content and modifications. -13

Video of modifications.

Worm bin notes: Death of a roach

Update 7 for bins 2 & 3.  Bin 2 is looking good.  No foul odors.  Looks like there is a notable amount of waste left in here than in bin 3.  This is indicating I need to move more worms from bin 3 over.  The difference is clear to see.  Moisture level seems good.  I’ll need to add more cardboard soon.  Better add some sand next feed time.

Bin 3 is working like a well oiled machine.  It’s unimaginable how much they can change the landscape inside the bin.  Somehow they move half a mango to make it look like it’s sinking into the soil.  Totally amazed by that.  Seems like there are more of the white dot and skinny bugs in bin 2 than in this bin.  Maybe they’re subsoil when the waste gets that low.  I can see them move in and out of the soil when I watch them.  Mostly I see them on top.  No foul odors.

IMG_3983

Last post I mentioned roaches.  Thought it was going to be a big hassle to find it.  Wow was I wrong.  As I was moving the cardboard out of the bin the roach ended up in my hand.  At first I didn’t know it was there because it was in the gloved hand.  I then noticed something kind of squishy.  Thinking it was a small pile of worm bunched up I quickly looked where my fingers sensing the difference.

It was the roach, or a new one.  I was in disbelieve it was that easy.  Couldn’t have planned that in a million years.  Once I realized my luck I threw it on the floor and killed it.  The cats sitting there supervising me.  Hope that was all of them.  -13

Video Update 7 Below

Worm bin notes: They aren’t alone

Update 5, bin 1.  Amazing progress.  There are worms everywhere in that bin.  I thought they would be concentrated in the thicker soil under all the food waste I’ve been feeding.   What a surprise to find then in numbers under the decaying grass introduced last week.  They all look healthy.  The roly poly are also doing well I could see many smaller ones running around in there indicating reproduction.  They might overrun the bin.  If they do I let them loose on my yard compost pile.  It is an experiment.

When I lifted part of a mango I found another unidentified insect alongside the worms.  Was able to get a close up on video.  It looked like something I’ve seen when pulling bark off a rotting tree.  Maybe I’ll be able to figure out what it is.  Guessing it was in the soil that the worms were in when I introduced them to the bin.

Can’t remember if I was going to start putting waste on the thinner soil side this soon.  After seeing the number of worms under the grass I will.  Start building it up.  Couldn’t be more fascinated by this bin and it’s progression.   The distribution and number of worms, rapidly reproducing roly polys and a new species.  Added strawberries, sprayed a good rain to keep the moisture up seemed a little dry in there.  The hard part at this point is knowing how much waste to put in without creating a stinking mess.  Don’t want to over do it.  -13

Video Update 5 Below

Vacuum Sealer Project: FIRESTARTER

The simple vacuum sealer. One of my favorite appliances made for home use. I’ve always wanted to have the ability to vacuum package my own stuff since I opened one in the 70’s.  It might be survival supplies, clothing I want to stay dry and compact, or something good to eat.  Around here seems like the sealer gets used for non-food items as much as repackaged food or snacks.

Sometime in 2016 I started to update our fire starting kits.  In the past my fire starting kit included military surplus matches/trioxane fuel bars/toilet paper packet, flint/steel/char-cloth/extra cloth/in a tin, Bic brand lighter, a Doan Magnesium Firestarter, pine heart wood, magnifying glass, and wildcrafted tender that was constantly in need of replacement.

I always use the lighter first.  All the rest of it backup or an aid when the flames needed a little help.  The updated kit for everyday fire starting is very small, natural fibre tender, lighter and WetFire if the fire needs help.

FS IMG_1575

The survival fire starting kit has more options based on the many fire starting failures and successes I’ve experienced over the years.  I know what does and does not work for me.  There is nothing like suffering as a motivator.  If at all possible I won’t do without a heat source.

The updated kit is set up to be self contained within an individual survival kit or pack.  All of the items within the kit are vacuum sealed individually.  Each vacuum package is over size to allow the package to be reused after opening.  The length is long enough to allow the end to be rolled up then held closed with a rubber band included in each package.

Not sure if this would work I tested to see if this would be enough to keep out rain or a dunk in water.  Part of a paper towel was placed into the package.  The torn edge was rolled then held in place with a rubber band.  The sprayer on the sink set to high, water blasted on the package from every angle for a minute or so with no leak.

A similar test was set up for dunking.  The same package used to test before was used for this test, nothing was changed on the package at all.  The package was held underwater in a drywall compound bucket for about thirty seconds to a minute.  I held it down by hand and moved it gently in the water to simulate a quick immersion in a body of water. Thinking as if this was in my pocket and I fell into water somehow and was able to get out quickly.  Again, the result, dry.

Wouldn’t it be great if I’d filmed it.  But no! It was an after thought.  Not so much as a photograph.  Getting used to that now.  Better off doing your own testing for sure.  The packing material rolled tightly along with the compression of the rubber band worked much better than I expected.

The contents are mostly modern.  I’ve eliminated the old time flint-steel and military surplus trioxane/matches/T.P.  The kits may still contain military surplus like a Doan’s firestarter  or folding knife since those seem to last forever.

Added UCO matches to the standard book matches and Bic lighter.  Anyone who has not seen the testing done on the UCO matches should see it then make up their own mind.  If it gets down to lighting a fire with matches I think those are my best chance of getting it lit.  They are the only match I know of that will still be lit if I manage to drop it in water.

FS IMG_1596

Various types of tender.  A tin of pine heart wood with a high pitch content, cedar and hardwood shavings, alcohol prep pads and WetFire cubes.  Magnifying glass and fresnel lens.  Swedish Fire steel purchased on sale with either a Camillus military stainless four blade folder or a Victorinox Pioneer knife.

FS IMG_1595

All of it packaged in a waterproof vacuum sealed pouch made at home.  It measures roughly 5 1/2″ x 8″, 1lb 3oz or 540g. The kit will never be a problem to keep on hand.  The last addition to the kit was a by accident item.

A friend came back from a professional convention and handed me several nylon carry bags.  I looked at them, they had cord configured into a backpack.  Didn’t think much of the flimsy things so I set them aside.  About an hour later a thought smacked me in the head like a hammer.

IMG_4035

I grabbed one, folded it a few times, it fit the fire starting kit profile.  Like it was planned that way.  The thought that hit me was how useful the bag would be in gathering all the small stuff needed to start a fire that is difficult to transport without loosing valuable resources.  The thinking was what if the fire starting kit was the only survival item I had on my person a way to carry things would be very helpful.

IMG_4056

Sure the bag is made of imported nylon and cordage.  The thing is, all it has to do is work well once for a short period of time.  If the bag is not overloaded I have confidence it will hold lightweight items for a few days until help arrived or conditions changed.  The already made kit and the bag were added to another vacuum pouch then sealed.  That way the bag can be retrieved without having to open the fire starting kit if its not needed.

Don’t forget the tear notch!  Must have the tear notch no matter what your preference!

IMG_2520

Tear notch samples

This video was filmed in early 2017 after getting all the items together.  I noticed after making the package in the video I had left the knife out.  That’s what I get for not making a checklist.  It was not filmed but the knife was added as soon as I moved some of the stuff visible to the right in the video.  The knife was covered by some it.

This is a kit I never want the need to use it.  Because if I do need to use it, it means something has gone wrong. -13

The video.

Video Projects: Correcting my mistakes: MOLLE 2 Pack Belt

Correcting my mistakes.  That is what I made this video about.  While recently dyeing a surplus MOLLE 2 pack belt to check the progress and color of it was placed in the sink.  My thought was run cold water over it to cool it so it could be easier to handle.  That turns out was the wrong thing to do.

When the belt was taken out of the dye bath it was in it’s original shape and retained the cushioning properties.  After the belt was placed in the sink, the cold water was turned on.  The moment the cold water hit the molded foam part of the belt it collapsed in an instant.  I was watching when it happened.  It looked like a vacuum sucked all the air out of it.

Total disbelief and amazement.  I stood there and stared at it for a moment because of the shock.  After that?  Time to fix it.

The materials were on hand to make the belt useable again.  Closed cell foam that won’t absorb liquids and 1000D Cordura to cover it with binding on the edges with military spec DOT brand snaps.  At first I thought that I could  cover a single piece of foam, attach it and I’m on my way.  That was not going to work because of the geometry.  I decided to make the pads in three pieces attached by snaps.  Both item I can repair or remake in my shop.

The video was made over a year ago so the first microphone I was using will sound much different than the microphone I used to do the voiceover.  The difference will be noticeable.  Nearly all of the video and many others from that time frame had music playing in the background that would for sure get a copyright claim on YouTube.

Lessons learned, turn the music down when I’m speaking/recording so I can save myself the hassle of fixing it later.  And, don’t run that molded foam under cold water when removing it from the hot dye bath! -13

Here’s the repair video.

Video Projects: Like a hot knife. Video satisfaction?

Come one, come all!  See what happens when I cut webbing with a rope cutter!  Sound like clickbait?  I think so too. So, thought I’d make this video because it seems some people like this kind of content.  This comes from another video project I’m working on at present.  Going to post it to the YT and see what happens. -13


Austere Medicine: Improvised Aspirator

Aspirator, one medical device I do not want to be without when I need it.  In an effort to be prepared I wanted to have several options.  Every once and a while something will catch my eye as potentially useful for this purpose.

One item is the FreshSaver battery operated hand held vacuum pump and another, a Harbor Freight transfer pump.  Something battery operated and something manual.  I was fairly confident the FreshSaver would work but had no faith in the transfer pump because of the quality.

By drilling out the hole on the FreshSaver I was able to retain the plastic seal.  It works perfectly on the tapered fittings on any suction canister.  It had very strong suction.  When I was experimenting with it I covered the inlet and let the vacuum draw on the unit and believe it has adequate suction to work well.  The battery may not last very long but it might last enough to get though a bad situation.  I like the way it worked so well I’ve added the FreshSaver to my aspirator kit as a backup.

The transfer pump worked much better than expected.  Didn’t have much trust in it but it worked.  The video footage demonstrates it.  Battery operated is fine, however I always want a manual way that doesn’t include batteries or electricity.  The transfer pump connected to any standard suction canister will be effective in my mind as long as all the connections are leak free.  Another one added to the aspirator kit for backup.

Some things to remember, when the vacuum pump is connected the canister will be top heavy so it must be accounted for.  Also the nipple connected to the pump could snap off from the weight of the pump or by getting bumped.  In the video I had configured the pump to connect via hose instead of directly to the nipple.  This reduces the risk of both the top heavy issue and snapping of the nipple.  I felt this configuration would work best because it makes the control to the vacuum more accessible.

It was a challenge to sync the videos so I could get the best audio but it worked.  I have an experiment in mind using clapping and will use it next time I make a multi camera video.  Below is a video I filmed when I made this experiment.  I used three old iPhones, one i5 and two i4’s.  Footage shot above from the front looked like it was recorded on a VCR from an antenna fed television in the 1980’s.  So we’re stuck with a partially blocked screen side view and a very clear side/front view.  Surprisingly the angles caught all of it. -13

VIDEO BELOW

Video Projects: New 256GB Flash = MORE VIDEOS!

Nearly out of storage space on the computer I use to edit videos, I stopped.  Importing new material and editing.  That was months ago.  The footage comes in faster than I can edit sometimes then it gets behind.  An average of 75 videos each day, five days a week.  It can be overwhelming.

As happened in recent times.  A fantastic combination of an injury, pain and no time.  Thousands of videos piled up like that.  I could store them for later.  My problem with that is what do I store them on.  I’ve had bad experiences with removable hard drives in the past.

That doesn’t leave me much to choose from.  I like portability, accessibility and reliability to be my priorities.  Feels like I’m left with usb flash.  After a few experiments over the last few months I’ve settled for storage on flash storage.  They don’t get used often.  Only when I’m copying new files then they sit in a storage box.

After a recent purchase of a 256GB flash was I able to clear out all of my old projects.  During the clean up I found many old unfinished projects.  Now that I have the time and space I was able to edit another 9 videos.  It is really a good feeling to be able to get this stuff done.

Here are a few of those projects below.  A couple minute video of a squirrel having a good time.  Palm fronds making contact with an electric line, the sounds are scary.  A knight anole hides from me after I discovered it on a palm tree.  A great way to waste a few minutes and distract the mind. -13


Dash Cam: Merge & Exit Madness 4

Merge – Exit Madness is back for number 4 of south Florida crazy driving.  A compilation of dangerous, stupid, selfish things drivers do merging and exiting I-95, I-75, the Florida Turnpike and other highways.  Get ready for CRAZY!

Worm bin notes: Life is good in the bin

Update 6 for bins 2 & 3.  Bin 2 is progressing along nicely.  The worms from bin 3 seem to help keep the balance so I can put an equal amount of waste in.  It appears healthy and moist.  I may add more worms from 3 later but am still watching the consumption rate.

Bin 3, doesn’t seem to have any noticeable difference in the consumption rate since I moved the worms.  The soil is moist.  There’s an abundance of the smaller insects that usually inhabit the bins.  Everything seems to be fine.

I did notice a roach on the cardboard when I was editing the video and have yet to locate it.  Here I go again with the roaches.  I haven’t introduced anything questionable to the bin lately so there hasn’t been much to note.  I’ll keep taking before/after stills and video to track the consumption rates, and when I introduce a questionable item that I haven’t filmed before.  Time to hunt for roaches. -13


Video Update 6 Below

Dash Cam: Fisher Island Ferry

Fisher Island Ferry.  It’s not exactly what I’d like it to be.  Was hoping to get a front row seat but haven’t over the last several years.  In this video we get a good view anyway.  I’ve been surprised how difficult it is to get in front.  It’s all about timing.  There has been other footage but the water was so rough that when the playback speed was increased it made it impossible to watch.

In this video we get smooth water and a decent view.  On the return trip there is I think a Netherlands flagged wood mast ship.  I couldn’t figure out which ship is was and am hoping someone will be able to identify it and share it with us.  Until we have better footage this will be it for the ferry. -13