Uh-oh, another, thought I’d done this already! What the hell is going on in my head!
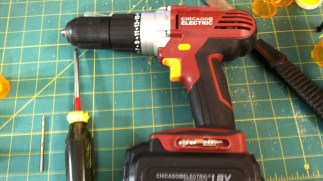
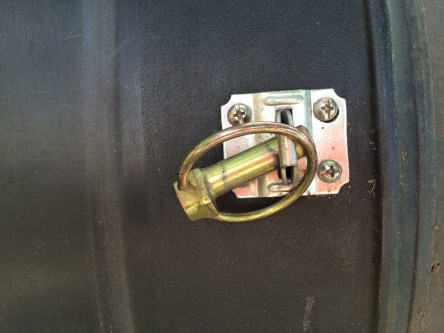
On topic! Here is my Works-For-Me moon clip carrier. Cannot believe how well it works! For me. Thinking mostly everything is in the video so I’ll make some brief notes here.
S&W 642 J-Frame size.
I had everything on hand for this project. The medicine bottles, specimen tubes, hot melt glue and small screws.
Tools required, some type of saw that will saw brittle plastics. A way to drill. A screwdriver.
The reason I didn’t make the specimen tube shorter (2″) is because the bullet part of the round came into contact with the tube lid. In addition, the bottle seems to be tapered, so the further the rounds were inserted the tighter they became. To much for a quick release.
Next ones I’ll make will use larger stainless screws. So far I have not had any problems with these at all. Currently I’m experimenting with bat grip tape wrapped around the bottle. So far the results are promising but time will tell. Let me know what you think. Thank you for checking out my stuff. -13
So much for my documenting getting it done. I get into the projects and don’t want to stop. One thing/project leads to the other I’m so far behind with my plans. Next thing I know I’m waking up ready to go for more. Given the time, the materials and it’s going to get done. Have to get better with the note’s/blogging. All the sitting around has been driving me crazy and I don’t want to get near a computer for fear of getting distracted. It did inspire me to start the dash cam YouTube channel. Did get some of my gear repackaged and labeled. That will be another blog for sure.
Then there are those simple truths that life has a way of teaching us when we reflect. Sure does make you wonder doesn’t it. It can all happen anyway no matter how hard you try to make it turn out differently despite the goals you set, promises made, education level, or experience. Sometimes, seem to make it worse. Never imagined landing in this space but I’m here. What the hell is it about that truth all up in my face! Understanding a whole new level of myself and why I’m like I am. Apprehensive to attempt to influence in any way based on the past attempts. What feels like altruistic intentions blows up in my face. Wondering what to do, or should I do anything at all.
Had to add this onto the original post. Not sure why I’ll do it but several post I’d thought I’d published, werent. Thought I’d clicked the publish button but didn’t then find myself wondering how did I do that. I think I’d clicking to see the preview and confusing the two. Who knows? I’m all over the place trying to catch up with everything. I’ll have to put maintaining my sanity at the top of the to-do list. -13
First it has came to my mind to simply list what I tick off my list or add on along the way. Not tracking project progress just making notes of what was done on a particular day since I can’t always remember the extras. I’m often working off a list but also fit in little projects here and there then wonder what I’ve done with my time.
I was once going to try to blog it everyday but that doesnt always work on my very odd schedule. This will help though with short notes. I’ll add or seperatly blog anything that requires a paragraph or more.
Hosed off carport, driveway, sidewalk
Moved dying orchids to another location in mostly shade under the carport. Will have to water regularly since they’ll get minimal rain. Maybe I can salvage them.
Cleared yard debris, the palm fronds never stop falling in south Florida, or the coconuts. The plumeria are in full bloom, along with the jasmine, the scent drifting in the air is intoxicating
Vacuumed the van, not too dirty this time.
Potted plants watered.
Cleared all personal plants from the side of the house. Complete!
NOTE: Late afternoon light is shinning next to the entry door I may have to move the orchids that I’m trying there.
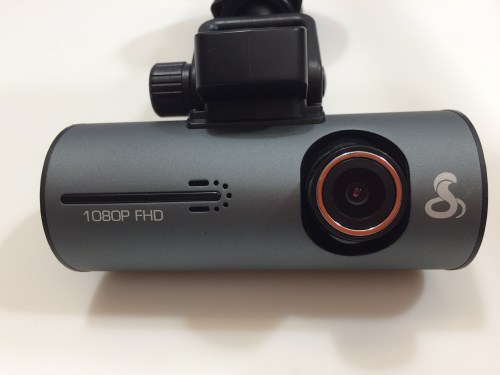
The truth about the Cobra CDR 840 dash camera like no other. If you would really like to know more about this camera and my experience just watch the video and you’ll see how I really feel about this dash camera. Sometimes, there are no words to express an experience, you have to be there, or, watch the video. The video is a little long but I don’t think I left anything out. Hope this little video helps you make your purchasing decision wiser. One small tip, use a 64 GB card if you want to capture over one hundred 3 minute videos so the auto over record doesn’t delete the footage from earlier in the day. -13
I can hardly believe the numbers. I’ve been messing around over at YouTube getting things in order over there, trying to understand things better and clicked on the wrong button. It went to the first page of my videos. When I was checking out the views on the videos listed I couldn’t believe how many views my compost sifter had. It’s really exciting to see that there are many people interested in composting and possibliy organic gardening. Really hope my video inspires and lifts people up. -13
South Florida Driving 101 Dash Cam Compilation 8. It’s a short one, under three minutes. It is not short on bad driving wait until you see some of the merges and exit craziness! No signal lane changes galore! As always??!! Plenty of drivers deserving of a good middle finger or horn blast! Just my opinion. Most of the footage is in Miami courtesy of dK2.
Editing was fun trying to use the “Do Not” strike out signs. I think having them float over the car is better than x-ing out the car. Getting a little bit better at tracking with the “follow me” sign. It can be hard to track the movements with them at times. iMovie is working out well for the low budget of the project. Plus it is easy to use. The next footage is about ready to be edited There is some good stuff in them can’t wait to get started. Get ready to see more bad drivers. -13
South Florida Driving 101 Dash Cam Compilation 6. Another short one. Nothing spectacular. Tried a montage of similar type events captured on the same drive. I like the way it works and will be using it in the future. It makes it easy to place the rear view footage. Sometimes it is hard to match up the timing.
The rear view camera adds so much more material I’m surprised. Takes up a lot more editing time but it looks like it will be worth it. Have to stay on top of this project I still have editing to do from March and early April! -13
South Florida Driving 101. Dash cam compilation 5. Trying to stay on top of all the footage from the two vehicles. It’s amazing how fast it is piling up. Picking up my speed as I learn new things. Editing this kind of footage is time-consuming at the least. Fun as can be. Was able to figure out how to add a watermark across the footage to prevent piracy. Can’t believe I’ve done it but it must be so. It is a lot of work creating just one video.
This footage is good with chaos and maybe an aircraft engine or wing on fire landing at the Fort Lauderdale-Hollywood airport. Of course all the no indicator signals you need. Footage is from dK2 filmed in Fort Lauderdale and Miami on March 28, 2017. Enjoy. -13
Grainger.com price jumps after registering online. How does that work? I’m confused. I’ve been ordering online and from Grainger for many years now and I can never remember the price getting higher after I registered at any website. Not once. Until now.
I casually clicked over to Grainger.com. Typed “garden hose fittings” into the search box. Found what I was looking for placed it in the cart. I thought I was ready to check out so the site wanted me to register to continue. Thought I had done this but may not have because I’m tired of having to log onto sites, keep track of passwords/login and would rather not use the website to store any information. I certainly won’t leave cashless type card information on file anywhere. It’s safer to have to enter it each time.
Enough of security measures ramble. Registering raised the price $2.41 per part. At first I thought I had remembered the price wrong. I had switched to another tab to follow the register procedure so I could place the order. For a moment I forgot about the other tab that was open with the original search because I went on a search tangent from the second tab looking at all the stuff Grainger is known for.
When I realized what I was doing I stopped the tangent. Started to check out and was looking at the price of the items and thought something didn’t look right. I thought for a moment then remembered the other tab with the price difference. I was surprised to see that they were different in price, much different to my eye.
For now I made this blog and a video to document the experience and will search for other sources for heavy duty garden hose parts. I do not mind paying a higher price for quality parts that will last. A quick look at any of my gear or equipment will prove it. I do have a problem paying more after registering at the online site.
I could call or contact the company but have such a distrust of corporate representatives that I believe about 95% of what they say is complete crap or should I be more clear, lies. That is based on the many years of hearing it over and over. I do like Grainger, they have so many products it’s hard to wrap around the scale of it. They have an excellent reputation on all the farms and ranches I’ve ever been to.
However we end up back at the corporate group think and how it will always be to cover their asses. I’m curious to know what other’s experiences have been. And where can one find heavy duty, I mean fit for using around large animals, tractors or at a fire station, hose end parts that will fit heavy duty 3/4″ garden hose lines.
Several years ago I packaged an emergency kit in vacuum sealer packaging. Tested it, and was completely shocked to discover how tough the packaging is and how difficult it can be to open without using some other instrument or object. Attempting to open one of them by hand-only proved impossible to do without assistance. It also made me realize how important and useful the tear-notch on freeze dried meals made for backpacking could be.
An individual, with an injured hand and/or dentures/front dental work would be at risk for not being able to open the package without assistance from an object or the tear-notch. With a tear-notch it may be possible place part of the package underfoot and tear with the uninjured hand. I know this for sure, I cannot do it without the tear-notch.
The first experiments with nothing more than a simple straight cut with the scissors worked fairly well. I noticed though when I decided to cut a “V” shape into the margin on the packaging that it was easier to open and the tear didn’t seen to veer off like the single cut did. Sometimes when I was testing the single cut way the tear would not always follow into and open the package, it would follow the margin and made it just as difficult to open.
I like the V cut over the single cut because it is more visible and easier to use. There are a few things I don’t like about the V cut. First it takes two cuts to make, that is a lot of cutting when making multiple packages and more than one tear-notch for each package. The cut must be more accurate to ensure that the two cuts meet at the V point, if they don’t it may create another more difficult package to open. It works great but it’s much more time consuming and requires a certain degree of accuracy unlike the single cut.
Not happy with either of those things I searched for another more efficient way to make those notches. I was trying to think of what to search for online when I remembered something I had seen in a sewing supply catalog I had but couldn’t remember what it was. Lucky me I had kept the catalog and found it. The item is a pattern notcher.
A, Style-45N, 1/16″ x 1/4″ Pattern Notcher. Turns out it works perfectly for this purpose. It cuts the perfect notch for getting the package open plus all one needs to do is put the margin edge of the packaging into the notcher until it stops then close the notcher with your hand and done! Wow what a really fantastic solution! I can quickly and accurately place the notch and make the cut in seconds then move onto the next pressing homesteading project.
I made a short video about my experience and demonstrate the way that “Works for me”. Hope you find this information useful. -13
If you haven’t’ subscribed yet you may want to if you’re into organic gardening, homestead living, animal husbandry, austere medicine, homestead fire prevention/protection, do-it-yourself and stuff about everyday life. Go check it out, don’t forget, it’s free. If you really like it share it with your friends or those of like mind. Not much there yet, but more is on the way. -13
After the marathon style cut and paste the other night I noticed that I never wrote much about my experience and had only made a video. So, now I’m feeling kind of motivated so here it goes. I’m into organic gardening, that requires compost, lots of it if you’re into producing a large amount of food for canning/storage purposes. I found a great local source for horse manure, fresh, steaming, shoulder-level piles of it. Moving 5 pick-up truck loads of horse manure by hand and wheel barrow will make you feel healthy. That’s moving all the organic material more than three times. Once at the point of collection, back at the homestead into the compost pile and then again before it gets used. One shovel and wheel barrow at a time.
A little sore after all that an individual needs a way to sift all the unwanted trash and unprocessed organic material so it doesn’t end up in your garden-of-plenty. Being on the low budget, do-it-yourself kind of mindset I decided to check out YouTube for some inspiration. Lucky me I found it. I cannot remember what I searched for but do remember the first video I watched on a homemade compost sifter made by Desert Garden Prepper with a Harbor Freight cement mixer. It was so creative the way the parts were machined and reconfigured into a compost sifter. Completely motivated by that I couldn’t wait to make my own.
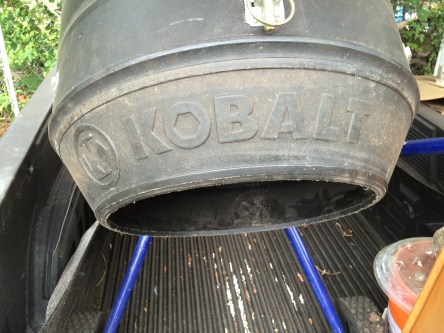
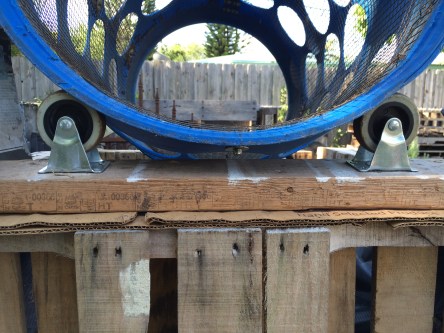
I wanted to make one like Desert Garden Prepper had made but don’t have the tools or knowledge to weld. That made me look at other mixers. I remembered one I had seen a Lowes store and when I looked it up online the instant I saw it the crazy idea came into my head that one of those blue barrels would fit onto the end of the mixer. I felt like I knew it would just fit. Imagine how shocked and surprised I was when it fit so well. I almost couldn’t believe it but it was right in front of me so I had no choice.
Since the barrel and mixer fit together so well without modification it made it easy to mount it in place with simple lock hasp and lynch pins. Okay that gets the barrel to the mixer and it turns. That leaves the barrel and how/what to do with the waste and out-feed.
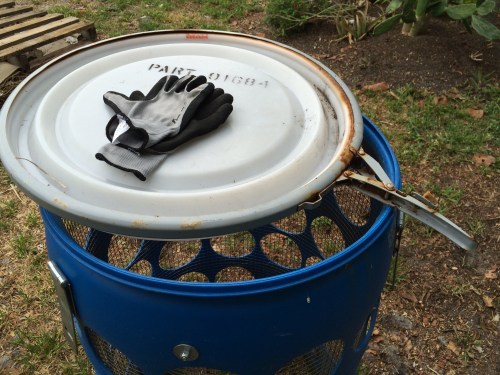
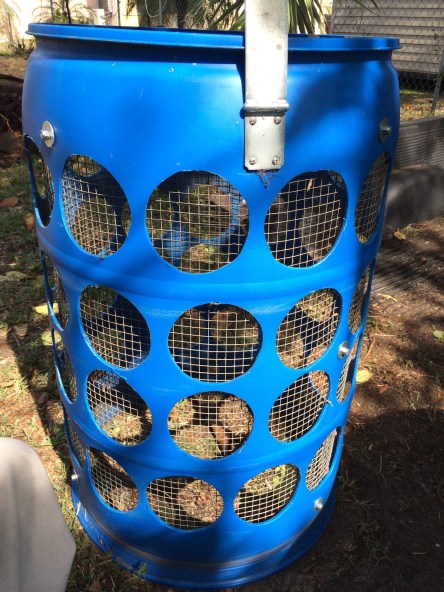
The barrel was a little bit of work. It came with a ring lid which is what I wanted so I could have a factory formed edge meet with the mixer. On the out feed part of the barrel, the bottom, I used a jig saw to cut just inside the rim. That removed the bottom. Next I had to make a way for the material to pass through and be sifted. This involved using a 5″ circle template I printed off my computer to mark the circle cutouts in no particular order. I tried to space them as evenly as possible to retain as much structural integrity and strength as possible. After marking the holes I drilled pilot holes then used a jig saw to cut out the circles.
Once the circles were complete I lined the inside with 1/2″ hardware cloth and bolted it in with stainless steel bolts and locking nuts. At first I was going to make two, one for 1/4″ and one for the 1/2″. After lining the barrel I realized that all I had to do to make this barrel sift smaller material was to just put the smaller size cloth inside the barrel with the 1/2″ cloth and use bolts and wingnuts to hold it in place. A real easy and quick change over requiring much less storage space than two or more barrels. Most everything goes through the 1/2″ screen anyway so a change over is rare.
The other part of the sifter is where will the waste go and how will I move it. To solve that I had the barrel set at an angle to dump waste into a wheelbarrow. The barrel rest on two casters affixed to a scrap of pallet spring clamped onto the wheelbarrow with a cardboard scrap underneath it to keep out processed compost. The spring clamps seem to provide enough holding power yet will give away if there is any real stress applied. I’m hoping that if there is some type of problem it will pop apart and not damage anything. On one end of the pallet scrap I have a hole drilled to hold one of those green garden stakes sold at local nursery’s. That holds a piece of cardboard which acts as a deflector to keep the unprocessed materials out of the processed materials.
I noticed when first using this sifter that the materials were passing through so that not all or even most of the material was getting sifted. To solve that I decreased the angle of the out flow to reduce the speed at which the material reached the out feed end of the barrel. So far everything seems to be working well because I’ve put much more through it that the original 5 manure loads. After watching several videos on YouTube I do not think this would be good for sorting worms. I believe the weight of the organic material would slam down on top of them and cause trauma to the worms every turn they made. Just my opinion though.
I really like how it works, the portability I can process every where I can plug into electricity, plus it’s either an organic material processer or a cement/soil mixer. It will be interesting to see how long it last and how good the idea was over time. -13